Before You Start
Answers to the 4 most common questions before starting Claude Code.
00. Before You Start
Written from the perspective of someone who just opened the black screen for the first time — the four places where most people stop.
I have spent years planning business systems, and yet, the first time I saw Claude Code, I sat staring at the screen for hours. No ad sold me on it. Nobody handed it to me. I installed it myself because I needed it and wanted to try things one at a time — and at the first screen, watching the cursor blink, my fingers stopped. "Is this thing actually going to produce something? Is this even something I can learn?" The dread came first.
If you have picked up this book, I suspect you stalled at a similar spot. The four questions on this page are the ones I hear most often in classrooms, but more importantly they are the four spots I stalled at the longest in my own beginning. The internet has scattered answers, but unless you also hold on to why the answer is what it is, the next stumble repeats. So this chapter pairs every conclusion with the trial and error I went through to reach it.
Q1. Same company, why does Cowork feel so different?
Architect and assistant — two hands in the same toolbox.
Q2. The desktop app is comfortable — what do I gain by switching to a black screen?
Parallelism, pipes, stability — three reasons worth setting comfort aside.
Q3. I typed my first command and nothing happened. Is that normal?
"What" comes before "where to begin."
Q4. After a week my tokens are gone. Am I doing something wrong?
No. That is the signal it is time to switch plans.
💡 Why these four — about ninety percent of the people who raise their hand in my classes are stuck at one of these. Each can be answered in thirty seconds, but only the thirty-minute version reduces the next stumble.
Q1. Same company, why does Cowork feel so different?
The first time I saw the two product names side by side, my honest thought was, "If they share a model, they probably feel similar." The reality turned out to be the opposite. They are like a knife and a ladle in the same kitchen — built by the same company, but the moment you grip one, what you can do with it is decided.
In one sentence, Claude Code is a tool that builds. Cowork is a tool that processes. "Building" means starting from an empty folder and ending up with something that did not exist before. "Processing" means tidying up an existing pile of work and handing it on. The two acts look alike but the hand moves in different directions.
A bit more concretely:
- Claude Code reaches into folders and files on your computer through text commands. Picture a builder with the blueprint in one hand and a hammer in the other. Putting up posts on empty land suits this hand best.
- Claude Cowork works inside an isolated virtual environment (a sandbox), looking at the screen and clicking. Picture an assistant at the desk next to yours, sorting the inbox and slotting events into the calendar.
Why Cowork is safe but slow and expensive
Cowork's isolated environment keeps mistaken commands from touching your real machine. A real security upside, but it has a cost when you trace the mechanics. Cowork captures the screen → has the model interpret the image → calculates click coordinates → clicks them, every loop. It solves a one-line text problem by drawing pictures, so the same job consumes several times the tokens and time.
Claude Code skips that whole loop. It handles file names and line numbers as text, so the same outcome arrives in fewer tokens and less time. And the result is not "the AI looked at it" but "the file actually changed," which makes it easier to chain into the next automation or reproduce a month later.
💡 Here is something that happened. In a class I ran the same task (cleaning 100 .csv files) on Cowork and Claude Code at the same time. While Cowork was opening the screen and going row by row, Claude Code had already finished and printed a diagnostic report. Same model — different tool in the hand.
When to use both, not pick one
Mail tidying, summarising existing documents — Cowork sits right for that. Starting a new project, touching code — Claude Code sits right for that. The sane setup is keeping both on the desk and reaching for whichever fits the moment, not picking only one.
| Situation | The natural hand | Why |
|---|---|---|
| Sorting mail, calendar, existing docs | Cowork | Click-driven processing, safer |
| New apps, automation, repeatable scripts | Claude Code | Direct text manipulation, fast |
| Analyse → report → auto-deliver | Both, chained | Code builds, Cowork processes/sends |
For about a month I kept mixing up which tool fit which job. I had Code answering emails (awkward results), Cowork writing scripts (long detours). About a month in, the choice stopped requiring thought. Until that instinct lands, keep this table next to you and check it once each time you start something.
Q2. The desktop app is comfortable — what do I gain by switching to a black screen?
When the desktop app launched, I also thought, "Goodbye terminal." And to be fair, as of May 2026 the gap in raw features has nearly closed. Yet people who spend a serious week with both quietly drift back to the terminal. There are three reasons. And those three are differences in flow, not features visible on screen.
Reason 1: many things running at once
The biggest difference is parallelism. Open four terminal windows and put a different job in each.
- Window 1 → fix up the front-end screens
- Window 2 → polish the back-end API
- Window 3 → run the test suite on a loop
- Window 4 → tidy the README and docs
Four Claudes work at the same time, and the human just hands the next instruction to whichever finishes first. Split a single screen into four panes with tmux and you can tell at a glance — by the blink — which pane is waiting and which one just spit out a result. The desktop app can hold multiple sessions, but laying them out on one screen and reading the flow at a glance is terminal-only territory.
Reason 2: paths the terminal opens that GUI cannot reach
Three roads close inside a GUI:
cat error.log | claude -p "find the cause"— piping another tool's output straight in- A cron job that sweeps your data every morning — scheduled work
- Hooking shell
aliases and functions naturally into the loop — scriptability
It looks irrelevant on day one. The moment you do the same thing twice, the road forks. Twice becomes three, three becomes a candidate for automation. The GUI's automation gate is closed; the terminal's is open.
Reason 3: stability — closing, but a gap remains
Features have evened out. Stability has not, quite. Notes I keep from running both side by side:
| Environment | Hooks | MCP | Felt weight |
|---|---|---|---|
| Terminal (CLI) | Stable | Stable | Light, snappy |
| Desktop app | PostToolUse bug reports | Slowdown with many connections | Relatively heavy |
| VS Code extension | Some bug reports | Connection bug reports | Heavier still — sits on the editor |
The gap closes every quarter. But right now, the lightest and most stable surface is the terminal.
When desktop is still the right starting line
The principle is clear, but not everyone needs to crack open the black screen on day one. The threshold sits in different places for different people.
| Situation | Reasonable starting line | When to move |
|---|---|---|
| Terminal feels unfamiliar and scary | Desktop app — get a feel for reading and editing files | When you've done the same task three times |
| Already living in VS Code | VS Code extension — start file by file | When several folders start tangling together |
| Many folders, automation, parallel work already | CLI from day one | — |
Workflow first, tool second. Walk in through the lighter door, and move to the terminal when repetition piles up.
💡 Here is something that happened. A student told me, "The terminal is dark and scary." After a week on the desktop app together, she said, "Okay, let me try the terminal now." The trigger? Producing the same report for the third time. The third repetition produces the urge to automate, and that urge crosses the terminal threshold for you.
Three signals you are ready to move
The moment desktop or VS Code users start thinking "maybe terminal next" usually fits one of three. Check which one is ringing.
- You did the same task three times — the "again?" sigh is the automation siren
- You wanted two sessions running at once — one screen no longer holds the work
- You wished you could throw another tool's output straight at Claude — pipes (
|) are the answer
If none of the three is ringing, you do not need to move. The hand will know when the tool needs to change.
Natural-language commands are the present, not the future. The terminal is no longer a developer-only place. Cross the threshold once and the next view is different.
Q3. I typed my first command and nothing happened. Is that normal?
This is the single most common question I get in class. Short answer: usually, yes — normal. But there is a more important answer underneath: "What do I want to build" comes before "where do I start." Reverse the order and no tutorial leaves anything in your hands.
I keep hearing the same story — someone follows the official Todo-app tutorial, finishes it, asks "wait, why did I make this?" and deletes the folder. Tool learned, motivation empty. Claude Code is friendly enough to follow from zero, but without a reason to follow, thirty minutes later it all evaporates.
There are two stages out of this trap.
Stage 1 — Look at what other people built
Spend an hour scrolling X, YouTube, blogs, Threads. At least one or two scenes will land — "I want to do that." That is the real starting line. Not a vague "I should learn this," but a concrete scene lodged in your head. Abstract motivation fades in three days; a concrete scene survives a month.
Signals I have learned to recognise:
- "I wish a piece of content like this existed" — content-creation desire
- "This repetitive task makes me angry" — automation desire
- "I wish this data were tidier" — analysis desire
When one of those three takes hold, Claude Code becomes the tool that records the desire.
Stage 2 — Ask, don't command
Don't translate a vague idea straight into a command. Ask Claude first.
"I want to do this — what approaches are possible?"
"What would I need to start this project?"
"Are there similar examples or reference structures?"
"How would this differ on my setup (WSL2 / Mac / Windows)?"
Claude Code is closer to a thinking partner than a task runner. While you talk, the possible and the impossible, the short paths and the detours, sort themselves out. Spending the first hour or two asking instead of building is, paradoxically, the fastest entry path.
💡 Here is something that happened. In my first class I opened with "Today we're building a Todo app." Half the feedback at the end was "I'm not sure why we built it." From the next round I switched the first thirty minutes to "Write down one repetitive thing that genuinely annoys you." Satisfaction doubled on the spot. The starting line is desire, not the tool.
Why a quiet first command is fine
When you type claude and the screen sits still for a moment, that is normal. The model is reading the environment, finding CLAUDE.md, checking permissions. Wait a clock-counted thirty seconds. Still nothing? Then move to the diagnostic order — which claude, node -v, the last line of ~/.zshrc (or ~/.bashrc).
Those three cover ninety percent of the first-day stumbles. If they don't, the rest is in chapter 12 (Common Mistakes). For now, "a quiet screen is normal" is the only thing you need in your head as you turn the page.
Installation, basic commands, and CLAUDE.md come up in the following chapters. They will still make sense if you read them after deciding what you want to build.
Q4. After a week my tokens are gone. Am I doing something wrong?
Another one I get a lot. Short answer: you are not doing it wrong — you started doing it right. And that signal is also the signal it is time to change plans. The longer answer: Pro $20 is not enough for serious use.
Worth saying first — people who suspect they are doing it wrong tend to share the same pattern. Receive an answer, fire the next question, push to the end, restart from scratch when stuck. That is not a mistake; that is the shape of immersion. The limit just chops that immersion into five-hour pieces. It is not user error.
Pro's reality — the 5-hour limit fills faster than expected
In focused mode, I have hit the ceiling within an hour. Once the wall hits, the day's rhythm breaks. You do something else while waiting and lose the thread. On top of that, Pro defaults to Sonnet 4.6 — Opus 4.7 is effectively out of reach because the limit drains too fast.
What changes when you move to Max
Move to Max and Opus 4.7 becomes the default, with the 1M-token context window following along. Escaping the state of "afraid of the limit, so I can't use the strong model" is the first change. The second is subtler — when the limit fades, the way you give commands changes. "Let me try a small thing" becomes "let me see this through to the end." The breath of a session lengthens.
Try Max for at least one month
Claude Code's true productivity shows up when long work runs uninterrupted. What used to fit a single session no longer fits within days. Three things grow together:
- Files and context accumulate, so each breath grows longer
- Build → check → fix cycles repeat
- Complex design or debugging starts asking for the Opus model
Once that flow appears, Max $100, with five times Pro's usage, becomes the realistic option. You can decide after a month whether to drop back to Pro. "Wait, it can do this much?" — that single moment makes the criterion for the decision crystal clear.
Plan picker — by your situation
| Your situation | Recommended plan | Why |
|---|---|---|
| "I just want a taste of what this is" | Pro $20 | Enough to see the potential |
| "I want to use it for real work and projects" | Max $100 (strongly recommended) | Opus 4.7 + 5× the limit |
| "I keep it open all day, every day" | Max $200 | Uninterrupted flow guaranteed |
💡 Here is something that happened. Someone who had been pushing through on Pro switched to Max saying "I can't relax with this limit hanging over me," and the next week reported, "When I'm not watching the limit, I let the work run longer." Plans don't just expand quotas — they shape how long the user is willing to think. That is why Max isn't a simple ceiling raise.
⚠️ Treat Pro as the trial version, mentally. It's enough to see the potential, but pulling out real productivity needs you in Max territory. The month you'd otherwise spend hesitating, spend it on Max — the answer is in there.
Before you close this chapter
- Wrote one line each on what I would use Cowork for and what I would use Claude Code for
- Picked my entry point (desktop / VS Code / terminal — any one is fine for now)
- Wrote down "the one scene I want to build" in a single line
- Confirmed whether my plan is Pro or Max, and turned on a usage notification
In chapter 01 What is Claude Code? we look at why the first answer you just received is fundamentally different from a web chatbot. The thread is in the words "my folder."
What is Claude Code?
Learn what Claude Code is and how it differs from other AI tools.
01. Claude Code, in one line
"An AI that walks into your folder and works there." We'll spread this single line across one chapter. No coding knowledge required.
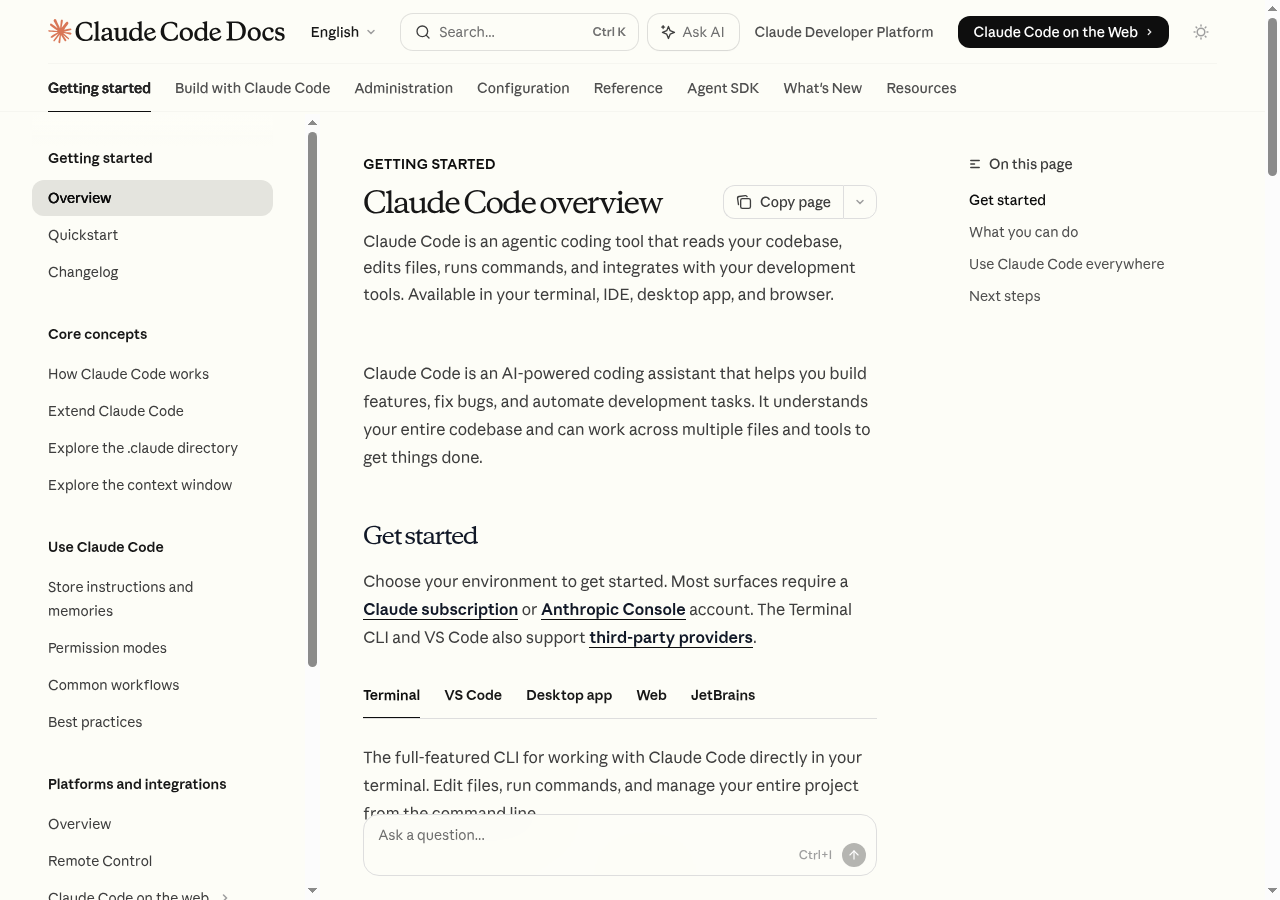 Source: Claude Code overview — Anthropic Docs
💡 Why is Claude Code suddenly back in conversation. Since late 2025, the centre of gravity for coding-assistant tools has shifted from "autocomplete that fills in lines" to "agents you delegate a whole chunk of work to." Posts like "I shipped a PR from a single terminal" started showing up in Korean communities too, and non-developer roles — marketers, planners, researchers — began opening the black screen. Claude Code sits in the middle of that shift.
A 30-second definition that lodges as a single image
In one line: Claude Code is an AI that walks into your folder and works there. It opens dozens of files at once and saves the distilled result back as new files. If Claude.ai in a browser tab is "an AI that talks back," Claude Code is closer to an AI that moves its hands on your disk.
Drawn out, the picture looks like this. The same model puts the answer on a screen on one side, and leaves a result inside a folder on the other. That difference is the seed of every other change that follows.
💡 Here is something that happened. I once spent an hour in a Claude.ai tab pulling decisions out of 30 meeting notes, then broke quote marks pasting the result into a notepad. The same job in Claude Code ended with one line: "collect just the decisions and save them as summary.md." The distance between "person who copies an answer out" and "person who checks the folder where a file appeared" is the gap between the two tools.
Same model, different fingertips — five strands of comparison with the web chatbot
Receiving an answer in a chat versus receiving a result in a folder. That single line is the largest difference. Before the table, read the five items — the grain of the two tools sharpens.
- File access: web requires uploads (one or two at a time). Claude Code reads the entire folder on its own.
- Work scope: web — the volume of one chat. Claude Code — dozens to hundreds of files in the same time window.
- Output: web — copy and paste, manually. Claude Code — files automatically created or edited.
- Repetition: web — start fresh each time. Claude Code — once told, repeats the same pattern.
- Long-term memory: web — only inside one chat. Claude Code — your rules pinned permanently into a file called
CLAUDE.md.
| Item | Web (Claude.ai) | Claude Code |
|---|---|---|
| File access | Manual upload (1–2) | Whole folder, automatic |
| Work scope | One chat's worth | Tens to hundreds of files |
| Output | Copy and paste | Files created or edited |
| Repetition | Reissue every time | Patterned repetition |
| Memory | Inside one chat | Permanent in CLAUDE.md |
In one line: the web shows you an answer. Claude Code leaves a result in a folder. Same model, different fingertips.
Three scenes by role — same tool, different hands
All three start with one sentence: "do this for me." The role differs, but the shape of the command Claude Code receives is nearly identical.
Scene 1 · Quarterly brief (analyst)
Read the 12 quarterly transaction-stat PDFs in data/,
group average price per district and year-over-year delta,
and save it as quarterly_brief.md.
→ Claude Code reads the 12 PDFs in turn, extracts the tables, and auto-saves them in one file.
Scene 2 · Trade history summary (retail investor)
Look at the CSV trade history in trades/,
make a per-symbol realized-PnL and holding-period table,
and leave the Python so I can rerun it.
→ You don't have to write the code yourself. The result table and a rerun-ready script land together.
Scene 3 · Catching a red test (developer)
The test is going red — find the cause and fix it.
→ Run tests → guess where the failure is → patch the code → run again. Claude Code picks up the loop a person used to spin.
💡 Here is something that happened. In a class a marketer ran "read 30 PDFs" and Claude Code stopped halfway, saying one PDF's table looked off. It suggested re-reading that single file with a different tool, then finished the rest. "Stops when stuck and proposes a detour" — that, all by itself, is the decisive difference between autocomplete and agent.
Who gets the most out of it — three groups
Three groups in particular take well to it.
- People with a lot of repetitive file-and-document work — weekly report formats, mass file renames, folder-structure tidying
- People who handle large volumes of source material — summarising 20 papers, sweeping competitor pages, fast data triage
- People who want to test ideas as artefacts quickly — small websites, dashboards, automation prototypes, without writing code
You're welcome here if any of these sound familiar:
- "I want to tidy data without Python or Excel formulas"
- "I want to handle dozens of documents without opening each one"
- "The recurring report format keeps drifting and it bothers me"
The terminal being unfamiliar is fine. The desktop app is enough to start. When one of the three signals from chapter 0 ("same task three times," "two sessions wanted," "pipe craving") rings, that's when to step into the terminal.
On the other hand, you don't have to insist on Claude Code if:
- You only need simple writing, translation, or one-off Q&A → Claude.ai web is lighter.
- You only work inside a specific IDE → review Cursor or the VS Code extension first.
Where you can run it — four entry points
Desktop app
The GUI as is. No terminal needed.
Terminal (CLI)
Automation, parallel sessions, shell integration — smoothest here.
VS Code / Cursor extension
Your IDE, exactly where you live.
Web browser
Just open claude.ai/code.
| Environment | One-line description | For whom |
|---|---|---|
| Desktop app | GUI as is, no terminal needed | First-timers |
| Terminal (CLI) | The most powerful, fastest base | Anyone leaning on automation/parallelism |
| VS Code / Cursor extension | Inside the editor you live in | People already settled in their IDE |
| Web browser | Just open claude.ai/code | Trying it briefly without installing |
The same engine sits underneath, so wherever you start you'll get the same result. Deeper features — automation, parallel sessions, shell integration — run smoothest in the terminal. If you can't pick an entry, start with the desktop app — chapter 0 said it best: your hand will tell you when to move.
iOS Claude app, Slack
@Claude, and Chrome debugging share the same engine.
A 5-minute experiment — toss it one folder
Words alone don't land. Toss one small folder at it — that's the fastest path. It doesn't need to be a code project.
mkdir -p ~/Desktop/claude-test
cd ~/Desktop/claude-test
claude
When Claude Code opens, type this:
Create three sample meeting-note files in this folder,
collect just the decisions from each into summary.md,
and tell me which files you made when you're done.
In this short experiment you'll see three things directly:
- Files created and edited relative to your current folder
- Output landing in actual files, not in the chat
- Freedom to ask for fixes mid-flight when something doesn't fit
Tighten summary.md's tone,
and add a one-row action-items table at the end.
Speak → file changes → look at the result → speak again. That tiny cycle is the substance of Claude Code. Code, documents, data — they all flow through the same shape.
💡 Here is something that happened. Someone who tried this experiment told me, "I opened summary.md, edited it by hand, and the next time I asked Claude something, it noticed my edits and adjusted the next result." The file is both output and the next input. That structure is the place that diverges most from a web chatbot.
In one line, again
Claude Code = "an AI that walks into your folder, reads files, tidies them, and leaves results behind."
You don't need to learn coding. You don't need Python. Describe what you want in your own words. The result lands not in a chat window but in your folder. Chapter 02 What you can do with Claude Code looks at how each role is putting this tool to work.
Before you close this chapter
- Wrote down, in one line, "the file in my folder I want to throw at Claude"
- Ran the 5-minute experiment and confirmed
summary.mdactually appeared - Picked my entry — desktop app, terminal, or VS Code
- Wrote one line each on what I'd do with Claude.ai web vs. Claude Code
What You Can Do with Claude Code
Claude Code beyond coding: research, documents, data processing, and personal AI workspaces.
Actually, I Used It More for This Than for Coding
Despite the name "Code," this isn't a coding-only tool. It's a general-purpose AI agent that happens to live in a terminal. I came in thinking it was a coding tool, but somewhere along the way I found myself using it more for meeting summaries and lecture material translation.
So What's Different from Claude.ai Chat?
"Can't I just use the chat?" is a question I get a lot in workshops. The short answer: yes, you can. But once you see the table below, you'll hit a moment where you think "no, chat can't do this."
| What's different | Claude.ai Chat | Claude Code |
|---|---|---|
| File access | Attach one file at a time | Read and modify entire folders |
| Work scope | One conversation turn | Dozens of files simultaneously |
| External execution | Not possible | Runs terminal commands directly |
| Automation | Manual every time | Set once with Skills and Hooks, then it runs |
| Long-term memory | Within conversation only | Permanent via CLAUDE.md |
When I first saw this table, the row I stopped at was "entire folders." With chat, you have to attach files one by one and re-upload them with every conversation. When I needed to summarize a folder of 40 lecture slides, chat would have meant 40 uploads. Claude Code handled it with a single folder path.
One sentence summary: Claude.ai is a conversation partner, Claude Code is an AI colleague working alongside you.
In a Development Context
Give Instructions in Natural Language
Write
Describe a new function or file in plain language
Fix
Patch bugs and adjust existing code based on new requirements
Refactor
Keep behavior the same, clean up the structure
Test
Generate unit and integration test cases automatically
Review
Draft PR descriptions, change summaries, and risk flags
Writing, fixing, refactoring, testing, reviewing — nearly everything a developer does daily can be directed with a single sentence in plain language. From a one-line commit message to structural changes across dozens of files, the scale differs but the flow is the same.
💡 One time, this happened. A student in a workshop asked "I don't know Python — can I make a data analysis script?" They dropped
@data.csvand said "pull out the monthly totals." Claude wrote a Python script, ran it, and showed the result — in 40 seconds. The student didn't need to understand a single line of code. They just needed the output.
Vibe Coding — Software from Description
Andrej Karpathy coined this term in 2025. Instead of writing code directly, you describe what you want in natural language and let the AI build the software. Here's how a developer and a vibe coder differ in practice:
- A developer writes code directly and debugs error messages. A vibe coder says "this errors, fix it" and that's it.
- The developer's core role is implementation. The vibe coder's role is planning and review.
- A developer needs to learn programming languages. A vibe coder's core asset is the ability to communicate requirements clearly.
Things you can realistically build this way: prototypes, MVPs, personal tools, small websites, data automation.
⚠️ Honest limits: large-scale production services, and sensitive areas like payments and authentication, absolutely require a professional developer's review. Use vibe coding to get the first version up fast, then bring in people as traffic starts to grow.
Four Habits for Better Results
- Put half your weight on planning. "Build me an app" produces much worse results than "Build a web app that organizes photos by date."
- Start small and grow. Don't ask for a finished product all at once. Stack it: "login screen first → then the list page."
- Run the output yourself. Always execute what the AI built before moving on.
- Keep a way back. A git commit before every major change means you can undo any experiment easily.
Beyond Coding: Scenarios by Role
Here's where it gets interesting. This is often where Claude Code has the biggest impact for non-developers. Let's break it into six areas.
Digging Into Topics: Research and Analysis
- Read multiple web pages at once and organize as markdown
- Competitor analysis, market research, tech trend tracking
- Batch-summarize dozens of PDFs and reports
Read the files in this folder and organize the core claims,
supporting evidence, and counterarguments into a table.
Include the source filename and mark anything uncertain as "estimated."
💡 Using a multi-agent research structure lets you investigate multiple sources in parallel and produce a full report automatically.
When I first used this approach for a competitor analysis report, work that normally took two days finished in three hours. That gap changed my workflow entirely.
Using @folder-name lets you feed an entire folder at once. PDFs, markdown files, and plain text can all be mixed. "Read all this and pull out three core claims they share" — Claude opens each file and synthesizes them.
Writing That Goes Straight to Files: Documents and Content
- Blog posts, newsletters, social media drafts
- Proposals, reports, presentation materials
- Korean ↔ English translation saved directly to files
Polish draft.md into a blog post.
Include three title options, an intro, section headings, and a closing summary.
Trim any overstated language and use a tone that practitioners understand immediately.
Translating my lecture materials follows this same flow. Drop @lecture-ko.md and say "translate this to English and save it as lecture-en.md" — the file appears. Then review for quality and say "keep this term in the original, but adapt the examples for an English-speaking audience."
When I built the English version of this guide the first time, I referenced the entire content/ko/ folder and said "translate everything into content/en/ using the same filenames." It processed all of them at once. I reviewed quality section by section but didn't type a single character of translation.
Numbers Without Code: Data Processing
- Analyze and transform CSV or Excel files — no Python required
- Batch-process hundreds of files (rename, convert, reorganize)
- Parse and transform JSON or XML
Analyze @sales.csv and find monthly revenue, top 5 products, and outlier rows.
Save the results to analysis.md and explain which criteria you used to flag them.
The answer to "do I need to know Python" is "no." Claude Code writes the code and runs it. You just receive the results. That said, when the results don't match your expectations, you need to be curious enough to ask "why did you flag this as an outlier?" You don't need to know Python syntax. You do need to be able to ask why.
Study Smarter: Learning Assistant
- Structure and summarize lecture materials and books
- Auto-generate quizzes and flashcards
- Concepts plus explanations plus practice problems in one pass
Turn @lecture.pdf into a beginner-friendly study note.
Include key concepts, simple analogies, 10 review questions, and answer explanations.
💡 One time, this happened. A student was preparing for a certification exam with a thick textbook in PDF form. "I don't have time to read all of this." So we dropped
@textbook.pdfand said "summarize each chapter into 5 key concepts and 3 likely exam questions." A structured study note came out in 30 minutes. That student passed two weeks later.
Reclaiming Your Week: Business Workflows
- Meeting transcripts → summary, decisions, owner-tagged action items
- Weekly and monthly reports automated
- Email drafts and customer response templates
Read this week's meeting notes in the meetings/ folder
and compile decisions, action items by person, and next week's risks into weekly-report.md.
That one command every Friday produces the weekly report. After I automated it, the Friday afternoon I used to spend writing meeting notes disappeared. I use that time for something else now.
Personal AI Workspace
Add your roles and rules to CLAUDE.md and you have not just an AI chat, but an agent system tuned to your way of working. The detailed design is covered in the workspace section.
For example, I added "reports always lead with the conclusion, then the supporting evidence" to my CLAUDE.md. Now Claude writes in that structure automatically — I don't need to say it each time.
I also put "thumbnail titles under 6 characters, start with an action verb" in the CLAUDE.md for my YouTube channel. Now whenever I ask for thumbnail drafts, that rule applies automatically. You define it once, and it keeps applying. That's the heart of a personal AI workspace.
Real Example: How This Guide Was Built
Not a single line of code was typed by hand.
Here's how it unfolded step by step.
- Planning: Started from one sentence — "I want to build a Korean-language Claude Code beginner's guide." The ideation workspace shaped the section structure, UX, and tech stack into a complete outline.
- Content creation: Official docs gathered, Claude extracted the key points and structured them into Korean and English markdown.
- Development: The entire Next.js site was written by Claude Code. Dark and light mode, language toggle, mobile responsiveness — all through conversation.
- Deployment: Vercel deployment, Cloudflare DNS, domain mapping — all handled by Claude Code directly.
- Ongoing refinement: After the first draft, short instructions like "add this part" and "frame this differently" kept it improving. The work of polishing this very text is a continuation of the same flow.
What surprised me most was how the nature of "what I need to do" changed. Before, I was thinking about "how to build this." Now I think about "what to build and why." Execution belongs to Claude Code.
When writing the guide itself, I set the topic and direction, and Claude Code built the markdown file structure and filled in the drafts. I read those drafts and gave feedback: "more specific here," "cut this example," "add a workshop story here." I worked like an editor. I barely typed at all.
Time Comparison: Meeting Notes
Take the situation of writing up team meeting notes every week. The time difference between the two approaches summarizes why this tool is worth using.
Old way:
  Meeting ends → 30 min organizing notes → 10 min writing email → share
  Total: about 40 minutes / week

Claude Code way:
  Save meeting transcript in the meetings/ folder
  → "Summarize, list decisions, sort action items by owner"
  → Markdown file saved + email draft generated automatically
  Total: about 3 minutes / week
Over 52 weeks, the old way spends about 34 hours on meeting notes alone. With Claude Code, that drops to 2.6 hours. You get 31.4 hours back for other work.
Of course, setting it up takes time. You need to explain to Claude which folder to use, and what format you want. Put that explanation in CLAUDE.md and from the next week on, "wrap up this week's meeting notes" is all it takes. A 20-minute investment returns 37 minutes every week.
One-Line Summary
Claude Code is closer to "a general-purpose AI agent that knows how to operate your computer" than a coding tool. Coding is just one of many things you can do with it. Many people use it most for things other than coding. I'm one of them.
Before You Leave This Chapter
- Thought of one repetitive task in your weekly routine that Claude Code could automate
- Understood through the vibe coding concept that you don't need to know how to code
- Can explain the difference between Claude.ai chat and Claude Code in one sentence
- Know which tool to reach for when you need to process more than six files at once
The next chapter (03 Plans & Pricing) covers what all these features cost, and which plan to pick. Pro or Max is confusing at first — the chapter leads with the conclusion and then explains why.
Plans & Pricing
Learn about different plans and pricing for Claude Code.
Which Plan? The Honest Answer Before You Sign Up
Claude Code runs inside a paid subscription — it's not part of the Free plan. If you're going to use it seriously, the conclusion comes first: Max (5x) is the most balanced starting point for most people. Here's why, and here's when Pro is fine.
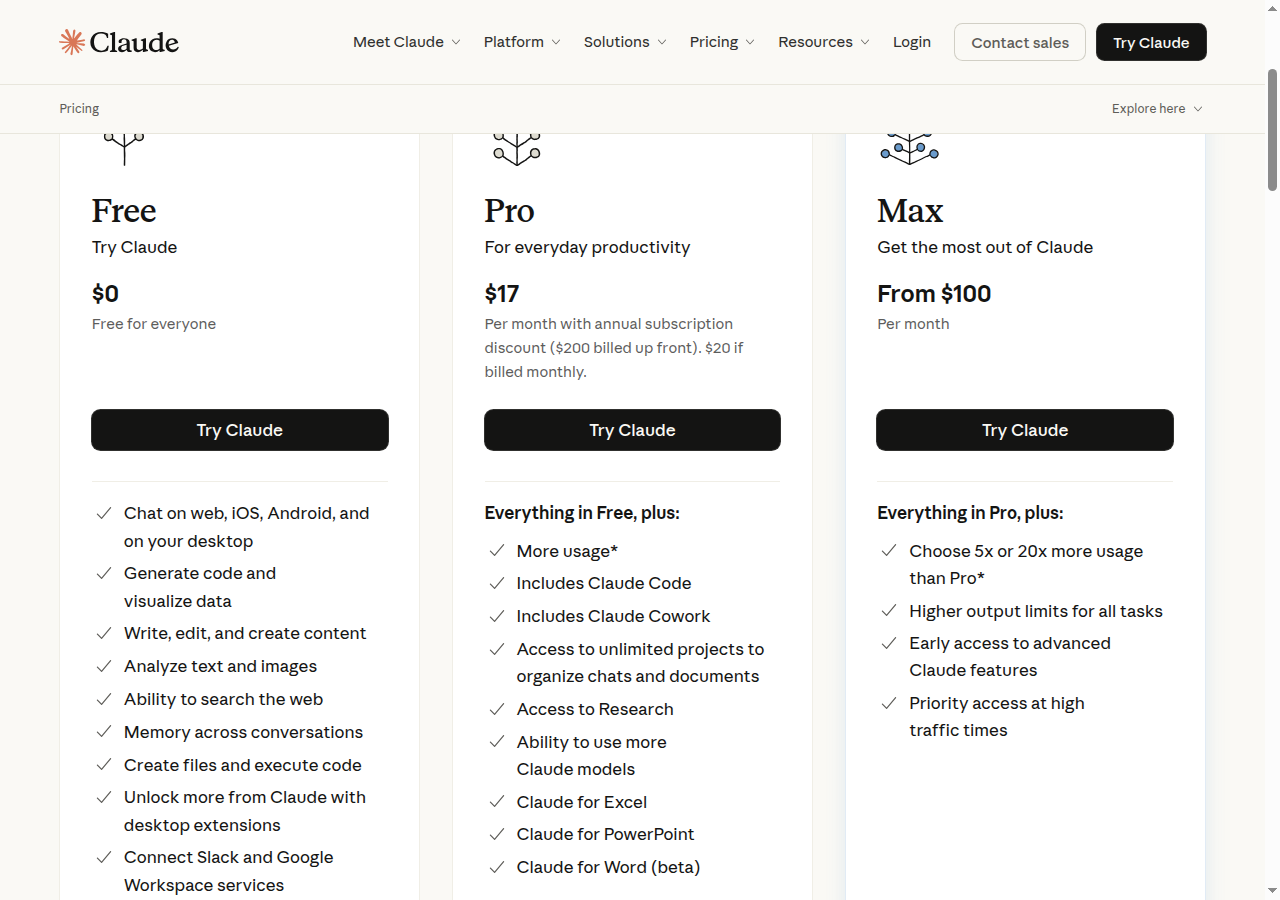 Source: Anthropic Pricing
The One-Line Guide by User Type
Let me lead with the conclusion. Detailed comparisons follow below.
| What kind of user are you? | Recommended first choice |
|---|---|
| "I just want to taste it for a week" | Pro — one week trial |
| "I'll genuinely use this for work and projects" | Max (5x) — the most balanced choice |
| "I run it all day, every day" | Max (20x) |
Plans Side by Side
Prices change frequently. Confirm the exact numbers at claude.com/pricing. The table below is a comparison snapshot.
Pro
$20 /mo
- UsageStandard 1×
- Default modelSonnet 4.6
- Opus 1MLimited · Max recommended
- Best forExploration, light use
Max (5x)
$100 /mo
- Usage5× Pro
- Default modelOpus 4.7
- Opus 1MIncluded automatically
- Best forRegular Claude Code users
Max (20x)
Max upper tier
- Usage20× Pro
- Default modelOpus 4.7
- Opus 1MIncluded automatically
- Best forHeavy users
| Item | Pro | Max (5x) | Max (20x) |
|---|---|---|---|
| Monthly cost | $17 (annual) / $20 (monthly) | From $100 | (Max upper tier) |
| Usage | Standard 1× | 5× Pro | 20× Pro |
| Default model | Sonnet 4.6 | Opus 4.7 | Opus 4.7 |
| Opus 1M context | Limited (Max recommended) | Included | Included |
| Sonnet 1M context | Extra usage | Extra usage | Extra usage |
| Claude Code | Included | Included | Included |
| Claude.ai web | Included | Included | Included |
| Best for | Exploration, light use | Regular Claude Code users | Heavy users |
💡 How to enable 1M context:
/model opus[1m]or/model sonnet[1m]. Max, Team, and Enterprise include Opus 1M automatically; on Pro, Opus 1M access is limited, so meaningful use starts at Max and above. Sonnet 1M counts as extra usage on every plan.
Three Honest Reasons I Recommend Max (5x)
- Pro's hourly limit fills up faster than expected. During focused work I've hit it in under an hour. When that happens, the day's momentum breaks.
- Opus 4.7 on Pro is theoretically possible but practically difficult. The quota burns too fast. On Max, Opus is just the default.
- Long conversations, multiple files, repeated revisions — token usage accumulates quickly. Max (5x) gives most individual users comfortable headroom.
💡 One time, this happened. At a workshop, a student was on Pro and hit the limit in the middle of a live demo. The session was at its most interesting point — debugging a multi-file restructure. We had to wait out the window before continuing. That session convinced me to start every recommendation with Max (5x).
When Pro Is the Right Call
Pro isn't automatically wrong. If the following describes you, Pro is a fine place to start.
- You want to spend 10–20 minutes a day just learning the commands and the flow
- Your main use is small document cleanup, README edits, or occasional questions
- You're mostly touching one file at a time in light sessions
On the other hand, if these patterns sound familiar, Pro will start feeling tight quickly.
- Long focused sessions: development, research, or automation running for hours at a stretch
- Needing Opus for complex architecture or difficult debugging
- Reading entire codebases or many files every day
Signals That It's Time to Move to Max
If two or more of the following apply to you, the cost of interruption is likely higher than the cost of the plan upgrade.
□ Claude Code sessions run over an hour a day
□ You've already seen a "limit reached" message
□ You regularly load long documents, multiple files, or entire codebases
□ You need Opus for architecture decisions or hard debugging
□ You go through build → validate → revise cycles frequently
□ You've started connecting MCP or automation to real workflows
Claude Code is a tool that yields more the deeper you go. Available usage directly shapes the quality of what you get out of it.
How the Cost Structure Works
Monthly subscription → Use freely within your limit
Hit the limit       → Responses slow down (no surprise charges)
- No need to track individual token counts. Limits run on two windows: a 5-hour window and a weekly window.
/usageshows session cost, plan limits, and activity stats in one view (/costand/statsare aliases for the same command).- On Max, when Opus usage crosses its threshold, it automatically switches to Sonnet — work continues without stopping.
Five Small Habits That Reduce Token Use
/clearbetween tasks: drops stale context so you're not carrying extra weight.- Sonnet first: enough for most work and lighter than Opus.
- Narrow your requests: "improve the codebase" costs more than pointing at a specific file or function.
- Trim unused MCP connections: disable external connections you're not actively using.
- Name the scope explicitly:
@specific-file.tsinstead of "all files" keeps context small.
Section 03 and Section 20: How They Split the Topic
This section covers what to buy. The operational side — reducing token use through CLAUDE.md diet, permissions.deny rules, and context compression — is covered in depth in 20. Cost Management & Saving Tips. Reading both sections together tends to flatten the cost curve noticeably.
For the latest pricing and plan details: https://claude.com/pricing
Before You Leave This Chapter
- Identified whether your usage pattern fits Pro or Max (5x)
- Understood that hitting the limit interrupts flow — not just pauses it
- Know how to check usage with
/usageor/cost - Have a plan for what to do if you hit the limit:
/compact,/clear, or/modelto switch to Sonnet
The next chapter (04 Installation & Auth) gets Claude Code actually running on your machine. The install itself is one command — but knowing what to check if something goes wrong saves a lot of time.
Installation & Auth
Learn how to install and authenticate Claude Code.
What Happened When I Ran That First Command: Installation to First Launch
One command to install, then a browser click. That's the whole setup. The goal of this chapter is to walk with you through "that first time" — because once it's done, it stays done.
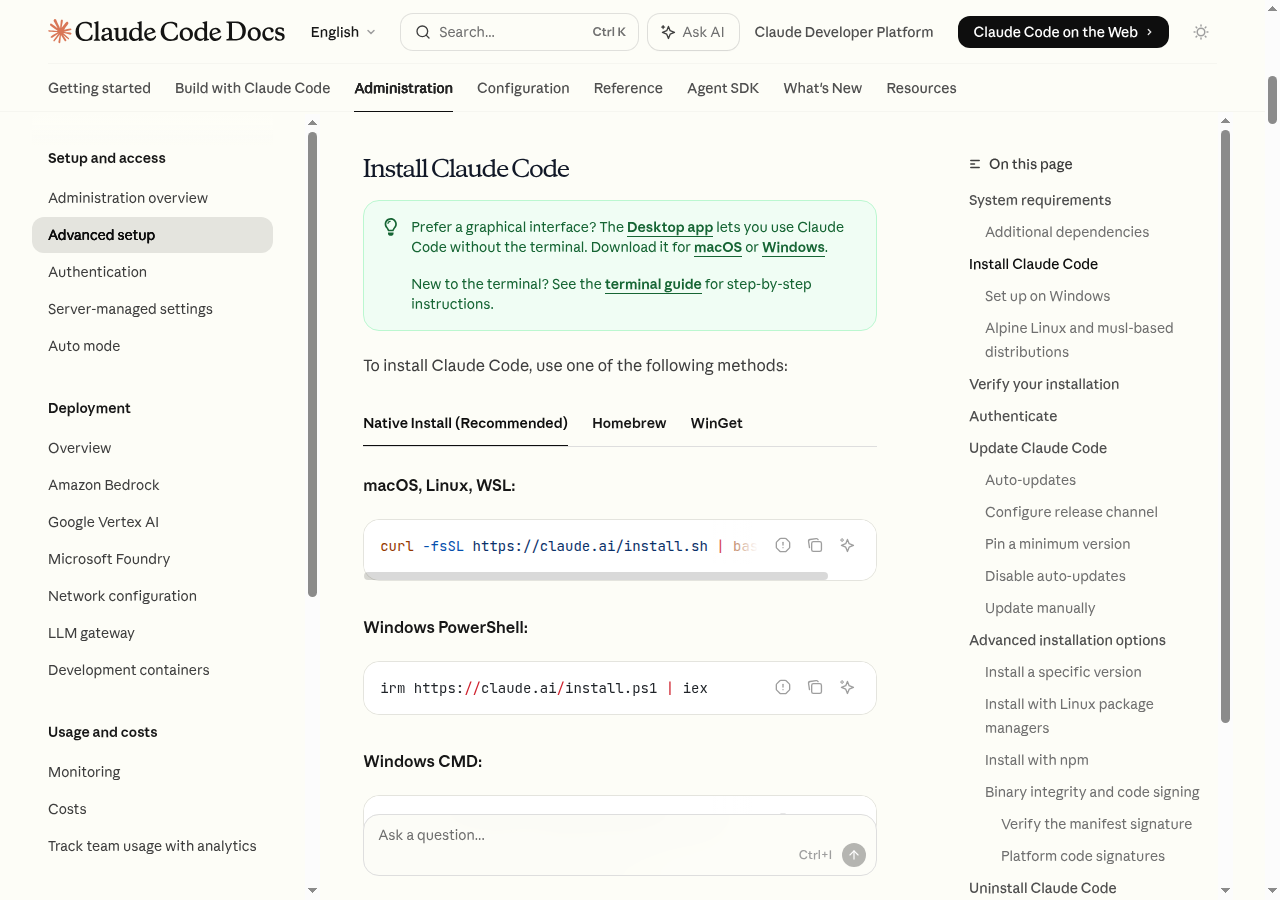 Source: Set up Claude Code — Anthropic Docs
💡 New to the terminal? That's fine. Copy the commands below (Cmd+C or Ctrl+C), paste them (Cmd+V or Ctrl+V), and press Enter. You don't need to understand what each part means right now.
- macOS:
Cmd+Space→ type "terminal" → Enter- Windows:
Win+R→ type "powershell" → Enter
Before Installing: Three Things to Check
Which OS does it run on?
| Operating System | Supported Versions |
|---|---|
| macOS | 13.0 or later |
| Linux | Ubuntu 20.04+, Debian 10+, Alpine Linux 3.19+ |
| Windows | Windows 10 (1809+) or Windows Server 2019+ |
What hardware do I need?
- 4GB RAM or more is enough
- An active internet connection (required both during install and while running)
Do I need to install Node.js separately?
No. Claude Code uses a native installer with no Node.js dependency. The older npm install -g method still works, but it's not recommended because of permission issues — especially with sudo, which is risky. Start with the native commands below.
Installing: Every Path Leads to the Same Place
macOS · Linux · WSL
The simplest approach is a one-line installer:
curl -fsSL https://claude.ai/install.sh | bash
If you're already using Homebrew, this works too:
brew install --cask claude-code
💡 One time, this happened. During a WSL2 workshop, a student ran the
curlcommand and nothing came back. Turns out a proxy setting was blocking the request. Since then I've made a habit of checkingcurl -I https://claude.aibefore the install command — if you get a response, internet connectivity is fine.
Windows: Four Entry Points
Windows users have multiple paths. Whichever you choose, the end result is the same.
WSL — Linux-like
Best feature parity. One extra setup step, but worth it.
PowerShell direct
Start immediately. Some features may be limited.
CMD
One curl line and you're done.
WinGet
Clean install via Windows package manager.
Option 1 · WSL — Linux-like experience (recommended)
Smoothest feature parity. One extra step upfront.
# Open PowerShell as Administrator
wsl --install
After rebooting, Ubuntu sets itself up automatically. Then use the Linux command above inside the Ubuntu terminal.
Option 2 · PowerShell direct install
Start without WSL, but some features may be limited.
irm https://claude.ai/install.ps1 | iex
Option 3 · CMD
curl -fsSL https://claude.ai/install.cmd -o install.cmd && install.cmd && del install.cmd
Option 4 · WinGet
winget install Anthropic.ClaudeCode
For Windows local sessions, Git for Windows must be installed.
Choosing Between WSL and PowerShell
One of the most common questions from people starting on Windows. Here's the short version:
| Deciding factor | WSL | PowerShell direct |
|---|---|---|
| Lots of code, automation, or Git work | ✓ | — |
| Need to match Linux examples exactly | ✓ | — |
| Starting with document cleanup or light file tasks | — | ✓ |
| Want quick access to Windows folders | — | ✓ |
If you expect a lot of coding, go WSL. If "organize the Downloads folder" is your first use case, PowerShell is fine. Switching to WSL later isn't hard.
Linux Package Managers (apt · dnf · apk)
You can also install from your distro's repository. For key registration and detailed steps, see the official setup guide.
# Debian · Ubuntu
sudo apt install claude-code

# Fedora · RHEL
sudo dnf install claude-code

# Alpine
apk add claude-code
⚠️ Versions installed through package managers don't auto-update. Run
sudo apt upgrade claude-code(or equivalent) manually to keep current.
Alpine Linux: Extra Packages
The native installer on Alpine also needs these:
apk add libgcc libstdc++ ripgrep
Logging In: Once After Install, That's It
Once installed, run it right away:
claude
On first launch, your browser opens automatically to an OAuth login page. Sign in with a Claude.ai account on Pro, Max, Team, or Enterprise — or with an Anthropic Console account. (Free plan does not include Claude Code.) Some environments also support external providers like Bedrock, Vertex, or Foundry.
The Login Flow in Diagram
If the browser doesn't open automatically, copy the URL printed in your terminal and paste it into a browser manually. Completing the login there will authenticate your terminal session.
Where Are My Credentials Stored?
- macOS: API keys and OAuth tokens go into the system keychain (encrypted storage)
- Other OS: stored in a protected location inside your user directory
- To re-authenticate: run
claude, then type/login
Confirming It Worked: Two Commands
claude --version
If a version number appears, the install is good. For a detailed diagnosis:
claude doctor
claude doctor shows install type, version, and environment status in one view. When something feels off, this command is usually the fastest way to find out why.
How Updates Work
If you installed with the native installer, Claude Code downloads new versions in the background at startup and applies them silently on the next launch. Versions installed via Homebrew, WinGet, apt, dnf, or apk don't auto-update — you'll need to update manually.
claude update              # Native installer
brew upgrade claude-code   # Homebrew
winget upgrade Anthropic.ClaudeCode  # WinGet
Waiting too long to update can introduce subtle issues that only appear on older versions. Running claude update once a month is a good habit.
The First Wall: Three Common Situations
Situation 1 · curl: command not found
curl itself isn't installed — uncommon today, but happens on some minimal Linux setups.
# Ubuntu / Debian
sudo apt-get install curl

# Alpine
apk add curl
After installing curl, run the installer command again.
Situation 2 · claude: command not found
Installed, but the shell can't find the executable. It's a PATH registration issue.
# Reload PATH in the current shell
source ~/.bashrc          # bash
source ~/.zshrc           # zsh
If that doesn't fix it, close the terminal completely and reopen it. New PATH entries only take effect in a fresh shell.
💡 One time, this happened. During a class session, a student ran
claudeand got "command not found" — even though the install had definitely completed. I walked through three steps:which claudeto check the path,node -vto verify the Node environment was correct (only if you chose npm install. The native installer doesn't need Node.), and then the last line of~/.zshrc. The culprit was nvm switching to a different Node version that had dropped the PATH entry. Found and fixed in five minutes. That sequence is now my standard first check after any install issue.
Situation 3 · "Git not found" on Windows
Local sessions on Windows depend on Git. Install Git for Windows and try again.
Once Installation Is Done
All that's left is to pick a folder and go in.
# Navigate to your working folder, then run
cd ~/Desktop/my-project
claude
It doesn't have to be a code project. Documents, research, work files — any folder can be a starting point. Claude Code scans the folder once and waits for your next instruction.
If it just sits there silently when you first open it, that's correct. That's the input prompt. Type your first instruction there.
A Few More Things Worth Knowing Right Away
A Good First Instruction
If you're not sure what to type first, try this exactly:
Take a look at this folder and summarize what files are here.
An empty folder is fine too. Claude will say "this folder is empty — what would you like to start with?" and you can say "create a sample meeting notes file for me."
Making Mistakes in Your First Session Is Fine
Before Claude modifies a file, it shows you what it's about to change and asks for confirmation. You'll see "is it okay to do this?" — and you can always say "n" to skip. This confirmation step lets you watch what's happening while you're still learning the flow.
If something goes wrong, press Esc twice to revert, or say "undo what you just did" and Claude will reverse it.
Update Methods by Install Path
The update command depends on how you installed. Keep this somewhere handy to avoid hunting for it later.
| Install method | Update command | Auto-update |
|---|---|---|
| Native installer (curl) | claude update | Yes (applied next launch) |
| Homebrew | brew upgrade claude-code | No |
| WinGet | winget upgrade Anthropic.ClaudeCode | No |
| apt / dnf / apk | sudo apt upgrade claude-code | No |
Start a CLAUDE.md Right Now
Setting up a CLAUDE.md right after install is a good habit. Just ask Claude: "record my project rules and preferences in CLAUDE.md." It doesn't need much content to start — even a single line like "always reply in English" is enough. You'll fill it in as you go.
CLAUDE.md is read automatically at the start of every session. It's the core memo that keeps you from repeating the same explanations over and over.
If It Can't Connect: Network Troubleshooting Order
On corporate networks, VPNs, or behind firewalls, Claude Code may not be able to reach Anthropic's servers. Here's the order to check:
curl -I https://api.anthropic.com— if you get a response, server connectivity is OK- Turn off VPN and retry
- If blocked by firewall policy, ask IT to allow
api.anthropic.com:443 - On a proxy setup, set the
HTTPS_PROXYenvironment variable before running
Most cases resolve by disabling VPN or adding a proxy setting. In a corporate environment, a quick check with IT may be needed.
Before You Leave This Chapter
- Ran
claude --versionand saw a version number - Ran
claude doctorand reviewed the environment status - Completed the browser login flow when launching
claudefor the first time - Know which install method you used (affects which update command to run)
The next chapter (05 Beginner Workflow) walks through what to actually type in the terminal that just opened — six beats for your first session.
Beginner Workflow
Learn practical workflows from your first session to writing effective prompts.
When You First Open the Terminal: A Workflow for People Who Don't Know Where to Start
Have you ever stared blankly at the terminal in your first session, not sure what to type? I have. The cursor blinked and I didn't know where to begin. Shortening that moment is what this chapter is about.
Six beats at a glance. Follow them exactly the first time, then bend the rhythm to your own pace as you get comfortable.
Your First Session: Six Beats
Follow these steps the first time through. Each beat is short.
Go to your working folder
cd ~/Desktop/my-project
Run Claude Code
Type claude and press Enter
Ask Claude to scan the project
Create a CLAUDE.md together
Give your first instruction
Describe what you want in plain language
Review and give feedback
If something's off, say so right away
Wrap up the session
/quit or Ctrl+D
① Go to your working folder
# Example: go to the my-project folder on your Desktop
cd ~/Desktop/my-project
Claude Code reads and writes files based on the current folder. Which folder you open it in determines your work scope for that session. If the folder doesn't exist yet, mkdir it and cd in.
Any folder is fine to start with. An empty folder is fine. You can even say to Claude "I'm not sure what to do in this folder" — you can figure it out together.
② Run Claude Code
claude
Type claude and press Enter. When the interactive mode appears, you're ready. The first time may briefly show a setup screen — themes, auto-update settings. The defaults are fine.
③ Ask Claude to scan the project
When entering a folder for the first time, having Claude scan the structure first cuts your setup time in half. Creating a CLAUDE.md at this stage means you won't have to repeat the same explanations in future sessions.
> Scan the whole project and create a CLAUDE.md
If you're working on an existing project, this shorter version works too:
> Describe the structure of this codebase
💡 CLAUDE.md is a memo where you keep project rules, tech stack, and important notes. Commit it to git and your teammates — or your future self — can start from the same context.
💡 One time, this happened. At a workshop, a student asked "do I really need to scan the project first?" I said it wasn't required. They immediately typed "build me a login feature." The code Claude generated was completely mismatched with the existing file structure — everything had to be redone. Five minutes of project scanning saves an hour of rework. Now I always scan before anything else in a new folder.
④ Give your instruction
Describe what you want in natural language.
> Build a login feature
> Find the bug in this code
> Translate README.md to English
Start small. Asking for too much at once scatters the results. "Login screen first" produces much better results than "build login, signup, forgot-password, email verification, and social login all at once."
⑤ Review and give feedback
When Claude modifies a file, it shows you what changed. If something's off, reply right away.
> Good, but change the error messages to English
> Let's try a different approach on this part — [explanation]
The more specific your feedback, the better the next result. "Make it better" is weaker than "this function is slow on 1000 records, bring it under 1 second."
⑥ Wrap up the session
> /quit
Ctrl+D does the same. When the session ends, the conversation is gone — but files and CLAUDE.md stay on disk. You can pick it up next session.
Five Habits for Better Prompts
Habit 1: Narrow the scope
The same request produces very different results depending on how specific you are.
- "Fix the code" → "Fix the TypeError on line 42 of login.js"
- "Add a feature" → "Add a feature that sends a password-reset link via email"
- "Make it better" → "This function takes 3 seconds on 1000 records — get it under 1 second"
- "Write tests" → "Unit tests for the login function in auth.js. Include success, failure, and invalid email cases"
The key is getting "what, where, and how" into the same sentence.
Habit 2: One thing per turn
Ask for multiple things at once and Claude loses priority, just like a person would.
# Results get scattered
> Build login, add signup, add forgot-password,
  add email verification, and add social login

# Results are clean
> Build just the email + password login feature first
(After confirming it's done)
> Now add the signup feature next
One at a time, then the next one. This counterintuitively speeds up the whole process — one big request leads to far more rework.
Habit 3: Specify the output format upfront
The same question gets different answers depending on the format you ask for.
> Explain this code           → text explanation
> Save this code to a file    → file creation
> Improve and overwrite this  → direct file modification
> List bugs as a table        → table format
Specifying the output format upfront reduces post-processing.
Habit 4: Use @ to reference files directly
Add a file path after @ and Claude reads that file immediately.
> @meeting-notes.txt extract only the action items
> @contract.pdf summarize the key clauses
> @prices.csv analyze and give me 3 insights
> @src/auth/login.js find bugs in this file
You can also reference entire folders:
> @docs/ read all files in this folder and build a table of contents
> @reports/2026/ compare monthly reports and analyze trends
💡 Type
@in the chat to get autocomplete. Korean filenames work fine.
Habit 5: When stuck, question the premise
When you're not getting the results you expected, don't repeat the same prompt. Instead, try: "Let's take another look at the assumptions here." The real cause often surfaces there.
You can also say "I don't understand why this isn't working — let's think through it from the beginning together." Claude will revisit the conversation and look for where the premise went wrong.
Real Scenarios by Domain
Documents and Business
> @meeting-notes-260225.txt
  Summarize today's meeting and list action items by owner in a table
> @report-draft.docx
  Review the logical flow. Flag anywhere that needs supporting data.
> There's a file at ~/Downloads/meeting-260225.mp3
  Convert it to text and summarize it
Claude Code installs and runs the STT tools itself. You don't need to know any Python libraries in advance.
Data and Analysis
> @apt-prices-2026Q1.csv
  Show average prices and year-over-year change for Seoul's 25 districts.
  Highlight the top 5 with the biggest increases.
> @competitor-a.html @competitor-b.html @competitor-c.html
  Compare the strengths and weaknesses of these three landing pages.
  Include design tone.
Development
> Build a user profile page.
  - Display nickname, email, and join date
  - Profile picture upload
  - Nickname editing
> npm test throws this error. Fix it.
  TypeError: Cannot read property 'id' of undefined
  at UserService.getUser (src/services/user.js:45)
Plan Mode: Safety Belt Before a Big Change
Plan Mode is a mode where Claude only plans — no files are touched. You can see the full picture before committing to a major change.
How to enable it
Shift+Tab twice or > /plan
When Plan Mode pays off
- When touching multiple files at the same time
- For hard-to-reverse operations like database migrations
- Before modifying a codebase you've never seen before
- For architectural changes
In Plan Mode, Claude explains "what will change and how" before doing anything. If the plan looks good, switch to normal mode and execute. If not, redirect at the planning stage. Far fewer mistakes this way.
Four Dangers in Your First Sessions
Don't paste sensitive information into the chat
# Never do this
> My AWS access key is AKIAXXXXXXXX and...
> My DB password is mypassword123 and...
> My SSH key is -----BEGIN RSA...
Keep API keys, passwords, and private credentials in environment variables or .env files. Don't type them into the chat directly. Information entered in a chat session stays in the conversation history.
Don't blindly approve permission requests
When Claude asks for sudo or system file modification: make it a habit to ask why first.
> Why do you need sudo? Is there another way?
--dangerously-skip-permissions is only for isolated environments
This flag skips all permission checks. Don't use it outside containers or other isolated environments.
Always commit before big changes
The small habit of committing before refactoring or migrations is insurance that saves days of work. You can ask Claude: "commit the current state for me, message: [description]."
Session Management: Small Techniques That Make a Difference
Name long sessions
> /rename housing-price-analysis
Resume later:
claude --resume housing-price-analysis
Naming sessions keeps you from losing track of context when running multiple projects in parallel.
Compress when the session gets long
If responses slow down or Claude starts ignoring rules you agreed on, the context is getting full.
> /compact
Adding a specific instruction helps: "compact around decisions, changed files, and remaining tasks."
Clear before switching to unrelated work
> /clear
When starting a completely different topic, empty the context. It prevents residue from the previous task leaking into the new one.
Save reusable prompts as files
If you repeat the same kind of task, save the prompt to a file.
Store this in prompts/weekly-report.md:
Read this week's meeting notes in the meetings/ folder
and compile decisions, action items by owner, and next week's risks into weekly-report.md.
Always put the conclusion first, with details in collapsed sections.
Then every week: @prompts/weekly-report.md — run this. No need to retype the complex instructions. This is also the seed for a proper Skill.
Multi-Session: Running Multiple Tasks at Once
Claude Code defaults to one session per terminal, but you can open multiple terminal windows and run separate sessions simultaneously. Here's how I typically set it up:
- Terminal 1: code development session
- Terminal 2: document organization session
- Terminal 3: data analysis session
Each session has an independent context. A code change in session 1 doesn't affect the document session in session 2. But they share the filesystem. If both sessions try to modify the same file simultaneously, you'll get conflicts — keep an eye on that.
For more systematic parallel work, Git Worktrees let you run multiple Claude sessions on the same repository without conflicts. The worktree section covers this in detail later.
Handling Difficult Situations
When Claude keeps repeating the same mistake
Sometimes Claude makes the same mistake two or three times. In that case, resetting the context is usually more effective than tweaking the prompt.
> Stop. Let's pause the current work.
  Think from scratch.
  What I actually need is [clear description]. Does that direction make sense?
Or use /clear to fully reset and try a fresh approach.
When responses are too long
Asking for detailed explanations can generate overwhelming length. Constraining the output format helps.
> Summarize in 3 lines, just the key points
> Only tell me the executable commands, minimize explanations
> Conclusion first, I'll ask for reasons when I need them
Short, action-focused responses make the review-and-iterate cycle faster.
Choosing the Right Model
Claude Code lets you switch models depending on the task. Pro defaults to Sonnet, Max defaults to Opus 4.7. Switching between them is how you optimize both cost and quality.
> /model sonnet   # Fast and light tasks
> /model opus     # Complex design or reasoning
> /model opus[1m] # Handling long documents or full codebases
My typical usage:
- Sonnet: file organization, translation, small edits, document drafts
- Opus: architecture design, complex debugging, analysis requiring long context
- Opus 1M: full codebase reviews, processing dozens of files at once
The 1M context model consumes more usage. Reserve it for tasks that truly need it — Sonnet handles most everyday work fine.
The Shape of a Good Workflow
A workflow that runs well converges on this pattern:
- Go to the folder and set context — tell Claude where you're working and what you're building.
- Break it into small pieces — one at a time, confirm it's done, then move to the next.
- Check the output yourself — look at and run what Claude produced.
- Give specific feedback — not "make it better" but "change this part, for this reason, to do this."
- Check in periodically — use
/compact, commits, and TODO.md to stay oriented.
At first this flow can feel unfamiliar and cumbersome. But after a week of working this pattern, your hands will remember it. From that point on, you follow it without thinking consciously about the steps anymore.
Prompt Patterns: Ready-to-Use Sentences by Situation
Starting a session
Create a CLAUDE.md for this project that someone seeing it for the first time can understand.
Include tech stack, folder structure, and three core rules.
Analyzing a file
@[filename] Explain this file's main role and anything that could be improved.
Give me 3 actionable improvement suggestions in priority order.
Requesting a bug fix
This error occurred. Explain the cause and tell me how to fix it.
[paste error message]

Before fixing, tell me which files you'll need to touch.
Adding a new feature
I want to add [feature description].
First draft a plan in Plan Mode.
I'll say when to proceed after reviewing the plan.
Requesting a code review
@[filename] Review this file.
- Potential bugs
- Performance issues
- Security vulnerabilities
- Code quality improvements

Organize each item in a table with severity (high/medium/low).
Organizing documents
@[folder] Read the documents in this folder
and create index.md with a table of contents, 3-line summary per doc, and how they relate.
Analyzing data
@[data file] Analyze this data.
1. Overview (row count, columns, basic statistics)
2. Outlier detection
3. Three major patterns
4. Areas that need further investigation

Save the results to analysis-[date].md.
Bad Habits That Wreck a Workflow
A few traps that show up in every workshop. Knowing them up front lets you sidestep them from day one.
Trap ① Asking for too much in a single turn
The most common mistake. Throwing in something like "refactor the entire project" makes the result unpredictable because the scope is too wide.
Not good:
Upgrade this whole project to the latest versions,
improve code quality, add tests,
and update the docs.
Better:
In package.json, which three dependencies are the most outdated?
→ After checking: "Tell me what to watch out for when upgrading these three." → After checking: upgrade them one at a time.
Trap ② Pressing on without feedback
While Claude is working, repeatedly saying "yeah, keep going" means small drifts in direction add up unseen, and you end up rolling back a lot of work later. Checking in midway is actually the faster path.
During long sessions, a useful habit is to ask "summarize what you've done so far" every 10–15 minutes.
Trap ③ Putting off Git commits
"I'll commit when it's done" is a trap. Committing before starting a big task, and whenever a meaningful change lands, is the safer move.
Just tell Claude "commit the current state with the message [description]." Claude will write the commit message for you too.
Trap ④ Vague "make it better" feedback
"Make this better" hands Claude far too wide a permission. Claude will interpret "better" in its own way and may take the change somewhere unexpected.
Instead, write something like:
Improve the response speed of this function. It currently processes 1000 records in 3 seconds — bring it under 1 second.
Change the algorithm, but don't add external API dependencies.
What you want to improve, what the measurement is, and what the constraints are — when these are spelled out, the result is much better.
Common Slash Commands
Slash commands you'll use regularly. No need to memorize them all — come back here when you need one.
| Command | Purpose |
|---|---|
/compact | Compress context when the session gets long |
/clear | Reset before starting new unrelated work |
/quit | End the session |
/plan | Enter Plan Mode |
/rename [name] | Name this session |
/context | Check current context usage |
/usage | Check session cost and plan limits |
/model | Switch models (sonnet, opus, etc.) |
Type /help for the full command list. If you're not sure what a command does, ask Claude: > what is /[command] used for?
A note on /compact vs /clear: /compact summarizes the conversation but keeps it — good for staying in the same work thread but trimming the weight. /clear wipes the slate — use it when switching to a completely unrelated task. The distinction matters for how much Claude "remembers" about what you've been doing.
One Line Summary
Narrow your scope → one thing at a time → check the result yourself → give short feedback → repeat.
Before You Leave This Chapter
- Navigated to a working folder and ran
claude - Typed a first instruction and received a response
- Used
/compact,/clear, and/quitat least once each - Understand what CLAUDE.md is for
- Remember the principle: "one thing at a time"
The next chapter (06 Plugins) looks at plugins that make this workflow more convenient. Installing one line opens up new capabilities — you'll see what that feels like firsthand.
Plugins
Install and use useful plugins.
The Moment Plugins Changed Things: Features That Open With One Install
Claude Code is powerful on its own. But the day I installed the GitHub plugin in a workshop and said "summarize the five open issues in this repo," Claude called the GitHub API and brought back the results directly. Before that, I had to copy-paste issue content into the chat manually. That difference was bigger than I expected.
What Are Plugins? The Smartphone App Analogy
Skills
- Form/pluginname:command
- WhenYou invoke them
- Example/lint, /summarize
Agents
- FormAI with a role
- WhenDelegating complex tasks
- Examplereviewer, researcher
Hooks
- FormEvent handler
- WhenTriggered automatically
- Examplelint on save, check before commit
MCP Servers
- FormBridge to external services
- WhenWhen external data is needed
- ExampleGitHub, Figma, Notion
A phone does calls, messages, and camera out of the box. Install apps and new categories open up: budgeting, photo editing, weather alerts. Plugins work the same way — capability bundles that sit on top of Claude Code.
Each bundle usually contains one or two of four things:
- Skills — custom commands in the form
/pluginname:command. You invoke them explicitly. - Agents — AI with a defined role. Think reviewer, researcher — a named collaborator.
- Hooks — event handlers that react automatically to file saves, command runs, etc. No explicit call needed.
- MCP Servers — bridges to services like GitHub, Figma, and Notion. Required for Claude to directly read and write external service data.
You don't need to understand all four before you start. Install something, use it, and the categories become clear naturally.
Where to Find Them: The Official Marketplace First
The claude-plugins-official marketplace, run by Anthropic, is available from the moment you start Claude Code — no separate registration needed. Type /plugin inside Claude Code and the Discover tab opens. Browse the catalog and install whatever looks useful.
/plugin install plugin-name@claude-plugins-official
Top Plugins by Category
- External integrations —
notion·slack·github: connect Notion, Slack, and GitHub directly to Claude. Read and write data without leaving the terminal. - Output style —
explanatory-output-style: reshape responses into summaries, checklists, step-by-step formats. - Dev workflow —
commit-commands: reads your staged changes and suggests appropriate commit messages.
🖥️ For developers: code intelligence plugins
LSP-based plugins are well-suited for code intelligence work.
/plugin install typescript-lsp@claude-plugins-official
/plugin install pyright-lsp@claude-plugins-official
These let Claude detect type errors in real time and use IDE-style features like go-to-definition and find-references directly. More accurate analysis when reading code.
Installing: Three Steps and Done
Step 1: Browse the marketplace and install
One line inside Claude Code:
/plugin install plugin-name@claude-plugins-official
For GitHub:
/plugin install github@claude-plugins-official
Or type /plugin and browse the Discover tab — categories make it easy to navigate.
ℹ️ Plugins install one at a time. Repeat for multiple plugins.
Step 2: Confirm the install
/plugin list
Or open the Installed tab in /plugin to see what's active and which versions.
Step 3: Update when new versions arrive
/plugin update
⚠️ After installing or updating, restart Claude Code once. New commands, hooks, and MCP connections need to be loaded into the running context.
The First Use Matters More Than the Install
Plugins earn trust in the first use, not the install. Don't give them important work right away. Start with read-only requests.
- GitHub → "Summarize issues closed in the last week in this repo"
- Notion → "Read the most recent meeting page and list only the decisions"
- Slack → "Compress today's main discussion in #general to five lines"
- commit-commands → "Suggest a commit message for the currently staged changes"
Only after read-only requests work smoothly should you expand to write and modify permissions — one step at a time.
💡 One time, this happened. Right after installing the GitHub plugin, I told Claude "close this issue and merge the PR." Claude ran it. A PR that hadn't been reviewed yet got merged. Since then, I always test a new plugin with read-only requests first. Write permissions come after I've confirmed the behavior is trustworthy.
Everyday Plugin Management
Five commands you'll use regularly:
/plugin: open the plugin manager (Discover · Installed · Marketplaces · Errors tabs)/plugin list: see all installed plugins at once/plugin disable plugin-name: temporarily turn off (without uninstalling)/plugin enable plugin-name: turn back on/plugin uninstall plugin-name: fully remove
As plugins accumulate, checking the Errors tab periodically is good practice. MCP connection failures and misconfigured settings show up there.
Key Plugins, Looked at More Closely
GitHub Plugin
Install: /plugin install github@claude-plugins-official
With this plugin, Claude can access your repositories directly. You can say "check this PR and merge it if there are no issues" — without manually copy-pasting content back and forth.
Common request patterns:
Gather issues opened in the past 7 days and sort them by priority.
Prioritize by: label, comment count, author permissions.
Compare main branch to feature/login and summarize what changed
in language a non-developer can understand.
Collect issues closed this sprint and draft release notes.
Translate technical content into user-facing language.
💡 One caution with the GitHub plugin: start with read-only access. Write permissions (creating issues, merging PRs, pushing code) should come after you've built enough confidence. Fine-tune in
/permissions.
Notion Plugin
Install: /plugin install notion@claude-plugins-official
If you use Notion for team docs or project management, this plugin turns Claude into a Notion editor. Not just reading — it can create new pages, update content, and add entries to databases.
Most useful scenario: weekly summary automation.
Read all Notion pages updated this week related to [project name]
and create a weekly update summary as a new page.
Post it to the team shared DB.
Meeting notes automation:
Write up today's meeting and add it as a new page in Notion's [meeting DB].
Match the format of existing pages.
Slack Plugin
Install: /plugin install slack@claude-plugins-official
If your team uses Slack, this plugin lets Claude read channel content or send messages. My most common use: channel monitoring.
Pull decisions and action items from #dev today.
Flag anything that involves me specifically.
Write a team standup message.
Yesterday: completed items from @TODO.md
Today: remaining items from @TODO.md
Blockers: none
commit-commands Plugin
Install: /plugin install commit-commands@claude-plugins-official
Simple but you'll use it daily. Reads staged changes and suggests commit messages in Conventional Commits format (feat:, fix:, docs:, etc.).
/commit-commands:suggest
Or ask directly:
Look at the staged changes and suggest 3 commit messages.
Use Conventional Commits format.
For anyone who finds writing commit messages tedious, this alone justifies installing a plugin.
Plugin Combinations: Real Workflows
Using plugins individually is good. Combining them creates stronger automation. Here's my actual weekly wrap-up workflow:
1. Fetch closed issues and merged PRs from GitHub this week
2. Read this week's meeting notes from Notion
3. Extract key decisions from Slack #dev
4. Combine the three into a weekly report
5. Add to Notion weekly-report DB and share link in Slack #general
Handled in one conversation:
Combine GitHub, Notion, and Slack data to create this week's report.
GitHub: closed issues and merged PRs this week.
Notion: the [2026-W19 meeting notes] page.
Slack #dev: today's main discussion.
Compile into a unified report.
When done, add to Notion [weekly-report DB] and share the link in Slack #general.
Before this, the process took about 40 minutes. Now it's one command plus 5 minutes of review.
Plugins That Work Without External Services
Some plugins run locally with no MCP server or external authentication.
explanatory-output-style
Changes response style. After installing:
Explain this code. [output style: beginner-friendly step-by-step]
Or set it globally:
From now on, always format explanations as step-by-step for beginners.
Especially useful for documentation work or building teaching materials.
chrome-devtools (or playwright)
Lets Claude directly inspect a locally running web app.
Open localhost:3000 and check for console errors.
If any, tell me which file and line they come from.
A good starting point for test automation.
Permission Patterns When Using Plugins
Grant permissions in stages
- Right after install: read-only only. Claude can read and analyze data.
- After one week: add create permissions. Allow creating new issues, pages, messages.
- After building confidence: add edit and delete. Allow modifying existing items.
Staging it this way means mistakes get caught before they cause big impact.
Set Deny rules first
It's safer to define what's forbidden before defining what's allowed.
/permissions
Set "never do this" actions to Deny. For example:
- Deny modifying production environment data
- Deny sending messages outside the organization
- Deny access to folders with sensitive information
These rules apply regardless of what the plugin tries to do.
I keep three Deny rules set at all times:
- Direct push to
mainorproductionbranch — denied - Sending email or messages outside the organization — denied
- Delete or modify on the production DB — denied
Just these three prevent most serious mistakes.
Before and After Plugins
Before: GitHub issue analysis without plugins
Workflow:
1. Open GitHub in browser
2. Click into each issue and read it
3. Copy content into Claude chat
4. Get analysis
5. Repeat for next issue

Time: 5–10 minutes per issue — 10 issues = 50–100 minutes
After: GitHub plugin for issue analysis
> Analyze all issues opened this week by priority.

Time: 30 seconds to 2 minutes
The difference is the time spent reading and copy-pasting. Plugins eliminate those steps.
Plugin Troubleshooting
When a plugin doesn't respond
Symptom: installed but no reaction, or "can't connect to service."
Steps to check:
/plugin list— confirm it shows Enabled/plugin→ Errors tab — check error messages- Check internet connection (especially with VPN or firewall)
- Restart the plugin:
/plugin disable [name]→/plugin enable [name] - If that fails: uninstall and reinstall
After reinstalling, restart Claude Code once. New settings need a fresh start to fully apply. Odd behavior without a restart does happen occasionally.
When an MCP server keeps disconnecting
Cause: usually expired auth token, service downtime, or network timeout.
Fix:
- GitHub:
/github:reauth - Notion:
/notion:reconnect - General: restarting Claude Code is the fastest fix
When a plugin does something unexpected
Most common: it creates or modifies items you didn't intend because write permissions were too broad.
Response:
- Stop immediately:
Ctrl+C - Check what changed: look at recently created/modified items
- Review permissions: tighten the allow scope in
/permissions
Using Plugins With a Team
Shared plugin setup
Recording shared plugin settings in CLAUDE.md cuts onboarding time for new team members.
## Team Plugin Setup

Required plugins (install right after joining):
- `/plugin install github@claude-plugins-official`
- `/plugin install notion@claude-plugins-official`
- `/plugin install commit-commands@claude-plugins-official`

GitHub plugin permissions:
- Repos: allow access only to [team repo name]
- Permission level: read + PR creation, issue creation
- Merge, delete: always confirm manually
Shared prompt management
Include frequently used team prompts in the repository for consistent usage across the team.
prompts/
  weekly-report.md      # Weekly report generation
  issue-triage.md       # Issue priority analysis
  pr-review.md          # PR review requests
  release-notes.md      # Release notes generation
Save prompt templates in each file, then call with @prompts/weekly-report.md — run this.
Plugins and Security
Security is the most important consideration when using plugins.
API key management
Plugins store auth API keys securely — macOS system keychain, for example. Never write them to files manually or put them in CLAUDE.md.
If anything asks you to enter an API key, only do it through Claude Code's official settings flow. Any other request should be treated with suspicion.
Data processing scope
Data processed through plugins may be sent to Anthropic servers via the Claude API. Things to verify:
- If connecting confidential company data through plugins to external services, check IT policy
- Consider excluding sensitive channels and repos from plugin access scope
- Enterprise plans have different contract terms for data processing
A Preview of Building Your Own Skills
Using the official marketplace isn't the only option. You can build Skills for tasks you repeat frequently.
Skills turn repeated prompt patterns into slash commands. If you build the GitHub issue analysis pattern into /triage:
/triage
One line runs it. A complex prompt executes internally but the usage point stays simple.
After 2–3 weeks of using plugins, you'll hit a moment where typing the same prompt again feels pointless. That's when you're ready to build a Skill. You'll know the moment naturally.
At first, just use what's there. As you get comfortable, repeating patterns become visible — and that's when you have something worth automating. Plugin use → pattern discovery → Skill creation: this progression flows on its own.
Skills are covered in detail in 17. Skills & Building Plugins.
Recommended Order for Getting Started
- Learn the base workflow first. Spend 2–3 weeks with just Claude Code, no plugins. What you're missing becomes obvious on its own.
- Add one at a time. Installing many at once makes it hard to tell which plugin does what.
- Always test read-only first. Give write permissions only after verifying behavior.
- Disable what you're not using. MCP servers maintain connections, so only activate them when needed. Unused MCP servers can slow Claude Code's startup and affect response speed. Check
/plugin listperiodically and disable what you're not actively using.
A Quick Recap
That covers the plugin fundamentals. Below we move into deeper material — real-world cases, security patterns, and team operations.
Real Problems Plugins Solved
Problem 1: Daily manual GitHub issue review was burning time
Before: every morning I opened GitHub, read through new issues, judged priority, assigned owners — 30 minutes gone. After installing the GitHub plugin, this is what I run each morning:
Fetch issues opened since yesterday and:
1. Classify each as bug or feature request
2. Assign priority (criteria: user impact, reproducibility, duplicate check)
3. Suggest which team member should handle each
Format the output as a table.
That work now takes 5 minutes. The rest of that time goes to actually fixing things.
Problem 2: Same meeting note format every time was tedious
Combined the Notion plugin with a meeting transcript flow:
Add this meeting to Notion [meeting DB] in this format:
- Title: [date] [topic]
- Attendees: [list]
- Decisions: (numbered list)
- Action items: (with owner tags)
- Things to check before next meeting: (checklist)
Match the format of existing pages exactly.
Meeting ends, paste the transcript, run the command. Two minutes.
Problem 3: Too many PR review comments made it hard to see the big picture
Using the GitHub plugin to analyze PR comments:
Read all comments on [PR number] and organize them into:
1. Core issues (points multiple reviewers raised in common)
2. Must-fix vs still-being-discussed
3. Quick fixes vs changes requiring design decisions
Summarize by category.
Even 20 reviews become clear in 3 minutes.
Connecting MCP Servers Directly (Without the Marketplace)
When the marketplace doesn't have the service you need, or you need to connect an internal system, you can configure MCP servers directly.
MCP (Model Context Protocol) is the standard protocol for connecting Claude to external services. Add server info to a config file.
In ~/.claude/settings.json:
{
  "mcpServers": {
    "my-internal-tool": {
      "command": "node",
      "args": ["/path/to/mcp-server.js"],
      "env": {
        "API_KEY": "your-api-key"
      }
    }
  }
}
Many pre-built MCP servers already exist. GitHub, Slack, Notion, Jira, Figma, PostgreSQL, Google Drive — official and community MCP servers are available. Browse modelcontextprotocol/servers and the Anthropic Directory for a list.
🖥️ For developers: building your own MCP server
If you need to connect an internal API or database, you can build your own MCP server.
Basic structure:
import { Server } from '@modelcontextprotocol/sdk/server/index.js';

const server = new Server({ name: 'my-tool', version: '1.0.0' });

server.setRequestHandler('tools/list', async () => ({
  tools: [{
    name: 'get-data',
    description: 'Query internal DB',
    inputSchema: { type: 'object', properties: { query: { type: 'string' } } }
  }]
}));

server.setRequestHandler('tools/call', async (request) => {
  if (request.params.name === 'get-data') {
    const result = await internalDB.query(request.params.arguments.query);
    return { content: [{ type: 'text', text: JSON.stringify(result) }] };
  }
});
More detail in MCP & Integrations.
Plugins Worth Knowing That Have Nothing to Do With External Services
Not every plugin needs an external account or MCP server to be useful. Some work entirely in your local environment.
Why that matters
Local-only plugins have zero auth setup, no risk of API key leaks, and no latency from external calls. They're the fastest and safest category to try first.
The explanatory-output-style plugin is a good first install. You set it once and every response that touches explanation automatically gets formatted in a way that's readable to someone seeing the topic for the first time. If you ever explain Claude Code to a colleague using your terminal, or build tutorial content, this plugin removes the back-and-forth of "make this simpler."
The Chrome DevTools plugin is worth having if you build web apps. Instead of switching to a browser, opening DevTools, scrolling through the console, and copying errors back to Claude — you just say "check localhost:3000 for errors" and Claude does the browser inspection itself. The round trip disappears.
The Long-Term View on Plugins
Plugins aren't just about convenience. They gradually shift the shape of your work.
When I first started using Claude Code without plugins, I was the bridge between Claude and every external tool. I read GitHub, told Claude what was there. I checked Notion, summarized it for Claude. I fetched Slack threads, pasted them in.
After plugins, Claude is the bridge. I just describe the outcome.
The mental model shift is real: instead of "how do I get this data to Claude," the question becomes "what outcome do I want." The toolwork moves off your plate.
That shift doesn't happen on day one. It happens over weeks, as plugins become reliable, as you stop checking whether they did the right thing every single time, as muscle memory builds around a new way of working. The first plugin install is just the entry point.
What's Next: A Tour of Core Concepts
- Ran
/plugin install github@claude-plugins-official, or at least typed/pluginto look at the Discover tab - Have a rough sense of the difference between Skills, Agents, Hooks, and MCP Servers
- Remember the principle: "test read-only first"
- Ran
/plugin listto check what's installed
The next chapter (07 Core Concepts) covers five concepts that explain how Claude Code works inside — Context, Tools, Permissions, Memory, and Session — one page each.
Core Concepts
Understand key concepts: Context, Tools, Permissions, Memory, and Session.
How Claude Code Works: The Concepts That Change How You Use It
Looking inside a tool's workings changes how you use it. When I first understood these concepts, a series of "so that's why" moments followed. It's not complicated — five diagrams.
Claude Code Is an Agent: Understanding the Flow at Once
Claude Code is not a chatbot. It's an Agent. Give it a task and it autonomously plans, reads files, makes changes, and checks results in a loop. This cycle is called the Agentic Loop.
One sentence from you
     ↓
① Understand the situation — read files, search code, check state
     ↓
② Act — modify files, run commands, search the web
     ↓
③ Verify — run tests, check for errors, revise
     ↓
Done (or back to ① and repeat)
Say "summarize the documents in reports/" and Claude checks the folder, reads the document content, drafts a summary, fills in anything missing — all in one breath without you directing each step.
This is how it differs from chat. Chat responds to each message in isolation. Claude Code runs steps autonomously until complete.
🖥️ Developer scenario: the flow of a bug fix
Internal flow of "the tests are red, fix them":
- Run tests → check which message appeared
- Find and read the relevant source file
- Modify the code
- Run tests again to verify they pass
- If not, loop back to step 2
Five Core Concepts
① Context: Claude's Working Memory
Everything Claude currently holds in its head is context. Conversation history, files read, command results, CLAUDE.md instructions — all of it. This memory has a token limit, so when it fills up, older content gets trimmed automatically.
# Check context status
/context

# Compress by summarizing older content
/compact

# Focus-compress on a specific topic
/compact focus on API changes when compressing
💡 Write rules you reference often in CLAUDE.md. Claude follows them consistently without them consuming context every session.
Signs that context is full
When these symptoms appear, /compact or a new session helps:
- Breaks rules you agreed on a moment ago
- Keeps re-reading the same file but reaches different conclusions
- Responses get longer but actual edit speed slows down
- Retries approaches that already failed
- Asks you to "describe the current state again" more often
💡 One time, this happened. A workshop student was in a 3-hour session when "Claude started saying strange things." The context was full. Running
/compactand saying "summarize around decisions, changed files, and remaining tasks" brought Claude back to normal. Context is memory with a capacity. Fill it up and performance drops.
Context management strategies
- Periodic compression: run
/compactevery 30–60 minutes - Focused compression: specify "compress around this topic" when compressing
- Session separation: use
/clearto start fresh when the topic is completely different - Use CLAUDE.md: save rules you'd repeat every session to CLAUDE.md
② Tools: What Claude Can Actually Do
Claude Code doesn't just talk. It uses Tools to cause real actions. Five categories:
- File operations: read, edit, create new files, rename, delete
- Search: pattern matching, regex, codebase navigation, file search
- Execution: shell commands, server startup, testing, Git operations
- Web: search, look up official docs, find error messages
- Code analysis: detect type errors after edits, go-to-definition, find-references
Seeing these tools in action explains why Claude Code feels different from chat. Chat returns text. Claude Code creates files, runs commands, checks results, revises again.
Tool use happens with your permission. You decide which tools are used and to what extent. This leads directly to the next concept.
The range of available tools expands through plugins. The base tools handle most work, but installing the GitHub plugin adds "read and write GitHub repos." Installing the Notion plugin adds "read and write Notion pages." Plugins extend the toolset.
③ Permissions: Setting the Allowed Scope Yourself
Powerful tools need safety mechanisms. Claude Code lets you control which actions are allowed for each type of work.
Three rules:
- Allow: execute automatically without asking
- Ask: ask for approval each time
- Deny: never execute under any circumstances
# View and manage permission settings
/permissions
⚠️ Priority order: Deny > Ask > Allow. A Deny rule always overrides an Allow targeting the same path.
When starting out with Claude Code, the recommended setup is: file reading as Allow, file modification and shell commands as Ask. Expand the Allow scope as you get comfortable.
Permissions are managed at three levels:
- Global (
~/.claude/settings.json): applies to all my projects - Project (
.claude/settings.json): applies to this project only - Local (
.claude/settings.local.json): this project, not committed to git
④ Memory: Long-Term Memory with CLAUDE.md
When a session ends, the conversation is gone. That's where CLAUDE.md comes in — an instruction file that's read automatically at the start of every session. A memo that persists.
Scope varies by location:
./CLAUDE.md: current project only (shareable with team)~/.claude/CLAUDE.md: all my projects (global)./CLAUDE.local.md: my project settings only (not committed to git)
What I recommend including when you first create a CLAUDE.md:
## Base rules
- Always reply in English
- Explain the change plan before modifying code
- Edit only one file at a time

## Project info
- Stack: Next.js 16, TypeScript, Tailwind CSS v4
- Deploy: Vercel
- Coding style: named exports, inline types

## Restrictions
- Do not directly modify package.json
- Do not push directly to main branch
Detailed writing guidance in chapter 08, where we go deep on the CLAUDE.md file itself.
⑤ Session: The Beginning and End of a Conversation
One complete run from open to close is a session.
- When a new session starts, the previous conversation disappears (CLAUDE.md stays)
- Files and settings created during a session remain on disk
- Name a session to resume it later in the same context
# Continue the most recent session
claude --continue

# Choose from previous sessions to resume
claude --resume

# Resume a named session
claude --resume project-a

# Try a different direction from the same point (fork)
claude --continue --fork-session
Small habits for managing sessions well:
- Use
/renameto name long sessions - Start each day with
claude --continueto pick up where you left off - Use
/clearwhen switching to a completely different topic
Naming sessions well makes context switching easier when running multiple projects. "shopping-mall-redesign" and "api-refactor" as explicit names, then claude --resume shopping-mall-redesign when needed. People need notes to switch work contexts; Claude benefits from session names the same way.
The Pause-and-Confirm Pattern: Not a Bug
This is not a bug — it's a deliberate safety mechanism. A chance to double-check intent before modifying files or running commands. The value of this step grows with the irreversibility of the action (deletion, deployment, DB changes, etc.).
At first this confirmation feels like friction. But after three times of "wait, that's not what I meant" — you appreciate it. Especially mid-large-task when direction has drifted slightly, this check catches it.
Three Permission Modes: Cycle with Shift+Tab
Default
Confirms before every file modification and shell command. Safest mode.
Auto-Accept
Files modified automatically, shell commands still confirmed. Middle ground.
Plan Mode
Read and analyze only, no changes made. For seeing the picture first.
One Shift+Tab cycles to the next mode.
- Default: confirms before every file modification and shell command. For beginners or important work.
- Auto-Accept: files modified automatically, shell commands still confirmed. After getting comfortable, for speed.
- Plan Mode: read and analyze only, no changes made. To see the full picture before a major change.
Same request, different modes
"Replace 'old phrase' with 'new phrase' across all documents in this folder"

Default     → Confirms before each file: is this modification approved
Auto-Accept → Files modified automatically, commands like git commit still confirmed
Plan        → Shows "which file, which line, what change" without making any changes
🖥️ Developer example: deleting all console.logs
"Delete all console.log statements from every JavaScript file"

Default     → Confirms per file
Auto-Accept → Files automatic, only git commit-type commands confirmed
Plan        → Shows which files and lines will be deleted, then waits
For operations touching the entire codebase, Plan Mode to check scope first dramatically reduces mistakes.
Start with Default to develop a feel for what's being done. Move to Auto-Accept once you're comfortable.
Checkpoints: Undo Even If Something Goes Wrong
Right before modifying a file, Claude automatically saves a snapshot. Two ways to recover from a mistake:
- Press
Esctwice in a row to revert to the previous state - Or just say: "undo what you just did"
This feature lets you experiment boldly without "what if I mess up" anxiety. It's one of the core reasons experimentation speed is high. Without checkpoints, many people would use Claude Code more cautiously, in smaller increments.
That said, checkpoints don't replace Git commits. A checkpoint reverts "what just happened." Git protects "everything up to yesterday." Using both together is safest.
When These Concepts Show Up in Practice
Specific situations where each concept becomes tangible:
Context in Practice: When Claude Suddenly Misbehaves
Mid-long-session Claude breaking previously agreed rules or re-reading the same file repeatedly — context is full. Continuing without intervention causes drift.
Fix: run /compact and say "compress around decisions, remaining work, and changed files." Usually enough to get back on track.
Tools in Practice: Watching the Agentic Loop Run
The most surprising moment for first-time users. "Analyze everything in this folder" — and it opens every file, runs code, presents results. That reaction is common — it feels more like a coworker than a chatbot.
Yes. It uses tools. The Claude model doesn't read files itself — it calls a file-reading tool, then decides the next action based on the result. This tool-action cycle is the agentic loop.
Permissions in Practice: Before You Hit Y
When Claude asks for sudo access to change system settings — don't automatically say yes. Ask why.
> Explain why you need sudo. Tell me if there's a way to do this without it.
That one question prevents a fair number of unintended system changes.
Memory in Practice: Things Worth Writing Down
If you're saying "reply in English" every session, put it in CLAUDE.md. "Explain the plan before modifying code" too. Write it once and it applies to every session.
Starting with an empty CLAUDE.md is normal. Add things whenever you think "I keep having to say this." Over time it becomes your personal AI collaborator spec.
Session in Practice: Picking Up Yesterday's Thread
Yes. claude --continue resumes the most recent session, or claude --resume [name] for a named session. The conversation is gone when a session ends, but files and CLAUDE.md remain. Coming back the next day, the files tell you where things stand.
At the end of the workday, "summarize today's work, incomplete status, and what to continue tomorrow in TODO.md" makes context recovery the next morning much easier.
When to Come Back to These Concepts
No need to memorize everything now. But when these situations arise, revisit this chapter:
| When this happens | Concept to review |
|---|---|
| Claude suddenly talks nonsense | Context (probably full) |
| Surprised by autonomous action | Tools (agentic loop) |
| Deciding what to approve | Permissions (check settings) |
| "I keep repeating the same thing" | Memory (update CLAUDE.md) |
| "I want to continue yesterday's work" | Session (--resume, --continue) |
How the Concepts Connect
These five concepts don't exist independently — they connect into one flow in actual work, each supporting the others.
Claude receives a task (Session)
  → Checks the current context (Context)
  → Forms a plan and uses tools (Tools)
  → Only within permitted scope (Permissions)
  → Records what to remember next session in CLAUDE.md (Memory)
With this flow in mind, most of Claude's behavior during work becomes predictable. Less confusion about why it pauses. More ability to actively steer direction.
When Claude asks for permission to modify a file you'll now recognize it as the Permissions check step. When it slows down or starts losing context, you'll read it as "Context is getting full." The concepts become a language for the behavior.
These five concepts are reference points you'll return to throughout your time using Claude Code. You don't need to fully understand them right now. They get clearer with use.
Understanding them versus not — the gap grows over time. Knowing where to look when things break: that's the biggest value of this chapter.
Before You Leave This Chapter
- Can picture the four steps of the agentic loop (Read → Plan → Edit → Verify)
- Remember at least two of the five signs that context is full
- Have used at least one of
/compact,/context, or/permissionsin practice - Understand the three CLAUDE.md locations (global, project, local)
- Can explain the difference between Default, Auto-Accept, and Plan Mode
The next chapter (chapter 08 on the CLAUDE.md file) goes deep on how to write and manage the long-term memory system. A direct extension of the Memory concept from this chapter.
Mastering CLAUDE.md
Master CLAUDE.md: Claude's long-term memory system.
08. CLAUDE.md — Ending the "Stranger Every Session" Problem
If it's been annoying that Claude forgets everything when a session ends, one file fixes that. Write it once properly, and you'll never have to introduce your project from scratch again.
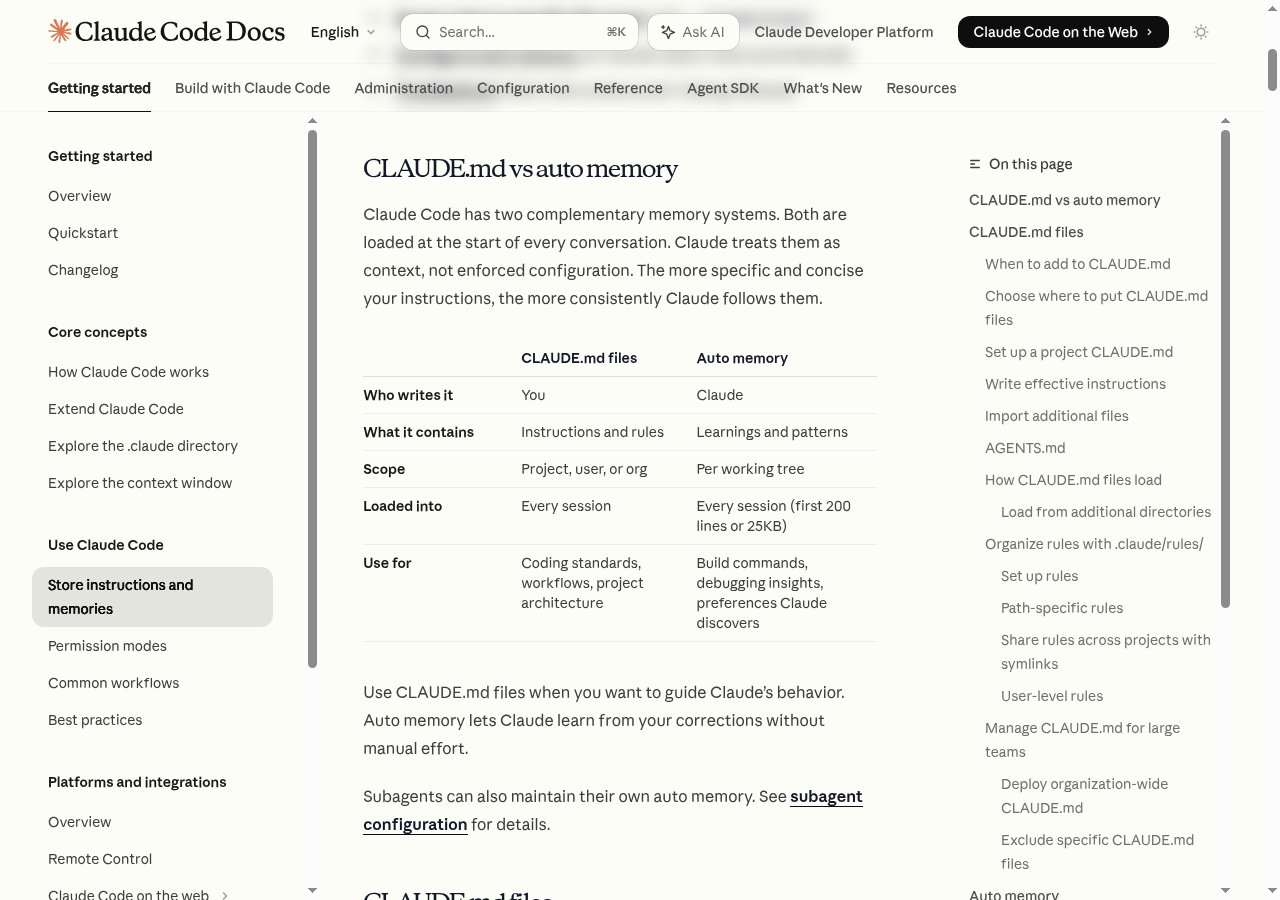 Source: Memory & CLAUDE.md — Anthropic Docs
When I first saw this diagram, I stopped at "why do we need three levels?" After using it for a while, the reason became clear. Global preferences (language, code style) should follow you everywhere, project rules should stay in the project, and personal local settings shouldn't be visible to teammates. Without the hierarchy, you have no idea which rule wins.
"I Keep Repeating the Same Thing Every Session"
The moment students in my workshops connect with this most is when they realize how much time they spend re-explaining the project at the start of each session. "This project uses TypeScript," "commit messages should be in English," "we use pnpm" — repeated every single day. Three minutes of repetition daily adds up to over an hour a month.
CLAUDE.md breaks that loop. Claude Code reads it automatically at startup, so every session begins with Claude already knowing your context.
Here's what the difference looks like:
[Without CLAUDE.md]
"This project is built with Next.js, uses TypeScript.
 Two-space indentation, commit messages in English."
→ Explained again every session

[With CLAUDE.md]
↑ That info is baked into one file
→ Work starts with context already loaded
💡 Here's something that actually happened. One of my students was copy-pasting "This project is React + TypeScript, uses Tailwind, pnpm, commit messages in English" at the start of every single session. They thought that was just how it worked. After they made a CLAUDE.md, their first reaction was "I wish I'd known about this sooner." The rule that made the biggest difference for them was "before any modification, tell me what you're about to do." They'd been anxious about code changing unexpectedly, and that one line removed the anxiety.
Placement Determines Scope
Different locations mean different reach. Closer to the current folder means higher priority.
./CLAUDE.md: Current project only (shareable via Git)../.claude/CLAUDE.mdis also officially supported../CLAUDE.local.md: Your personal project settings. Running/initwith the personal option adds it to.gitignoreautomatically.~/.claude/CLAUDE.md: Applies to all your projects globally- Managed policy (Enterprise): A
CLAUDE.mddeployed by your organization's IT (/Library/Application Support/ClaudeCode/CLAUDE.mdon macOS,/etc/claude-code/CLAUDE.mdon Linux/WSL,C:\Program Files\ClaudeCode\CLAUDE.mdon Windows). Users cannot opt out.
The most common starting point is ./CLAUDE.md in the project root. Two ways to create it:
# Create an empty file and write it yourself
touch CLAUDE.md

# Let Claude generate a draft
/init
/init scans your current folder and drafts the file automatically. Best cure for blank-page paralysis.
"What Should I Actually Write?" — What Tripped Me Up at First
There's no fixed format. It's free-form Markdown. Fill in these five categories and you'll see immediate results.
💡 "Project" here doesn't mean only code projects. Research folders, content folders, workflow automation folders — all of them work the same way.
Category ① Work Overview
One or two lines about what this folder is for. No need for detail — just enough for Claude to answer "what kind of project is this?"
## Work Overview
This folder is a competitor market research project.
Results go into the reports/ folder as Markdown files.
Category ② Tools & Environment
What tools, resources, and storage methods you use. Even one line is dramatically better than nothing.
## Work Environment
- Tools: Notion (planning), Google Docs (drafts), Canva (design)
- Storage: docs/ folder in Markdown format
- Language: Korean primary, English sources get translated summaries
Category ③ Working Rules
Guardrails for style, naming, sourcing. Vague instructions like "be friendly" don't work well. "No statistics without a source" is verifiable and works much better.
## Working Rules
- Tone: warm and clear (no exaggerated language)
- File names: YYYY-MM-DD_topic.md format
- No statistics or figures without a cited source
- Match the language of the prompt unless I specify otherwise
Category ④ Prohibited Actions
Explicitly listing what not to do prevents accidents. Whenever you experience a mistake, add it here immediately.
## Never Do This
- Cite statistics without a source
- State unverified information as fact
- Expose customer or partner names in documents
- Overwrite previous file versions (always include date in filename)
Category ⑤ Formats for Recurring Outputs
Bake in the skeleton of outputs you produce repeatedly. If Claude already knows what a meeting summary should look like when you say "write a meeting summary," everything goes smoother.
## Recurring Task Formats
- Research report: "Summary → 5 key insights → Source list"
- Meeting notes: "Decisions → Action items (owner + deadline) → Open issues"
- Document review: Lead with a summary, mark anything needing changes with a reason
Ready-to-Use Templates by Domain: Just Fill in the Blanks
Template A: Real Estate & Market Analysis Workspace
# Market Analysis Project Rules (CLAUDE.md)

## Project Purpose
- Goal: [Region, time period, and target in one line]
- Deliverables: report.md (summary), data.md (raw data), brief.md (1-page executive brief)

## Data & Folder Rules
- Raw sources go in sources/ (filename: YYYY-MM-DD_source_title.md)
- Processed data goes in data/ as csv/xlsx
- Personal notes and hypotheses go in notes/ (keep separate from source material)

## Source Reliability
- Every figure must include its source and measurement criteria
- Source tier: A (government/primary) / B (industry reports/secondary) / C (blogs/opinion)
- Estimates get labeled "estimated" with the calculation method

## Output Format
- Korean, keep sentences short
- Default structure: ① 5-line summary ② 5 key insights ③ 3 counter-scenarios/risks ④ 3 next actions
Template B: Content Creation Workspace
# Content Creation Rules (CLAUDE.md)

## Brand Tone
- Warm but no hype ("perfect," "revolutionary," "guaranteed" are banned)
- Audience: [Target reader in one line], jargon gets a short parenthetical explanation

## Format by Channel
- Blog: 3 title candidates → body (4–6 subheadings) → checklist → 1 CTA
- Instagram: 7–9 card slides (one sentence per card), final card has summary + link
- Newsletter: 3-line summary → 600–900 word body → preview of next topic

## Restrictions
- No competitor names (use "Company A" / "Company B" if needed)
- Numbers without sources get labeled "(example)"

## File Output
- Drafts: drafts/YYYY-MM-DD_topic_channel.md
- Final: final/ folder, top metadata includes version, reviewer, publish date
Template C: Business Operations Workspace
# Operations Rules (CLAUDE.md)

## Company & Product Context
- Product: [name] / Customers: [target] / Core value: [one line]
- Accumulate term definitions below: [term: definition]

## Communication Style
- Email/messages: formal, 3 paragraphs (summary → detail → next steps)
- Handling complaints: "1 empathy sentence → 2 clarifying questions → 2 resolution options"

## Document Templates
- Meeting notes: Purpose / Decisions / Action items (owner + deadline) / Issues
- Proposals: Problem → Solution → Timeline/scope → Cost → Risk

## Security & Sensitive Data
- Mask personal/payment info (e.g., 010-****-1234)
- Before sharing externally: print "confidentiality check + client name review list" first
🖥️ Developer Template (Next.js + TypeScript)
# Project Instructions

## Project Overview
[1–2 lines]
Example: Inventory management SaaS for small businesses. Next.js 14 App Router + TypeScript + Supabase.

## Tech Stack
- Framework: Next.js 14 (App Router)
- Language: TypeScript (strict)
- Styles: Tailwind CSS
- Backend: Supabase
- Package manager: pnpm
- Deploy: Vercel

## Coding Rules
- Components: PascalCase
- Functions/variables: camelCase
- Constants: UPPER_SNAKE_CASE
- No `any`, all functions need explicit return types

## Common Commands
pnpm dev, pnpm build, pnpm test, pnpm lint

## Never Do This
- Use npm or yarn (pnpm only)
- any types
- Hardcode env vars in code

## Git Commit Rules
- English, "type: description" format (e.g., feat: add user login page)
Global Memory: Your Preferences, Any Project
Whatever you put in ~/.claude/CLAUDE.md applies automatically whenever you open Claude Code, regardless of folder.
# Edit the global CLAUDE.md
nano ~/.claude/CLAUDE.md
The first line I added when setting this up on WSL2 was "always respond in Korean." English answers to Korean questions were happening occasionally, and that one line stopped it entirely. The second addition was "for changes that are hard to undo, ask for confirmation first." Those two lines cover about 70% of what I need from a global config.
# Global Settings (All Projects)

## Personal Preferences
- Always explain in Korean
- Before modifying anything, describe what you're about to do
- For hard-to-reverse changes, ask for confirmation

## Coding Style (Universal)
- Keep functions short (20 lines max)
- Variable names should be self-explanatory
- Code should read itself — minimize comments
Priority: The More Specific Rule Wins
When multiple CLAUDE.md files apply simultaneously, which one takes precedence? The answer is simple: the more specific one.
Load order: read top to bottom, concatenated. What loads later wins.
① Managed policy (Enterprise) — loaded first, cannot be turned off
② ~/.claude/CLAUDE.md (personal global settings)
③ ./CLAUDE.md (or ./.claude/CLAUDE.md) — shared project settings
④ ./CLAUDE.local.md — personal project settings (wins over everything)
If global says "2-space indentation" but the project CLAUDE.md says "use tabs," the project wins. Within the same directory, CLAUDE.md is read first and CLAUDE.local.md is appended after it.
💡 Managed policy is a "policy" — users can't disable it, but in load order it comes first, with everything else stacked on top.
💡 Use
@path/to/fileimport syntax to pull in other files (@README.md,@~/.claude/personal.md, etc.).
Good CLAUDE.md vs Weak CLAUDE.md: Lessons from the Field
Verifiability, Not Length, Is What Matters
A good rule is one you can check was followed. Here's the difference between vague and verifiable:
| Vague Rule | Verifiable Rule |
|---|---|
| "Write good code" | "Follow TypeScript strict, never use any" |
| "Be friendly" | "Final answer in English, just list changed files and verification result" |
| "Care about security" | "Never hardcode API keys, tokens, or passwords. Use .env.local" |
| "Write good docs" | "Docs structure: title → summary → procedure → checklist" |
💡 Here's something that actually happened. During a workshop CLAUDE.md review, I saw one that said "always write clean code." Good intention, but "clean" means something different to everyone — including Claude. After changing it to: "functions max 20 lines, 2-space indentation, variable names as verb+noun form" — all three lines are checkable. After that, nobody said "this function is too long" during code reviews.
Quick Edit with /memory
Want to edit CLAUDE.md during a session?
/memory
A file picker opens and you can edit right there.
Import Other Files with @
Rather than cramming everything into CLAUDE.md, split detailed content into separate files and reference them with @.
# Project Instructions

See @README.md for the project overview.
See @package.json for available npm scripts.

## Additional Rules
- Git workflow: @docs/git-guide.md
Starting a New Project: CLAUDE.md First
/init
Or just ask directly:
This folder is a competitor market research project.
Results go in the reports/ folder as Markdown.
Every claim needs a source. Write in Korean.
Create a CLAUDE.md based on this.
🖥️ For developers: "This project uses Next.js 14 + TypeScript + Tailwind, with pnpm. Create a CLAUDE.md."
The Top Things Added in the First Three Months
Looking at CLAUDE.md files that students build in workshops, certain content tends to accumulate over time. Start with these and skip the trial and error.
"Before any modification, tell me what you're planning to do" Unexpected file changes are unsettling. This one line removes the unease.
"Before fixing an error, explain the cause first" If Claude just fixes it, you never learn why. Adding "explain first" grows your own understanding alongside the work.
"Don't touch non-code files (images, config, env vars)"
I learned this the hard way when .env.local got overwritten. Added it immediately after.
"Don't say 'done' without confirming the build passes" This dramatically reduces the "all done" + build error situation.
When the Team Uses CLAUDE.md Together
Working solo is straightforward, but conflicts emerge when teams get involved. Patterns I've seen and how to handle them.
Separate Shared (./CLAUDE.md) from Personal (./CLAUDE.local.md)
Rules everyone must follow go in ./CLAUDE.md. Personal preferences go in ./CLAUDE.local.md. The .local file is automatically excluded from Git.
./CLAUDE.md         # Team rules — included in Git
./CLAUDE.local.md   # Personal preferences — auto-excluded
When Rules Conflict
Global says 2-space indentation, project says tabs? The project wins. But when this conflict is hidden, it's hard to debug. When creating a project CLAUDE.md, add a brief "things that override global settings" note. Makes it easier to find later.
What If Someone Accidentally Overwrites It
Git history keeps everything. That's usually enough, but for teams with frequent changes, adding a rule that CLAUDE.md changes require a PR review is reasonable.
When CLAUDE.md Gets Too Long
At some point you'll cross 300 lines. Claude spends more context just reading it. Two strategies:
Split and reference
## Detailed Coding Rules
See @docs/coding-standards.md for details.

## API Design Principles
Follow @docs/api-design.md.
Keep the essentials in CLAUDE.md, move detailed content to separate docs, link with @ imports.
Most-used rules at the top, rarely-used at the bottom
Claude weighs content near the top more heavily. Put daily-use rules (commit format, language setting, prohibitions) at the top. Special-case rules go toward the bottom.
Summary at a Glance
| Item | Core |
|---|---|
| Role | Claude's long-term memory and project instructions |
| Location | CLAUDE.md in the project root |
| Global | ~/.claude/CLAUDE.md |
| Auto-generate | /init |
| Edit | /memory or any text editor |
| Format | Free-form Markdown |
| Core principle | Verifiable criteria, not vague instructions |
| Priority | CLAUDE.local > ./CLAUDE > ~/.claude/CLAUDE > managed (top wins) |
| File splitting | Use @ imports when it gets long |
Real-World Impact: With vs Without
Here's how the same first message plays out differently:
Without CLAUDE.md
User: Build me a login page
Claude: What tech stack are you using?
        React or Vue?
        Are you using TypeScript?
        ...
Three to five rounds of Q&A before any actual work.
With CLAUDE.md
# CLAUDE.md contents:
- Next.js 15 + TypeScript + Tailwind
- Components go in /components
- Pages go in app/ (App Router pattern)
User: Build me a login page
Claude: I'll create app/login/page.tsx.
        It'll include email/password fields and a submit button,
        with the form extracted to /components/LoginForm.tsx.
        Shall I proceed?
The first response is already an action plan.
The Best CLAUDE.md Is the One You Actually Have
Don't wait to make it perfect. A 5-line CLAUDE.md beats none, and one you write today beats a perfect one you plan to write someday. Wrong rules can be fixed. Missing ones can be added.
Start with the one thing that annoys you most right now. That's enough.
Top 10 Annoyances Solved by CLAUDE.md
Things that students in the workshops said were resolved after writing their CLAUDE.md:
- Re-explaining the tech stack every session → "Tech environment" section
- Commit messages coming out in the wrong language → Language rule
- Files changing without warning → "Show plan before modifying" rule
- "All done" with a broken build → "Confirm build before claiming done" rule
- Answers that are way too long → "Just list changed files and results" rule
- Repeating the same error → "Prohibited actions" section to record root causes
- Folder structure getting rearranged → "No folder structure changes without asking" rule
- Document format changing every time → "Output formats" section
- Touching .env files → "Never touch environment config files" rule
- Ignoring team conventions → Git-committed
./CLAUDE.mdrules
If any of these is bothering you right now, put that one in your CLAUDE.md first. Don't try to fill the whole list — start with today's biggest pain point.
Appendix: Commands You'll Use with CLAUDE.md
# Auto-generate a CLAUDE.md draft for the current project
/init

# Quickly edit CLAUDE.md during a session
/memory

# Edit the global CLAUDE.md directly (macOS/Linux)
nano ~/.claude/CLAUDE.md
# or
code ~/.claude/CLAUDE.md

# Reference other files from within CLAUDE.md
@README.md
@docs/coding-rules.md
@package.json

# Request a CLAUDE.md when starting a folder from scratch
"Create a CLAUDE.md for this folder.
 Read the current file structure to understand the project, then write a draft."
CLAUDE.md Health Check
Quick checklist to verify your CLAUDE.md is actually working:
Open a new session and confirm:

□ Does Claude start without asking about the tech stack again?
□ Does it automatically follow the commit message format?
□ Are "Never Do This" rules actually being respected?
□ Does output match the format defined in CLAUDE.md?
□ Does it show a plan before making modifications (if that's configured)?

Any "no" means that rule needs to be more specific.
Run this check in week one of a new project, then again a month later. Verifying that rules actually work is the most efficient way to improve your CLAUDE.md over time.
How CLAUDE.md Changes the Relationship
When you work with someone for a long time, you learn their patterns. "This person always wants a 3-line summary first," "this person hates it when I suggest things without being asked." Picking that up normally takes months.
Claude Code starts every session as a stranger. CLAUDE.md is how you skip that learning curve. Write down how you work, what you want, what you don't — and every new session starts feeling like a three-month-old collaboration instead of a first meeting.
At first it might feel odd to "explain yourself to an AI." But when a new team member joins, we explain "here's how we work on this team." CLAUDE.md is that onboarding document. Instead of repeating the same onboarding every session, you write it once and let it apply automatically.
Evolving CLAUDE.md Over Time: The Feedback Loop
The most effective way to improve your CLAUDE.md is to run this at the end of a session:
"Look at our conversation today.
 What did I have to explain more than once?
 What did you do that I didn't want?
 Suggest additions to CLAUDE.md based on those patterns."
Claude scans the conversation history and proposes missing rules. Agree and add them; disagree and skip. Two minutes, tops. Maintain this loop for a month and your CLAUDE.md will naturally evolve to match your actual working patterns — no separate planning needed.
Monthly Review
Once a month, scan through your CLAUDE.md and ask: "Does this rule still make sense?" Projects change, and so should their rules. Old rules that conflict with new workflows are a hidden source of confusion.
For Teams: Quarterly Retrospective
For a shared ./CLAUDE.md, a quarterly review works well. Three questions: "Did this rule actually help?", "What should we add?", "What can we remove?" Fifteen minutes covers it.
CLAUDE.md Maturity Stages
Here are four stages I see when reviewing students' CLAUDE.md files. Find where yours is and see the path forward.
Stage A — Empty or missing
Every session starts with re-explanation, or you keep a text file of prompts to paste.
Fix: Run /init — five minutes to a working draft.
Stage B — Role description only "This is an e-commerce site, built with React + TypeScript." Context exists, but no rules. Fix: Add a "Never Do This" section. Pick three things that have annoyed you and ban them.
Stage C — Rules exist but are vague "Write good code," "respond quickly," "be helpful" — subjective criteria throughout. Fix: For each rule, ask "how would I verify this was followed?" Replace unverifiable ones with concrete standards.
Stage D — Rules are specific and verifiable Checkable criteria, prohibited actions, output formats — all defined. Sessions start well from the beginning. Fix: Check whether it's getting too long. Over 100 lines, consider splitting content into referenced files.
Before You Close This Chapter
- There is a
CLAUDE.mdfile in your current working folder (or you created one with/init) - You've written at least one item in the "Never Do This" section
- You've taken one vague instruction ("do it nicely") and turned it into a verifiable criterion
- You've added at least "respond in English" to the global settings (
~/.claude/CLAUDE.md) - You've run
/memoryonce and confirmed the edit screen appears
The next chapter (09 Commands) covers which session commands work together with the CLAUDE.md you just created. If CLAUDE.md is the "memory," commands are the handles that retrieve and manage it.
Commands
A complete reference for CLI commands, slash commands, keyboard shortcuts, and alias setup.
09. Commands — The Handles That Get You Through the First Week
When you first open Claude Code and see the command list, "do I have to memorize all of this?" is a completely normal reaction. In practice, you'll use fewer than five commands in the first week. The rest you look up when you actually need them.
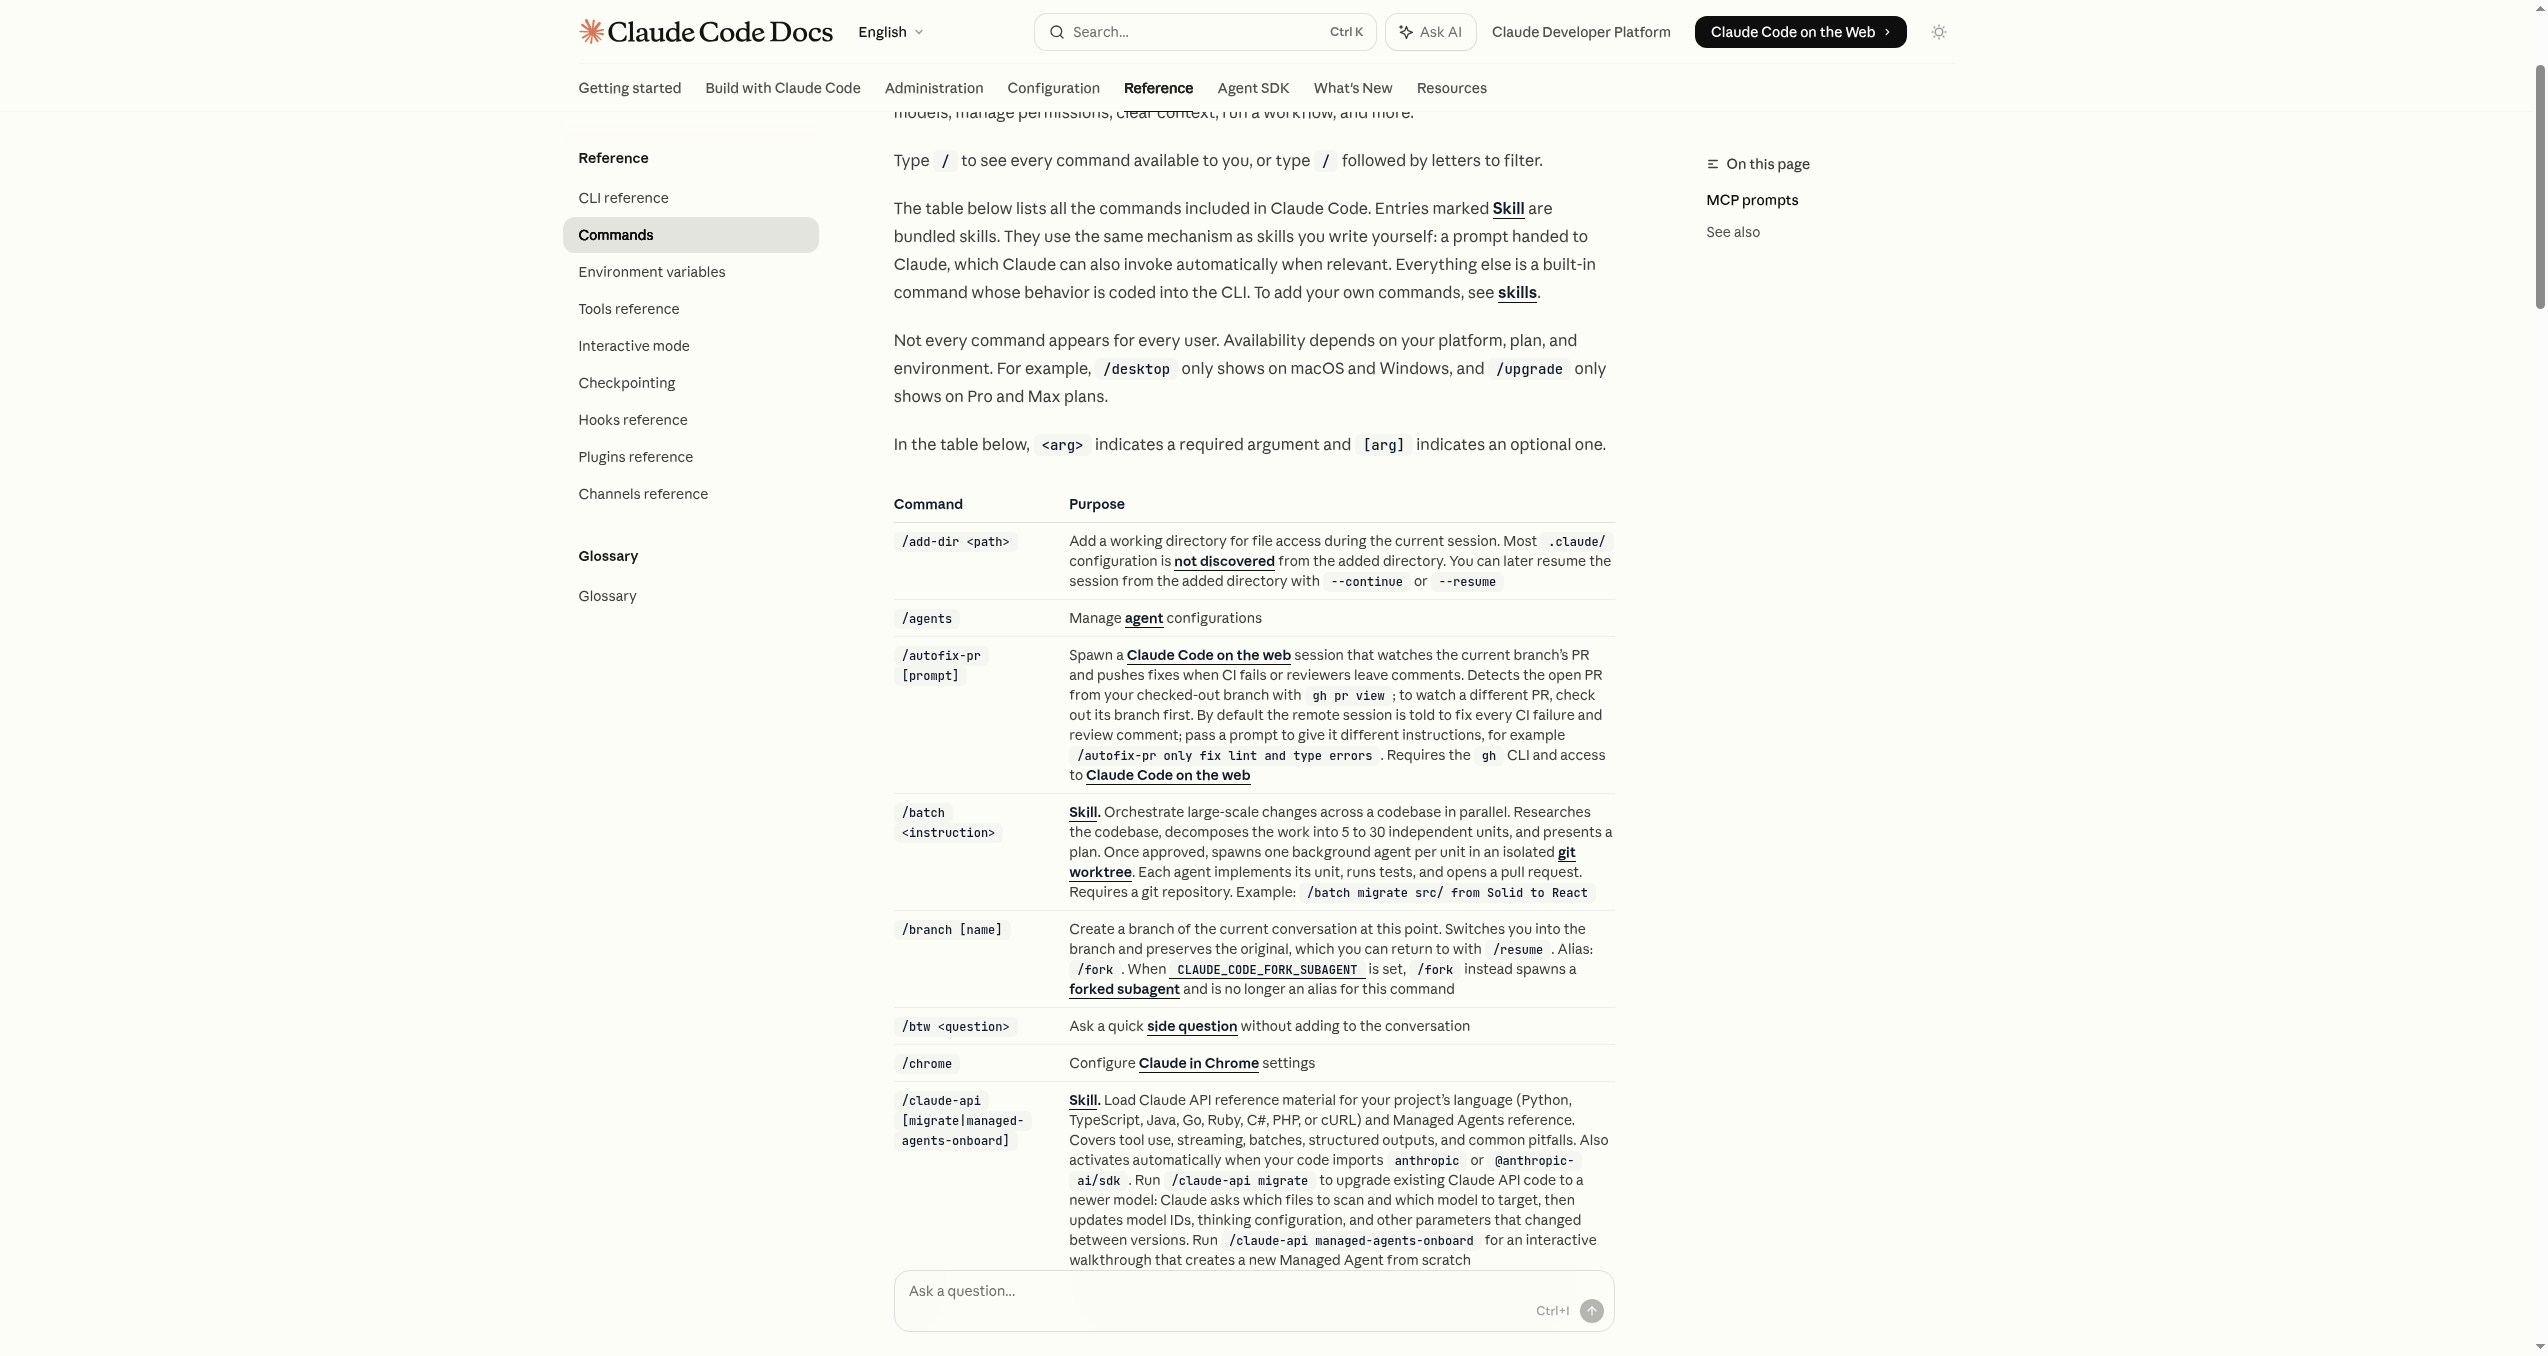 Source: Slash Commands — Anthropic Docs
Commands Come in Three Groups
CLI Commands
Typed outside Claude Code. claude, claude --version and other launch commands.
Slash Commands
Typed inside Claude Code, starting with /. Session commands like /help and /compact.
Keyboard Shortcuts
Ctrl+C, Shift+Enter and other shortcuts to speed up interaction.
Grouping them by where you type them clears up the confusion.
- CLI commands: Typed in the terminal outside Claude Code (
claude,claude --version, etc.) - Slash commands: Typed in the conversation inside Claude Code (
/help,/compact, etc.) - Keyboard shortcuts: Pressed with your fingers during conversation (
Ctrl+C,Shift+Enter, etc.)
The Five Fingers for the First Week
Start with just these five. Trying to memorize the whole list at once means you end up using none of them. I made that mistake too — spent time organizing everything and ended up not actually running anything.
claude: Start/compact: Tidy up when conversation gets long/clear: Switch to a completely different taskCtrl+C: When you want to stop/quit: When you're done
Find everything else with /help when you need it.
💡 Here's something that actually happened. On the first day of a workshop, one student typed
claudeand got no response at all. Turned out Claude Code wasn't properly installed due to a Node.js version conflict. The first check wasclaude --version— it came back "command not found." That's when I made this checklist: 1 —which claude, 2 —node -v, 3 —npm list -gto verify installation. Half of all install problems get caught in these three steps.
Group ①: CLI Commands (Typed in the Terminal)
These commands launch and control Claude Code. In order of how often you'll use them:
Starting, Stopping, Checking
claude: Start interactive modeclaude "question": Start and ask something immediately (e.g.,claude "explain this project")claude -p "question": Print the answer and exit (great for scripts)claude -c: Resume the most recent sessionclaude --version(or-v): Check versionclaude --help: View helpclaude update: Update to the latest version
Of these, claude is the one you use every day. --version is the first thing you check when something seems off. Everything else is for special situations.
Choosing a Model
# By full model ID
claude --model claude-opus-4-7
claude --model claude-sonnet-4-6

# Using short aliases
claude --model opus     # Opus 4.7 (Max/Team Premium default)
claude --model sonnet   # Sonnet 4.6 (Pro/Team Standard default)
claude --model haiku    # For lightweight tasks
claude --model opus[1m]    # Opus 4.7 with 1M context (for very large codebases)
claude --model sonnet[1m]  # Sonnet 4.6 with 1M context (for very large codebases)
My pattern: I usually just start with claude. On days with complex architecture work or tricky refactoring, I start with claude --model opus. For simple file conversions or repetitive tasks, haiku is more than enough. Switching models isn't just about cost — the right model for the task weight also affects response speed.
Options to Tuck In at Startup
# Start in Plan Mode (plan only, no file changes)
claude --permission-mode plan

# Resume a named session
claude --resume session-name

# Pick from a list to resume
claude --resume
💡 Just
claudeis enough to start. Learn the options one at a time as you need them.
Group ②: Slash Commands (Typed During Conversation)
Start with / in the chat window and special features open up. Organized by how often you'll use them:
The Ones You'll Use Every Day
/help: See all available commands/compact: Compress conversation (essential for long sessions)/clear: Completely reset the conversation/usage: Session cost, plan limits, activity stats (/costand/statsare aliases)/model: Change the model mid-session/permissions: View and manage permissions/memory: Edit CLAUDE.md/quitor/exit: Exit
Looking back at two weeks of actual use, /compact and Ctrl+C account for 90%. Long conversation? /compact. Wrong direction? Ctrl+C. Building those two habits is step one.
The Ones You'll Need Occasionally
/plan: Enter Plan Mode/init: Generate a CLAUDE.md draft for the project/doctor: Check installation health/config: Settings screen (theme, model, editor mode, etc.)/branchor/fork: Branch the conversation at the current point/context: Visualize context token usage/rename [name]: Name a session (resume with--resume name)/bug: Send a bug report to Anthropic/login//logout: Log in or out of your account/rewind: Rewind conversation and code to an earlier point
Slash Commands Accept Arguments Too
> /compact
→ Standard compression

> /compact focus on code changes and decisions
→ You direct what to keep

> /model
→ Opens model selection menu
💡 Typing just
/in the chat brings up autocomplete.
Small Tools for Branching and Experimenting
For changing conversation direction or safely testing risky ideas:
/branch (or /fork): Keep the Original, Make a Side Branch
Branch before big refactors or structural changes, and if it doesn't work out, come back with /resume.
> /branch
→ Start a new branch from the current point
→ Return to original with /resume
Best times to use it:
- When you want to try just one of several implementation approaches first
- When you want to try a change but are worried about failure
- When you want to compare two different approaches to the same problem
I first thought of branching as "undo insurance," but after using it, it feels more like an "idea lab." You can experiment boldly because the original is still there.
/compact: When You Need to Breathe Again
When responses start slowing down, compress to stay in the same session. If you need a completely fresh start, use /clear.
> /compact focus on changes made and decisions reached
→ Context gets lighter while the session continues
💡 Here's something that actually happened. A workshop student hit
/compacttoo quickly and lost the context of a three-hour research session. After that, I always stress this in workshops: before running/compact, specify what to keep as an argument. Like/compact center on key findings so far and hypotheses still unverified. Directionless compression can cut your most important context.
/context: How Full Is the Context Right Now?
> /context
→ [■■■■■■■□□□] 70% (143,000 / 200,000 tokens)
If it's over 80%, compress with /compact or start fresh with /clear.
/rename: Label the Session
For important work, add a name so you can find it quickly next time.
> /rename housing-research-2026Q2

# Next day in terminal:
$ claude --resume housing-research-2026Q2
Group ③: Keyboard Shortcuts
A few keystrokes give you fast control over the conversation flow.
Core Shortcuts
Ctrl+C: Cancel current work (instant stop when Claude goes off track)Ctrl+D: Exit Claude CodeCtrl+L: Clear terminal screen only (conversation stays)Ctrl+R: Search previous inputsCtrl+G: Edit input in an external editorCtrl+T: Show/hide task list
Input Helpers
Shift+Enter: New line (for long instructions)Option+Enter(macOS): New line (macOS default)\+Enter: New line (works in all terminals)↑/↓arrows: Navigate previous/next inputsEsc Esc(twice): Roll back to previous state
Mode Switching
Shift+Tab: Plan Mode ↔ Normal modeOption+P(macOS) /Alt+P: Change modelOption+T(macOS) /Alt+T: Toggle extended thinking modeCtrl+B: Send current work to background, open new conversation window
Five for Day One: These Will Get You Through the Week
① /compact: Clear the Conversation
> /compact
Longer conversations get slower responses and start forgetting earlier content. Press it whenever the conversation starts feeling long. Making it a habit is the key.
② Ctrl+C: Stop Immediately
When the direction is wrong or a dangerous command slips in, don't hesitate — press it. Early on there's anxiety about "is it okay to stop?" Once you get comfortable pressing this quickly, Claude Code becomes much less stressful. Stopping a wrong direction fast is a core habit for good results.
③ /clear: Switch to a New Task
> /clear
When moving to a completely different topic, previous context following you around is more hindrance than help. Clear it and start clean.
④ Shift+Enter: Multi-line Requests
Requests that are hard to compress into one line get better results when you break them up across lines.
(Multi-line input with Shift+Enter)
Build a login page.
- Email and password fields
- Show/hide password button
- Login button (with loading state)
⑤ /usage: Check Cost and Limits
> /usage
Session cost, plan limits, and activity stats in one view. /cost and /stats are aliases for the same command. In the first month, check this occasionally to get a feel for how much you're using.
Two Mindsets That Matter More Than Memorizing Commands
The goal isn't to memorize commands. Two mindsets matter more.
First: Open /help without hesitation when you're stuck
You don't need to know specific commands in advance. Open /help when you need it. When you can do this naturally, you don't need to study commands separately.
Second: The instinct to reach for a command when something feels off
"Response is slowing down" → /compact. "Direction is wrong" → Ctrl+C. "Moving to a different task" → /clear. When this instinct develops, commands become real tools.
Once these two are in place, the rest of the commands will come to you naturally when needed.
Quick Reference by Situation
| Situation | Recommended Command |
|---|---|
| Starting Claude Code | claude |
| Conversation getting long | /compact |
| Switching to a completely new topic | /clear |
| Need to stop mid-execution | Ctrl+C |
| Ending the session | /quit or Ctrl+D |
| Continuing yesterday's work | claude --continue |
| Returning to a specific session | claude --resume [name] |
| Plan first, execute later | claude --permission-mode plan |
| Checking cost and limits | /usage |
| Naming a session | /rename [name] |
| Creating a conversation branch | /branch or /fork |
| Checking installation health | /doctor |
| Editing CLAUDE.md | /memory |
🖥️ For Developers: Shorten Commands with Terminal Aliases
If typing long options every time is a hassle, bundle them as aliases.
macOS · Linux (zsh)
Add to ~/.zshrc:
alias cc='claude'
alias ccd='claude --dangerously-skip-permissions'
alias ccr='claude --resume --dangerously-skip-permissions'
Apply to new shell:
source ~/.zshrc
Windows (PowerShell)
Define functions in $PROFILE:
function cc { claude @args }
function ccd { claude --dangerously-skip-permissions @args }
function ccr { claude --resume --dangerously-skip-permissions @args }
Restart PowerShell to apply.
Alias Quick Guide
cc: Basic start (always)ccd: Auto-approve permissions (for trusted projects and quick tasks)ccr: Resume previous session + auto-approve (for picking up yesterday's work)
⚠️
--dangerously-skip-permissionsauto-approves all permission checks. Use only for your own projects or in isolated environments.
One-Page Cheat Sheet
[ Terminal ]
  claude                    → Start
  claude -v                 → Check version
  claude --help             → View help
  claude -c                 → Resume last session
  claude --resume [name]    → Resume named session
  claude --add-dir [path]   → Include additional directory

[ Aliases (after setup) ]
  cc / ccd / ccr            → Basic / auto-approve / resume+auto-approve

[ Chat window ]
  /help                → Full command list
  /compact             → Compress conversation (use often!)
  /clear               → Reset conversation
  /branch (/fork)      → Create branch
  /context             → Check context usage
  /usage               → Cost, limits, stats (/cost·/stats aliases)
  /model               → Change model
  /rename [name]       → Name the session
  /bug                 → Send bug report
  /quit                → Exit

[ Keyboard ]
  Ctrl+C               → Cancel work
  Ctrl+D               → Exit
  Ctrl+B               → Background / new window
  Shift+Enter          → New line
  ↑↓                   → Navigate previous inputs
  Esc Esc              → Roll back to previous state
Command Groupings: Why They're Separated This Way
"Why are slash commands and CLI commands separate?" is a question I hear in workshops regularly. There's a reason.
CLI commands control what happens before Claude Code starts — how to launch it, which model, which session to resume, what permission mode to use. These are pre-startup decisions.
Slash commands are tools for adjusting the conversation flow while Claude Code is already running. Cleaning up memory with /compact, switching models with /model, creating experiment space with /branch — these are mid-session needs.
Keyboard shortcuts replace typing. They perform common actions faster than typing commands.
Once you see the three groups this way, when you encounter an unfamiliar command you can identify "which group is this in?" before trying to understand it.
Using Slash Command Autocomplete
Typing / in the chat brings up the autocomplete list. This list contains two types of commands mixed together:
- Built-in commands: Claude Code's own features (
/help,/compact,/model, etc.) - Custom commands: Your own slash commands created in
.claude/commands/
Custom commands turn frequently-used prompts into reusable slash commands like /report or /analyze. The details are covered in an advanced section. For now, just know "I can create my own slash commands in addition to the built-in ones."
Note: as of 2026,
.claude/commands/still works, but Skills (.claude/skills/<name>/SKILL.md) is the recommended path. See chapter 17.
Actual Command Journal: The First Three Days
Based on what came up in real workshop sessions, here's what commands actually appeared during the first three days.
Day 1 (Mostly Exploring)
claude               ×1  (first run)
claude --version     ×2  (version check, troubleshooting)
/help               ×5  (exploring what's available)
Ctrl+C              ×3  (when Claude went off track)
/quit               ×2  (ending sessions)
Mostly exploration. Looking at /help multiple times at this stage pays off later.
Day 2 (Starting Real Work)
claude               ×2
/compact            ×3  (conversation starting to get long)
/clear              ×1  (switching topics)
Shift+Enter         ×8  (multi-line input)
Ctrl+C              ×2
/compact appears for the first time. Starting to manage lengthening conversations.
Day 3 (Routine Taking Shape)
claude --continue    ×1  (continuing yesterday's work)
/compact            ×4
/rename             ×1  (discovering session naming)
/usage              ×1  (curiosity about cost)
Shift+Enter         ×15
Ctrl+C              ×1
By day three, /compact is becoming a habit and --continue starts picking up previous work. When this pattern settles in, Claude Code becomes a real work tool.
Reality Check: Command Usage Frequency
After six months of actual sessions, the distribution looks like this:
| Command | Usage | Notes |
|---|---|---|
claude (start) | Every day | Absolute #1 |
Ctrl+C | Almost daily | Core tool for course-correction |
/compact | Multiple times daily | Essential for long sessions |
Shift+Enter | Multiple times daily | Multi-line input |
/clear | Every 2-3 days | When switching topics |
/quit | Daily | Session end |
/usage | 1-2 times/week | Cost monitoring |
claude --resume | 3-4 times/week | Picking up previous work |
/rename | At project start | Session name management |
/branch | 5-10 times/month | When experimenting |
/doctor | When problems arise | Environment check |
| All other commands | Less than 5% combined | Special situations only |
The top six cover 90%. That tells you what to practice.
Small Tips That Earn "Oh, That Exists?" Reactions
/ then Tab or arrow keys
Navigate the autocomplete list with Tab or arrow keys. For frequent commands, first letter + Tab is faster than typing the full command.
Slash commands are case-insensitive
/COMPACT, /Compact, and /compact all work.
--version and -v are identical
claude -v is faster than claude --version.
/usage, /cost, and /stats all go to the same screen
Three names because different people remember different ones.
Two Ctrl+Cs stop more forcefully
Sometimes one doesn't stop it. Two in quick succession is more reliable.
/branch and /fork are the same command
Two names for the same function.
--add-dir includes another folder
claude --add-dir /path/to/other/folder
Use this when referencing a folder outside your current working directory.
Before You Close This Chapter
- Typed
claude --versionand confirmed it outputs a version number - Opened a conversation and typed
/helpto see the command list - Ran
/compactonce and experienced the result - Used
Ctrl+Cto cancel mid-execution (confirmed immediate stop) - Typed
/in the chat and confirmed autocomplete appears
The next chapter (10 Session & Context Management) covers how these commands fit together in actual session flow. When to press /compact, when opening a new session is the better call — the judgment beyond the commands.
Session & Context Management
From context window basics to /compact, --resume, Plan Mode, and parallel sessions.
10. Session & Context Management — Ending "I Already Said That"
Conversations get hazy for people and Claude alike. Once you understand what causes the haziness, the fix becomes clear.
The Context Window: There's No Infinite Notepad
Conversation builds
Each message adds a line to the notepad
Limit approaches
Earlier content gets pushed to the margins
/compact runs
Summarizes the conversation, rewrites the notepad
Continue with summary
Picks up with key decisions and context only
Claude works by writing everything exchanged so far onto a notepad. That notepad has a finite size. As the conversation grows, the earliest content gets pushed to the margins. "I already told you that, why don't you know it?" has a precise cause — not forgetting, but content being cut off the notepad.
Technically: the context window is the maximum number of tokens the model can process at once. Claude Code uses a sliding window, so when the limit is reached, the oldest tokens are dropped first.
Both descriptions are the same picture.
As conversation grows:
  Early content starts getting cut
  → Work done earlier may be forgotten
  → Answer quality starts degrading
  → Same mistakes start repeating
Left alone, it compounds. Occasional manual cleanup is necessary.
💡 Here's something that actually happened. A workshop student said: "Claude perfectly followed my style at first, but after two hours it suddenly started answering in English and ignoring the format I'd set." They'd been doing research for four hours in one session and the context was completely full. Checking with
/contextshowed 92%. One/compactfixed it. Ever since, I tell workshop students: "/compact is like wiping a window. When it gets foggy, wipe it."
/compact: Rewriting the Notepad Shorter
/compact
Summarizes the current conversation to reduce context. The core move: preserve what matters, trim the volume.
- Important decisions and results make it into the summary
- The session continues without interruption
- When to press it: when the rhythm slows, when answers start going vague
You can direct the compression:
/compact summarize around research findings and key discoveries
/compact focus on the structure and progress of the report I'm writing
/compact keep only conclusions, reasoning, and unresolved questions
Without an argument, Claude decides what's important to keep. But context you care about might get cut. For important sessions, providing an argument is worth the habit.
Timing /compact Well
"When should I press /compact?" is something almost every student asks. Watch for four signals.
Signal ①: Response speed noticeably slows
When responses are taking significantly longer than they did at the start of the conversation, the context has gotten heavy.
Signal ②: Being asked about things already covered
"I already told you this project uses Next.js and now it's asking again?" When that happens, check with /context.
/context
→ [■■■■■■■□□□] 73%
Over 70% is compact time.
Signal ③: Starting to break earlier agreements
"I told it to respond in English and it's suddenly writing in Korean" or "I set the commit message format and it's ignoring it" — early instructions have been cut off.
Signal ④: Repeating the same mistake
Fixed once, but the same pattern came back. The correction has likely been pushed out of context.
Two Ways to Resume an Interrupted Flow
--continue: Pick Up the Most Recent Session
claude --continue
Picks up exactly where the last session left off.
- Right after closing and reopening the terminal
- Morning, continuing yesterday's work
The first time I used this, "yesterday's work is just here" felt refreshingly good. I used to start a fresh session every morning, but after switching to --continue, picking up with the previous day's context turned out to be significantly more productive.
--resume: Choose From a List
claude --resume
Shows previous sessions and lets you pick one.
- When juggling multiple projects
- When you need to go back to a specific session from a few days ago
Name sessions with /rename and navigating the list gets much easier.
# Resume directly by name
claude --resume housing-analysis-2026Q2
A Template for Starting Fresh Without Losing Context
Rather than forcing a long session to continue, starting fresh with a core summary is often more accurate.
Current work:
- Project/folder:
- Goal:
- Completed so far:
- Still remaining:
- Rules to follow:
- Files to reference:

Based on the above, assess current state first,
then propose next steps before making any changes.
Paste this into a new session and Claude reads the summary to get context immediately rather than starting from scratch. Especially effective when the session has gotten messy or the same error keeps repeating.
New Session vs Continuing: Decision Table
| Situation | Recommended approach |
|---|---|
| Completely different topic or project | New session (/clear or new terminal) |
| Claude starting to forget earlier promises | New session + re-deliver the essentials |
| Same error repeating | New session (context may be corrupted) |
| Same task, conversation just getting long | /compact then continue |
| Continuing yesterday's work today | --continue |
| Returning to a specific session from days ago | --resume |
Before Big Changes: Run Through Plan Mode First
When you're about to touch multiple files simultaneously or make a hard-to-reverse change, get the plan reviewed before execution.
Shift + Tab → Switch to Plan Mode
In Plan Mode, Claude:
- Shows only the execution plan — doesn't touch any files
- Asks "does this look right to you?"
- Only executes after approval
Best situations for it: modifying multiple files at once, restructuring folders, mass replacements, anything hard to undo.
💡 Here's something that actually happened. A student asked "refactor the entire database schema" and Claude immediately started modifying 30 files. They stopped it midway, leaving some files changed and others not, and it took two hours to recover. With Plan Mode, they would have seen a list of which files would change and how, before anything was touched. After this incident, I teach in workshops: "anything that touches five or more files starts with Plan Mode."
Parallel Sessions: The Feeling of Extra Hands
Open multiple terminals and assign different tasks to each.
Terminal 1: claude (market statistics research)
Terminal 2: claude (writing the analysis report)
Terminal 3: claude (organizing summary slides)
Each session runs independently.
⚠️ Modifying the same file from two sessions at once will cause conflicts. Dividing files and roles in advance is the safe starting point.
Parallel sessions work especially well when:
- Research (session 1) and drafting (session 2) run simultaneously
- Multiple sections are distributed across sessions
- One session handles a long-running task while another does separate work
Two Habits for a Steady Conversation Rhythm
① One Thing at a Time
The most common beginner mistake is requesting everything at once.
# Tends to fall apart
> Build login, dashboard, DB connection, API, tests, and deployment
# Gets good results
> First, set up the project structure
(confirm)
> Now build the login feature
(confirm)
> Next, add the dashboard
One task per turn, confirm, then move on. It may feel slower, but the results are faster and more accurate.
② For Multi-Day Work: Track Progress in CLAUDE.md
# Current Progress
- Login feature: complete
- Dashboard: layout finished, data connection needed
- Next: connect real-time data to dashboard
Even with a new session, Claude reads CLAUDE.md and picks up context immediately.
Two Common Scenarios: Quick Responses
Scenario ①: Answers suddenly going wrong
1) Try /compact first
2) Still wrong → new session
3) In the new session, just the essentials:
   "Working on [project]. Done so far: [summary].
    Next: [task]."
Scenario ②: Need to stop and step away
Mid-task → Ctrl+C to pause
→ Close terminal
→ Next time: claude --continue
Claude holds the state from where it was interrupted.
Context and Cost: The Direct Connection
Context management is directly tied to cost. The longer the context, the more tokens each response consumes.
For example: maintaining 100,000 tokens of context means every response incurs the input cost of 100,000 tokens. Compress to 50,000 with /compact and subsequent responses cost half as much for input.
[/compact's effect from a cost perspective]
Context 100K → /compact → Context 30K
→ 70% reduction in per-response input cost from there on
So /compact isn't just "for when it gets slow" — it's also a cost-saving tool. More on cost management in chapter 20.
Session Strategy by Work Type
Research Work
Morning: claude --continue (or --resume)
Throughout: /compact to update summary as new findings emerge
End: "Add today's findings to the progress section in CLAUDE.md"
Code Work
Morning: claude (fresh session)
During: Break at feature boundaries, git commit completed work
Before big changes: claude --permission-mode plan or /branch
When session gets long: /compact or new session + re-deliver essentials
Writing & Content Work
Morning: claude --continue (continuing yesterday's work)
Break by section: Section done → save → /compact, or new section = new session
Big structural change: Plan Mode first
Session Management Summary
| Situation | Tool | Why |
|---|---|---|
| Conversation getting long | /compact | Reduce context while keeping session |
| Continuing yesterday's work | --continue | Resume most recent session |
| Returning to specific session | --resume [name] | Return to named session |
| Fresh start | /clear | Clean start without previous context |
| Safety before big changes | Plan Mode | Review plan before execution |
| Parallel work | Multiple terminals | Independent concurrent sessions |
| Multi-day task context | CLAUDE.md progress note | Memory that persists across sessions |
| Corrupted session | New session + re-deliver essentials | Restart with clean context |
FAQ: Session Management Q&A
"New session or /compact — which is better?"
Depends on the situation. For continuing the same task, /compact is better. For corrupted context or switching to a completely different task, a new session is better. Unsure? If Claude is giving strange answers, new session. If it's just slow, /compact.
"Can I /compact too often?"
No hard limit, but doing it too often can cut important context. When context is under 50%, just continue instead of compacting. Once at 70%+ is the right balance.
"How should I name sessions?"
project-date pattern is practical. Like market-research-2026may or login-feature-may07. Having the date makes it easy to distinguish in the list later.
"What are the symptoms when the context limit hits?"
Watch for four things: slower responses, asking about things already covered, breaking earlier agreements, and repeating the same mistakes. If any of these appear, check with /context.
"Do parallel sessions cost double?"
Each session is billed independently. Two sessions running simultaneously each consume tokens. But with double the output in the same time, it's actually more efficient from a productivity-per-hour perspective.
What Changes When Session Management Becomes a Habit
It's natural to feel "why do I need to manage all this?" at first. But once session management becomes second nature:
- The "suddenly went wrong" phenomenon in long tasks disappears
/compactas a habit means lower cost and maintained speed--continuedaily creates a productive rhythm with yesterday's context- Plan Mode means noticeably fewer hard-to-recover mistakes
When these four are in place, collaboration with Claude Code stabilizes.
Session management is one of the easiest skills to learn in Claude Code, and one of the fastest to show results. If you've run /compact once today, you've already started.
Before You Close This Chapter
- Ran
/contextand confirmed the context percentage shows as a number - Ran
/compactonce and experienced how the conversation gets summarized - Used
claude --continueand confirmed a previous session resumes - Cycled permission modes with
Shift+Tab(default→acceptEdits→plan) and felt Claude showing plans without touching files in Plan Mode - Remembered the four signals that mean
/compactis needed
The next chapter (11 Getting Started with GitHub) covers a different dimension of safety net: Git and GitHub. If sessions manage memory, Git manages the history of your files.
Getting Started with GitHub
Git & GitHub essentials for Claude Code. Just say 'save this' and 'upload it'.
11. Getting Started with GitHub — The Moment "Unrecoverable Mistakes" Disappear
🖥️ This section has the most impact for people writing code. If there's no coding in your work, reading through the Non-Developer File Safety Nets below and moving on to the next section is entirely fine. Git isn't about memorizing commands — it's about earning the peace of mind that comes from knowing you can undo anything.
Not a Developer? Three Safety Nets Without Git
Files getting accidentally deleted or overwritten happens to everyone, not just coders. These three options are solid protection without ever touching Git.
- Google Docs/Notion "Version History": Restore yesterday's or last week's version with one click
- Folder snapshot before working: Ask Claude "copy the reports/ folder to reports_backup_today's-date"
- Undo the last thing Claude did: While in a Claude Code session, press
Esc Esctwice in a row
💡 Curious about Git now? Git works for any kind of file, not just code. Research materials, quarterly reports, planning documents — all of them get a safety net that lets you restore "what it looked like at midnight last night."
Why Git and GitHub?
Working with Claude Code means files change constantly. Without Git, certain moments come up regularly. You've probably experienced some of these:
- Yesterday's code worked fine; today it doesn't, and I don't know why
- Claude accidentally overwrote important code and there's no way to undo it
- A teammate and I were editing the same file and we wiped each other's work
- "I definitely fixed this yesterday" can't be proven
Git records every change so you can return to any past state at any time. GitHub backs up those records in the cloud and shares them with your team. The two come as a pair.
For Claude Code users, this pair isn't optional. Having a safety net is what lets you ask Claude to do bold things, and bold asks are what generate real productivity.
💡 Here's something that actually happened. In a workshop, one student lost two weeks of project work because Claude accidentally overwrote files. They were working without Git. The shock was understandable — but the real issue is that "the moment you need protection" always arrives without warning. Git exists for those unannounced moments. In the very next session we set up Git first, and nothing similar happened after that.
Google Drive vs Git: The One Difference That Explains Everything
This is the most confusing point for first-time Git users, and once you get it, it never confuses you again.
- Google Drive: Modify a file and it automatically syncs to the cloud
- Git: You have to save it yourself, and you have to upload it yourself
This one sentence unlocks how Git works. Git always moves in two beats:
- Save (Commit): Record the change on your computer
- Upload (Push): Send that record to GitHub
💡 Why two beats? Because it lets you save even when offline, and because you can bundle just the changes that are ready to go and upload them all at once. "Saved ≠ immediately public" is both a freedom and a safety mechanism.
5-Minute Setup: Natural Language with Claude Code
No need to memorize Git commands. One sentence in plain language handles most Git work. For a friendlier flow, look in /plugin for Git-related plugins.
Just Once to Get Started
"Set this folder up to be managed with Git and uploaded to GitHub"
Behind the scenes, this one line handles:
- Check if Git is installed (installs it if not)
- Check if GitHub CLI (
gh) is installed - GitHub login (browser opens automatically)
- Project folder setup: creates a new repository for new projects, pulls from GitHub for existing ones, or initializes the current folder as a repository
Steps already completed are skipped automatically. From start to finish takes about five minutes, and once done, you rarely need to think about setup again.
Three Actions You'll Use Every Day
Save
Commit · Bundle all current changes into one point
Upload
Push · Send those points from your computer to GitHub
Request Review
Pull Request · Teammates review the changes before merging
Action ① · Save (Commit)
"save this"
Shows the list of changed files and asks for a short description (commit message). The message should be written so "my future self can read this line six months from now and know what it was about."
Examples:
  "Redesign login page layout"
  "Bug fix: password validation error"
After saving, a confirmation follows:
✅ Saved!
Still on your computer only.
Say "upload it" to send it to GitHub.
Action ② · Upload to GitHub (Push)
"upload it"
Sends the saved records to GitHub. When done, the repository link comes with it. Common errors are handled automatically:
- If a teammate already pushed conflicting changes, auto-merge with rebase
- SSH auth errors automatically switch to HTTPS
- First push to a new branch automatically sets the upstream
Action ③ · Request Review (Pull Request)
When you want teammates to review changes:
"request a review"
Automatic flow: create branch → save & upload → create PR → provide link → return to original working state. The PR body is automatically filled with a change summary, so you just add "what this change is about in one line."
Natural Language to Git Command Mapping
What you want to do                 How to say it
─────────────────────────────────────────────────────
First-time setup                    "start git for me"
Check current state                 "what's the current state?"
                                   "what changed?"
Save (Commit)                       "save this"
                                   "commit it"
Upload to GitHub (Push)             "upload it"
                                   "push it"
Request review (PR)                 "request a review"
                                   "I want to show this to my team"
Ask about terminology               "what is a commit?"
                                   "what's the difference between push and commit?"
💡 For a more structured Git onboarding, browse the Git-related plugins with
/plugin. Some bundle this workflow into slash commands, or automate team conventions like branch naming and commit messages.
Git Terms Quick Reference: Learn by Analogy
When an unfamiliar term comes up, unfold this and look. Don't memorize it — come back and look each time is the faster habit.
- Repository: Project storage → "shared folder on GitHub"
- Commit: Save → "package the files and add a label"
- Push: Upload → "ship the packaged files via courier to GitHub"
- Pull: Download → "receive the latest from GitHub"
- Branch: Workspace → "personal workspace that doesn't touch the original"
- Pull Request: Review request → "Google Docs 'Suggest Edits' mode"
- Merge: Combine → "apply the suggested edits to the original"
- Clone: Copy and download → "download the shared folder to your computer"
When you hit an unfamiliar term, just ask right then and there:
"what's the difference between push and commit?"
Daily Routine: Follow This and You're Covered
[ Start ]
  Run claude → "start git for me"  (only on day one)

[ During work ]
  Edit files → "save this" → "upload it"
  Before big changes: "what's the current state?" to check first

[ Wrapping up ]
  "save this" → "upload it"   (both beats, every time)

[ Team collaboration ]
  Feature done → "request a review" → share PR link
This routine means everything you build with Claude Code gets safely preserved. If something breaks, you can return to midnight last night. "I definitely fixed this yesterday" becomes provable.
.gitignore: Keep API Keys Off GitHub
The most common and most expensive mistake in Git onboarding is uploading .env files containing API keys. A key that ends up in a public repository is essentially impossible to fully recover.
When you say "save this" to Claude Code, it detects the project type and automatically creates a .gitignore. If one already exists, it leaves it alone. If you're writing one yourself, this is a solid starting point:
# .gitignore example
.env
.env.local
node_modules/
.DS_Store
⚠️ If you accidentally uploaded a key: rather than deleting it from the repository, immediately revoke the key in that service and issue a new one. Assume it's already scattered across caches, mirrors, and forks.
Dangerous Git Commands: Here's How to Ask Safely
Git is powerful, but some commands can wipe entire bodies of work. Building in this "safety briefing" habit with Claude is worth it:
- "revert everything" → "show me the changed files first, then ask which ones to revert"
git checkout .→ "usegit restore .but show megit difffirst"git reset --hard→ "check for uncommitted changes, make a backup branch, then proceed"git push --force→ "explain why force push is needed and which branches are affected first"
Modern Git uses git restore for file recovery because the intent is clearer. If the commands feel hard to remember, just speak to Claude plainly:
"I want to revert only src/auth/login.js to its previous state.
Show me the diff first, then confirm before proceeding."
When You Start Using Git, What Changes
The thing students say most often a month after starting with Git: "Now I can actually tell Claude to go bold." That one sentence captures Git's value.
Without a safety net, "completely change this feature" feels scary. If it goes wrong there's no recovery. But with a git commit, worst case is git revert in one line and you're back to yesterday. That peace of mind is what makes experimentation possible.
The most creative work happens when "failure is okay." Git and Claude Code together create that environment.
Common Git Mistakes to Avoid
Writing "fix," "change," "update" for every commit message
Six months from now, this tells you nothing. Write what and why changed.
Bad: "fix"
Good: "Add loading spinner to login button on click"

Bad: "update"
Good: "Add minimum 8-character password validation (security requirement)"
Committing an entire day's work at once
Smaller, per-feature commits make it easy to revert specific changes or trace when a problem was introduced. You don't need perfect granularity — feature units or meaningful chunks are enough.
Committing without pushing
A commit is still only on your computer. If the computer fails or is lost, it's gone. Pushing when important work is done creates the real backup.
Git + CLAUDE.md: Sharing Project Rules with the Team
Managing CLAUDE.md with Git means the whole team works under the same rules.
# Include the team's CLAUDE.md in the repository
./CLAUDE.md         # Included in Git → applies to the whole team

# Personal settings excluded via gitignore
./CLAUDE.local.md   # Auto-included in .gitignore → stays on your machine
When a new team member clones the repository, CLAUDE.md comes with it. They start with the team rules already applied. Onboarding time cuts in half.
Branches: How to Experiment Safely
A branch means keeping the original and creating a separate workspace.
"make a branch for working on a new feature"
→ Creates a branch named something like feature/login-page
→ Work in this branch without affecting the main branch
Branches are especially useful when:
- Building a new feature when an urgent bug fix comes up midway (switch to main)
- Multiple features being developed simultaneously on the same project
- An experimental change doesn't work out (just delete the branch)
"this branch work is done. merge it into main"
→ Either merge directly without PR, or create a PR for review first
Common Git Situations and How to Ask for Them
A collection of more specific situations and the natural-language requests that handle them.
| Situation | How to say it |
|---|---|
| Commit only a specific file | "commit just src/components/Login.tsx" |
| Undo the last commit | "undo the last commit (keep the files as-is)" |
| Pull changes from another branch | "bring in the latest from main" |
| Temporarily stash work | "stash my current work for now" |
| View an older version | "show me what login.tsx looked like 3 days ago" |
| Revert only one file | "revert login.tsx to the last committed state" |
| Clone a repository | "clone this GitHub repo to my computer" |
Claude handles every action in this table. Knowing the commands gives you more precise control, but plain language already solves 90% of cases.
Before and After Adopting Git: What Changes in the Classroom
A summary of how things shift before and after introducing Git in a workshop.
Before
- "Something went wrong with Claude and I have no idea what changed"
- "Yesterday this feature worked, today it suddenly doesn't"
- "I can manage solo, but the moment a teammate touches the same file something gets wiped"
- "I'm scared to ask for any big change"
After
- Restoring a previous state: three lines in the terminal
- Tracking changes: "what changed yesterday?" in natural language
- Team work: branches separate work, conflicts resolved automatically
- Bold experimentation: after a commit, even "rewrite the whole thing" isn't scary
Without Git, Claude Code is powerful but precarious. With Git, it becomes powerful and reassuring.
GitHub Actions: Auto-run Tests Every Time You Push
After using Git for a while, the thought "it would be nice if tests ran automatically every time I push" tends to come up. GitHub Actions does exactly that.
"set this up so every push to GitHub runs the build tests automatically"
Claude Code creates a config file under .github/workflows/. After that, every push triggers GitHub to run the build, and the result shows up in the PR.
You don't need this right now. But knowing "this is also possible" lets you feel that Git is more than a backup tool.
Why Branches Are Useful Even When Working Solo
"Do I need branches if I'm working alone?" is a common question. Yes — for three reasons.
First, freedom to experiment. When a "what if I tried it this way" thought hits, making a branch keeps main untouched. If it works, merge. If not, delete the branch. Clean.
Second, parallel work. While building Feature A, an urgent bug surfaces — you can switch to main, fix the bug, and return to the Feature A branch. Conceptually similar to /branch in session management.
Third, tidy history. Per-feature branches leave a clean record of "this feature was finished at this point."
Git works without branches, but once you start using them, the thought becomes "why didn't I do this sooner?"
How Often Should You Commit?
No fixed rule, but two guidelines help:
Commit whenever "if this goes wrong, I'd have to start here again" happens.
Before starting a new feature, before making a major change, at the end of each day's work — these three moments are always commits.
Too often is fine too.
"Won't my history get messy if I commit too often?" Some people worry about this, but committing locally often and cleaning up before pushing is an option. For beginners, just commit often. Losing work by committing too rarely is far worse than having a long history from committing frequently.
💡 To use Git commands directly, just tell Claude: it will run
git commitandgit pushright there. For people who find Git unfamiliar, the recommended path is starting with plain language ("save this," "upload it"), getting comfortable, then moving to the actual commands. Both paths arrive at the same place.
Before You Close This Chapter
- Ran "start git for me" in the current project folder and confirmed Git is set up
- Made the first commit with "save this" (wrote a meaningful commit message)
- Pushed to GitHub with "upload it" and received the repository link
- Confirmed
.envis included in.gitignore - Asked "what's the current state?" and saw the list of changed files
The next chapter (12 Common Mistakes & Fixes) covers the moments that still trip you up even with Git and sessions — the actual errors that come up often and how to handle them.
For First-Time Git Users: Sticking Points and How to Handle Them
"I don't have a GitHub account"
First, create an account at github.com. An email address is all you need. A free account lets you create both public and private repositories. Private repos are visible only to you, so you can use them without worrying about code leaking.
"It says Git isn't installed"
"install Git for me"
Claude Code walks you through the OS-appropriate installation. On macOS, Homebrew. On Ubuntu/WSL, apt. On Windows, Git for Windows. After installing, verify with git --version.
"It's asking for my password when I push"
Since 2021, GitHub uses tokens (Personal Access Tokens) instead of passwords. If issuing a token feels cumbersome, the GitHub CLI (gh auth login) handles it in one shot. Tell Claude "set up GitHub authentication" and it will walk you through.
"I pushed and got a conflict with a teammate's changes"
The most common situation. Tell Claude "resolve the conflict" and it will show which files conflicted and suggest how to resolve them. It feels alarming the first few times, but the pattern becomes familiar quickly.
Common Mistakes & Fixes
Common beginner problems and how to fix them.
12. Emergency-room Manual for the First Few Days
The walls you hit in the first week are mostly the same ones. This chapter collects them in one place — treat it like an ER, not a textbook. Don't read it cover to cover. Come here when you're stuck and search.
💡 I have gathered the 14 stumbles I've seen the most hands raised over in classrooms. Each case carries a short note from the time I hit that wall myself. The same error message stalls people in slightly different ways, and recognising the grain of your own stall helps. Steps are kept short on purpose so that, in front of the dark screen, you can find the next move within a minute.
Case ①: claude command not found
What you see
$ claude
zsh: command not found: claude
What just happened
It is installed, but the shell does not know where the executable is. One of the three below will untangle it.
Fix ㉠: Reinstall with the native installer (cleanest)
# macOS / Linux / WSL
curl -fsSL https://claude.ai/install.sh | bash
After installation, close the terminal window completely and open a fresh one.
Fix ㉡: Inspect PATH
which claude         # where it landed
echo $PATH           # current PATH
If ~/.local/bin is missing from PATH, add a line to .zshrc or .bashrc:
export PATH="$HOME/.local/bin:$PATH"
Reload with source ~/.zshrc.
Fix ㉢: Diagnostic command
claude doctor
This runs a combined diagnostic across install path, version, and shell environment. For first-timers, I recommend feeding the diagnostic output straight back to Claude — "look at this and tell me what's wrong."
💡 Here is something that happened. A student in a class typed
claudeand gotcommand not found. They were on nvm, and each new shell would land on a different node version, so PATH kept shifting. The diagnostic order I built that day still holds: 1)which claude, 2)node -v, 3) the last line of~/.zshrc. Those three cover ninety percent of first-day stumbles.
⚠️ On macOS and WSL alike, an empty
which claudemeans a PATH issue, while seeing~/.local/bin/claudebut failing to run usually means a permissions issue (chmod +x). Different solutions for each.
Case ②: Login is blocked
How it shows up
- Browser doesn't open
- Auth screen hangs
- Logged in but still getting auth errors
Fix flow
Step ㉠ · Browser popup doesn't appear
After running claude, press the c key to copy the auth URL, and paste it into your browser yourself.
Step ㉡ · Log out, re-auth
# Inside Claude Code
> /logout

# Or from the terminal (session/config is stored in ~/.claude.json)
claude auth logout
claude
Step ㉢ · If that fails, run diagnostics first
> /doctor
Step ㉣ · Last resort (delete all settings)
# ⚠️ Only when the steps above don't unstick it
rm ~/.claude.json
rm -rf ~/.claude/
claude
⚠️ This wipes every setting, session, and plugin. Try
/doctorfirst. If you must proceed, back up withcp ~/.claude.json ~/.claude.json.backupbefore deleting. Don't confuse the project's.claude/with the home directory's~/.claude/.
💡 Here is something that happened. A laptop kept demanding re-auth, and the cause turned out to be the company VPN blocking the OAuth callback URL. Switch VPN off, authenticate, switch it back on. Done. Roughly thirty percent of auth failures are network problems, not Claude problems. The first place to suspect is the network you're sitting in.
Case ③: Responses are too slow
The longer the conversation gets, the heavier Claude's load (context) becomes. It is normal, but disruptive to flow.
Four fixes, lightest first
/compact: most effective. Compresses the conversation and recovers speed./clear: when starting fresh is fine.- Switch model:
/modelto Sonnet or Haiku. Opus isn't required for everything. - Tidy MCP: in
/mcp, disable connections you aren't using.
Telling apart kinds of "slow" helps
"Slow" is not one thing. Pin which of these three you're seeing.
- First response takes 30+ seconds — heavy context.
/compactfirst. - Tokens drip out one character at a time — network is shaky. Check Wi-Fi or tether.
- It's just stuck — a tool call has frozen.
/doctoror Ctrl+C and restart.
💡 Here is something that happened. Same task, fast yesterday, slow today. The difference was simple — yesterday I ran
/compacttwice; today, not at all. Don't try to finish a long job in one breath. A rhythm of compacting every thirty minutes ends up faster overall.
Case ④: It doesn't do what I asked
Almost always one of three: vague instructions, missing project context, or a long messy thread that has accumulated confusion.
Fix ㉠ · Narrow the instruction
# Vague
> improve the code

# Narrowed
> in auth.js's login function, email validation is missing.
  Add a regex-based email format check after line 42.
Fix ㉡ · Lift repeats into CLAUDE.md
If you've said the same thing twice, that's the signal to move it to CLAUDE.md.
> /memory
# Code style
- error messages always in Korean
- JSDoc comment required on every function
- no var; only const and let
Fix ㉢ · If the same mistake repeats, new session
> /clear
Restart with a tighter instruction.
💡 Here is something that happened. "Refactor it" is the single line that produces the most accidents. One student turned a 100-line file into 280 lines from that one line. They retried with "don't refactor; just fix the bug in this function" and only five lines changed. "Improve," "refactor," "optimise" are vague and dangerous words. When they show up on your tongue, slice the sentence one more time.
Case ⑤: It looks like a file was edited wrongly
Fix ㉠ · Rewind inside Claude Code (fastest)
Esc Esc or > /rewind
Conversation and code roll back to the previous state together.
Fix ㉡ · Restore via git
git diff                                # what changed
git restore src/auth/login.js           # one file back
git restore .                           # all changes undone
Fix ㉢ · Make git commit a habit before big work
git add .
git commit -m "backup before work $(date +%Y%m%d-%H%M)"
💡 Here is something that happened. Skipped a
git commitbefore a big change once and lost an hour of work in a single shot. The alias I made afterwards isgwip(git add . && git commit -m "wip $(date +%H%M)"). Once before a big task, once after — when this rhythm lands in your hand, ninety-nine percent of accidents recover within a minute.
Rewind vs git restore — which to grab first
Knowing which hand is faster per situation keeps you from hesitating.
| Situation | Reach for first | Why |
|---|---|---|
| Something went wrong inside the current chat | Esc Esc or /rewind | Rolls conversation + code together |
| Yesterday's work looks off today | git diff → git restore | The session is closed |
| Unsure how far back to roll | git reflog first | Every HEAD move is logged |
| Multiple files broken at once | git stash → tidy → restore parts | Pull them aside, apply selectively |
Print this table and tape it next to the screen — the next move arrives within a second of an accident.
Case ⑥: Costs suddenly jumped
Start with the four common culprits.
- The conversation grew long; context thickened
- A whole large folder was loaded without trimming
- Opus was left on
- Multiple sessions or sub-agents were running at once
Look at the limit first
> /usage
Session cost, plan limit, activity stats — all at once. /cost and /stats are aliases.
Four ways to bring it down
- Use
/compactlike breathing: shorter context, lower cost - Switch simple tasks to Sonnet or Haiku via
/model - Use
@filenameinstead of dragging a whole folder in /clearbetween unrelated tasks
Budget cap when running automation
claude -p --max-budget-usd 1.00 "your prompt"
ℹ️ Official CLI option names can change between versions — confirm current flags with
claude --help.
Three patterns that blow up costs — know them before they hit
Looking at the cases of people who got surprised by cost spikes, three patterns dominate.
- One line that says "look at the entire codebase" — loading a whole folder into context jumps tokens by tens of thousands instantly. Narrow with
@needed_fileinstead. - An automation left running overnight — infinite loops at 3 AM eating the monthly limit in a day are not unheard of. Always attach
--max-budget-usdand an iteration cap. - Forgetting to switch off Opus mode — once raised, simple tasks under Opus cost five times more. Check
/modeloften.
💡 Here is something that happened. Someone emailed me, "my limit is draining fast." We checked together — an automation script was stuck in an infinite loop, repeating the same task once per second for eight hours. A month's allowance gone in a day. Automation always wants both an exit condition and a budget ceiling.
Case ⑦: Permission prompts come up too often
Fix ㉠ · Always-allow your common tools
> /permissions
In the permissions screen, set specific tools to Always Allow.
Fix ㉡ · Auto-accept file edits
Shift+Tab → Auto-Accept Edit Mode
For the current session, file-edit prompts get auto-approved.
Fix ㉢ · Memorise the modes in a sentence
- Default (Ask): safest for first use or critical work
- Plan Mode: review the plan only, no file edits
- Auto-Accept: speed first for trusted work
⚠️
--dangerously-skip-permissionsbypasses every permission check. Don't use it outside an isolated container. You can edit system files by accident.
💡 Here is something that happened. A user fed up with permission prompts kept running with
--dangerously-skip-permissionsand a month later asked me about "files that disappeared somewhere." Once you turn off the safety entirely, you can't trace what happened. The answer to "too many permission prompts" is not turning permissions off — it's adding the tools you commonly use to Always Allow.
A small table to pick a permission mode by situation
The three modes mapped onto situations so the hand doesn't fumble.
| Situation | Recommended mode | Why |
|---|---|---|
| New project, trust not yet established | Default (Ask) | Human checks each step |
| Reviewing before a big change | Plan Mode | No file edits, only plan |
| Repetitive, trusted work (git, tests, etc.) | Auto-Accept | Speed first; git restores accidents |
| One-off automation script | Auto-Accept + budget cap | With exit condition, this is safe |
| Risky experiments inside a container | --dangerously-skip-permissions | Container falls; host stays |
Pick once at the permission screen and the choice holds for the session. "Allow everything every time" is worse than "decide once per project."
Case ⑧: Korean text breaks (mojibake)
Happens when the terminal isn't using UTF-8.
macOS · Linux
In .zshrc or .bashrc:
export LANG=ko_KR.UTF-8
export LC_ALL=ko_KR.UTF-8
Add and run source ~/.zshrc. Also check the terminal app's own setting:
- iTerm2: Preferences → Profiles → Terminal → Character Encoding → UTF-8
- macOS Terminal: Preferences → Profiles → Advanced → Text Encoding → Unicode (UTF-8)
- VS Code terminal: uses UTF-8 by default in most cases
Windows · WSL
sudo locale-gen ko_KR.UTF-8
💡 Here is something that happened. Spent an hour chasing broken Korean inside WSL until I added
LANGto.bashrc. It snapped right after. Now it is the first line I add on any new machine. When Korean breaks, Claude's answer also looks broken — the terminal is to blame ninety-nine percent of the time, not the tool.
Case ⑨: When you lost the context
A session dropped or the terminal closed and reopened.
Fix ㉠ · Continue the previous session
claude --continue                       # the latest one
claude --resume                         # pick from a list
claude --resume housing-research-2026Q2 # straight to a name
Fix ㉡ · Name important sessions in advance
> /rename housing-research-2026Q2
Fix ㉢ · Information that must survive cuts goes to CLAUDE.md
# Current work
- Goal: 2026 Q1 market competition report
- Done: A and B company analysis
- In progress: C company analysis, comparison table
- Reference folder: research/competitors/
💡 Here is something that happened. A user mid-week-long project lost every session when the laptop died. But because they had the habit of writing progress into CLAUDE.md, opening a new session and saying "read CLAUDE.md and tell me where I left off" got them back in five minutes. Sessions are volatile memory; CLAUDE.md is disk memory.
A three-layer safety net for context
Run sessions, CLAUDE.md, and git commits together — any accident leaves a five-minute return path.
| Safety net | What it holds | When you use it |
|---|---|---|
Session name (/rename) | A one-line identifier | Finding it quickly in the session list |
| CLAUDE.md progress block | What's done, what's next | Returning in 5 minutes from a fresh session |
| git commit message | The state of the code at a moment | When code is also lost — one-line time travel |
Leaving all three lines beats leaving none by roughly two-fold safety. The cost is under a minute per task.
Case ⑩: Code changed far more than expected
You said "small fix" and Claude touched unrelated files.
- ① Stop now:
Ctrl+CorEsc - ② Rewind:
Esc Escor/rewind - ③ Inspect and restore via git
git status                # changed files
git diff                  # detailed diff
git restore path          # restore one file
git restore .             # undo everything
- ④ Use Plan Mode as prevention: before big work,
Shift+Tabtwice orclaude --permission-mode plan - ⑤ Narrow the instruction: "only touch the login function in auth.js, leave other files alone," "don't refactor — only fix the bug"
💡 Here is something that happened. A backend developer said "fix this one bug" and Claude said, "while we're at it let's tidy up too" and edited thirty files. Luckily git was clean, so
git restore .rolled everything back in one line. "While we're at it" is a friendly phrase from Claude — and the start of an accident for the user. Keeping Plan Mode on is the safest preventative measure.
Case ⑪: Asked for partial edit, got a full rewrite
You asked for a small text edit and the document got rewritten from scratch. Three steps and it's resolved.
- Rewind immediately with
Esc Escor/rewind - Narrow the scope and retry: "Only soften the sentence in the second paragraph that starts with 'However.' Don't touch anything else."
- For larger work, use Plan Mode first — get Claude to show "where and how" it would change before any file moves
Case ⑫: Searches in Korean only — results feel thin
State the search language explicitly.
"Search English and Korean sources and combine them"
"Search English first; summarise the gist in Korean"
"Global trends in English, domestic context in Korean"
If you don't specify, Claude tends to follow the Korean conversation context and search mostly Korean.
Recommended primary language by domain
The weight of information leans differently per field. Keep this table at hand and stop hesitating.
| Domain | Primary search language | Supplement | Why |
|---|---|---|---|
| Latest libraries · SDK usage | English | Korean (real-world posts) | Official docs are English-standard |
| Korean market · policy · regulation | Korean | English (global comparison) | Source material is Korean |
| Cloud · infra troubleshooting | English | Korean (blog cases) | StackOverflow dominates |
| Design · UX patterns | English | Japanese (Note etc.) | Case databases are English-centric |
| Academic citations | English | Korean (journals) | arXiv · Google Scholar |
💡 Here is something that happened. "Summarise the latest React patterns" in Korean returned blog posts from two years ago. Switching to "search English first; only post-2025 articles" made the result a level deeper. "Language" affects the time axis of the search results too — Korean material trails the global conversation by 1–2 years.
Case ⑬: A package the AI recommended looks suspicious 🖥️ Developer
What is slopsquatting
When a model confidently recommends a non-existent package (hallucination), an attacker pre-publishes a malicious package under that exact name on npm or PyPI. Claude might recommend react-auth-helper, but it could not exist or might exist as a malicious lookalike.
Four checks before installing
- Inspect on npm first
npm info <package> # download counts · last update · dependencies
If it was published days ago or has only a handful of downloads, pause and doubt.
- Ask for the source alongside
"Tell me whether this package really exists, with the npmjs.com link and GitHub repo URL alongside"
- Prefer well-known options: equivalent functionality? Pick the older, higher-star package. Prefer Anthropic, Microsoft, Vercel, Meta, and other vetted orgs.
- Inspect the entry point after install
cat node_modules/<package>/index.js | head -100
Five suspicion signals — check the moment you read the package name
If any of these five trips, pause the install and use a human eye.
- A subtly similar real package exists —
react-helmetis real,react-helmentrecommended. One-letter swaps are the classic slopsquatting pattern. - First registered within the last two weeks —
npm info's first-publish date too recent? Suspect. - Single-digit or two-digit downloads — a genuinely useful library would not have that few.
- Maintainer is one person with no history — click the maintainer on npm, see whether they have other packages.
- README is empty or feels auto-generated — serious libraries have non-empty READMEs.
💡 Here is something that happened. In a class a student installed Claude's recommendation
react-cool-loader. The real one isreact-cool-onload. We caught it vianpm info(12 downloads), uninstalled immediately. A one-minutenpm inforight after install is the first defensive line against slopsquatting.
Case ⑭: Worried about security after Claude has worked 🖥️ Developer
Eight checkpoints before you commit
Security checklist:
□ ① Any hardcoded secrets? (API keys, passwords, tokens)
□ ② User input validated? (SQL injection, XSS)
□ ③ No dynamic code execution? (eval-family)
□ ④ File paths don't pass user input through verbatim? (path traversal)
□ ⑤ Error messages don't leak internals?
□ ⑥ Outbound URL requests check the domain? (SSRF)
□ ⑦ Did dependency packages appear without notice?
□ ⑧ Existing auth/permission logic is not bypassed?
Review hunk by hunk with git add -p
git add . stages everything Claude touched in one go. Use git add -p instead and choose hunk by hunk what to bring in.
git add -p
# y → include  n → exclude  s → split smaller  d → exclude rest of this file  q → quit
Suspicious patterns to memorise
- Files you didn't ask about were also edited → unintended side effects possible
- Existing code was wholesale replaced without comments → hard to see what changed
- Config files like
.envorpackage.jsonsuddenly modified → check env vars and dependencies - Tests deleted or disabled → existing checks may have been bypassed
- A package you've never seen added → suspect slopsquatting (see Case ⑬)
- Empty catch blocks wrapping errors → exceptions silently swallowed
⚠️ Principle: code Claude wrote deserves the same scrutiny as code from outside. AI authorship does not guarantee safety.
A 3-step flow for fast security review
The eight-item checklist all at once is heavy. When you're tight on time, this 3-step is enough to clear ninety percent of latent accidents before commit.
- Step 1 (30 seconds) —
git diffonce and ask, "did any file I didn't ask about change?" One unexpected line means stop. - Step 2 (2 minutes) — open
.env,config, andpackage.jsonseparately. Secrets or new dependencies? Inspect. - Step 3 (5 minutes) — let Claude check.
Re-review the changes you just made from a security angle.
Hardcoded secrets, injection points, eval-family calls,
direct path use, empty catch blocks, added dependencies — only those six.
This 3-step filters ninety percent of latent accidents pre-commit. Eight when you have time, three when you don't — pick by the weight of the day's work.
💡 Here is something that happened. Someone said "just one-line edit." Claude helpfully created a new
.env, moved API keys into it. They committed without noticing. Caught at thegit diffreview before push. A one-minutegit diffbefore commit is much cheaper than a secret leaked to GitHub.
Appendix A — Six side symptoms that often arrive with the main case
Beyond the 14 cases, six side symptoms come up in classes too. Not as central, but if you don't know them they will eat your flow.
A1. "It answers but the Korean feels off"
Conversation began in English then shifted to Korean? Claude tends to mix the two. Add this to CLAUDE.md.
# Output language
- All replies in Korean
- Code comments in Korean too
- Only commands and filenames stay in English
A2. "Folder auto-detection isn't working"
If claude was launched from outside the project root, the auto-detect range narrows. Always cd to the project root before starting. Starting one level above leaves Claude unsure what it's looking at.
A3. "Terminal colours look broken"
TERM is wrong.
echo $TERM    # not xterm-256color? suspect
export TERM=xterm-256color
A4. "Pasting doesn't paste"
Common in WSL or SSH. Clipboard tools (xclip, pbcopy, wl-copy) missing or unconfigured. macOS by default; WSL via clip.exe and friends.
A5. "MCP server keeps disconnecting"
> /mcp
If status reads disconnected, check that MCP's underlying stack (Node, Python, OS permissions). About half resolve via reconnect alone.
A6. "Skills or sub-agents aren't recognised"
Skill files must follow .claude/skills/<name>/SKILL.md. Folder name and file name must be exact, and frontmatter name must match the folder name.
💡 The six side symptoms aren't as common as the main 14, but they take longer when they hit. Bookmark this once and the next time the same symptom arrives, the branch jumps within a minute.
Appendix B — Environment-specific quirks
OS, terminal, and shell combinations make the same symptom appear in different shapes. Common environment-specific quirks gathered here.
B1. macOS
- Homebrew vs nvm conflict: with both,
which nodereturns multiple, and shells land on different versions. Addnvm useto.zshrc, or remove the Homebrew node — cleanest. - "Claude isn't responding" can be a system permissions issue. Add the terminal app to System Settings → Privacy & Security → "Full Disk Access."
B2. Windows + WSL2
- Path confusion is the most common accident. WSL
/home/useris not the same as WindowsC:\Users\user. When asking Claude to work, stay inside WSL paths (starting with~) — fewer accidents. - I/O speed:
/mnt/c/is roughly ten times slower than/home/. Big work belongs under/home/. - WSL clock drift: after sleep, time can skew, breaking auth-token validation.
sudo hwclock -sto sync.
B3. Linux desktop / server
- SSHing to a remote server to run Claude Code makes the auth flow trickier. Authenticate on a local machine and copy
~/.claude.jsonover via SSH — usually faster. - Broken colours inside tmux/screen: add
set -g default-terminal "screen-256color"to~/.tmux.conf.
B4. Inside a Docker container
- Containers often miss
nodeor carry an outdated version. Base onnode:20or newer in the Dockerfile. The native installer doesn't need Node, but Docker base images often include Node anyway for build tooling. - If auth flow stalls inside the container, authenticate on the host first, then mount
~/.claude.jsoninto the container as a volume.
B5. Corporate network / VPN
- A VPN blocking the OAuth callback URL is the most common cause of auth loops. Disable VPN to authenticate, then re-enable.
- With a corporate proxy, set
HTTPS_PROXYandHTTP_PROXYenv vars so Claude can reach external APIs. - If npm/PyPI access is blocked by corporate policy, package install will hang indefinitely. Pinning a mirror registry URL into CLAUDE.md helps.
💡 Environment quirks could fill a book, but the five above account for about eighty percent of the questions I've seen in classrooms. Marking which environment you live in lets the next stumble jump straight to the right branch.
A one-line diagnostic tree across the 14 cases
Reopening the cases in the heat of a stall is too much. Use this tree to land a branch in one line.
What is stuck?
├─ The command itself doesn't run ───────── Case ①
├─ Login fails ──────────────────────────── Case ②
├─ Works, but very slow ─────────────────── Case ③
├─ Result is unsatisfying ───────────────── Case ④
├─ A file got changed wrongly ───────────── Case ⑤·⑩·⑪
├─ Cost / limit drops fast ──────────────── Case ⑥
├─ Worried about permissions / security ── Case ⑦·⑭
├─ Korean / encoding broken ─────────────── Case ⑧
├─ Lost session / context ───────────────── Case ⑨
├─ Search results feel thin ─────────────── Case ⑫
└─ A recommended package looks off ──────── Case ⑬
Print and tape it next to your screen, or drop a one-liner into CLAUDE.md — the next stall jumps to the right branch within a second.
A one-page prevention checklist
[ Before ]
□ Did I cd into the working folder? (cd ~/Documents/my-project)
□ For important work, did I git commit?
□ Does CLAUDE.md hold project rules?
□ Is the current model the right one? (/model)
□ Did I check the limit and budget? (/usage)

[ During ]
□ Is the instruction narrow enough?
□ Am I asking for too much in one go?
□ When the breath got long, did I /compact?
□ When something looked off, did I Ctrl+C right away?
□ Did I leave a git commit / name (`/rename`) before risky work?

[ After ]
□ Did I check what changed? (git diff)
□ Are the tests passing?
□ For an important session, did I name it? (/rename)
□ Did I add a one-liner to CLAUDE.md for the new rule I learned?
□ For security-sensitive change, did I clear Case ⑭'s checklist?
Seven habits one step beyond the ER
For people who survived the first few days in the ER, the next stage. Once these seven habits land, half of the 14 cases here are pre-empted. Don't try to acquire all seven at once. Pick one this week.
1. git commit right before big work — the one-line shield
The single most effective line. ER visits drop by half. Make it an alias and the hand catches it faster.
alias gwip='git add . && git commit -m "wip $(date +%H%M)"'
gwip once before each task is enough. Format broken, message thin — fine. As long as a rollback point exists, it's insurance.
2. /compact once every 30 minutes — a rhythm that doesn't break the breath
Keeps context light without snapping the breath. Press it too often and the core context flies away; too late and replies slow. Thirty-minute intervals were my balance point.
3. Replace "improve" / "refactor" with concrete verbs
"Improve," "refactor," "optimise" — three vague, dangerous words. Translate them.
- "Fix only the NullPointerException in this function. Don't touch anything else."
- "Replace the for-loop with forEach. Logic identical."
- "Translate only the error message strings to Korean. Leave error codes."
Concrete verb + scope limit + what stays — three beats, almost no accidents.
4. One progress line in CLAUDE.md
Disk memory that lets a fresh session return in five minutes. Add this at the end of each task.
# Current progress
- Last work: 2026-05-06 auth module refactor
- Next: token-expiry auto-refresh logic
- Stuck on: timezone handling in expiry comparison
5. Always a budget and exit condition for automation
Infinite-loop prevention. With claude -p automations, attach all three.
--max-budget-usd 1.00(budget cap)- A maximum iteration count (explicit counter inside the script)
- Exit conditions (clear termination on both success and failure)
6. Run npm info once on every new package
First defensive line against slopsquatting. With Case ⑬'s five suspicion signals on hand, you'll judge safety in a minute.
7. Suspicious changes get reviewed line by line with git add -p
Treat code Claude wrote like outside code. Don't git add . everything in one shot. git add -p and pick hunks — this habit prevents the bigger accidents downstream.
💡 Here is something that happened. Last session of a course, someone said, "I rolled back about half of what Claude built this week with git." It sounded deflating at first, then they finished with, "but because I could roll back, I felt safe enough to keep trying." The goal isn't fewer mistakes — it's faster recovery from mistakes. That is why the ER manual exists.
Before you close this chapter
- Bookmarked the case I hit this week among the 14
- Copied the diagnostic tree onto my desk or into CLAUDE.md as a one-liner
- Skimmed the Before / During / After checklists
- Picked one of the seven ER habits to acquire this week
In chapter 13 Debugging: when an error appears we look at the first minute after meeting an error message — how to keep the breath before reaching the ER. The ER is the last line; the first minute is what keeps you from getting there.
💡 If nothing untangles:
/doctorfrom inside Claude Code for an install diagnostic,/bugto report directly to Anthropic. In Korean communities, GitHub Discussions or local Slack channels tend to be the fastest path — someone who hit the same symptom probably has the answer already.
💡 One last line — visiting the ER often during the first few days is normal. People who have used Claude Code for a month or more rarely open this page anymore; instead, an "ER manual" of their own grows inside their CLAUDE.md. The ER is a chapter you graduate from.
Debugging: When You Hit an Error
A 3-step workflow for resolving errors without panic.
13. When Errors Hit — Half Is Staying Calm, Half Is Having a Method
A three-step workflow for not falling apart when errors appear.
We've all stared at a terminal full of red text and gone blank. In the first few days I jumped to a search engine after reading only the first line of an error message — turns out the actual answer was usually lower down the screen. Half the work is staying calm; the other half is trusting the rhythm of capture → narrow → fix. Once that rhythm clicks, errors stop feeling like alarms and start reading like the next instruction in a guide.
The First Thing to Do When an Error Hits
When an error appears, what you need to do is show it — not understand it. Understanding comes second.
Copy and paste the full error message
I'm getting this error:
TypeError: Cannot read property 'name' of undefined
at UserList.render (src/components/UserList.js:23:18)
at processChild (/node_modules/react-dom/cjs/react-dom-server.node.development.js:4019:14)
...
Key point: don't trim it. For long errors, the actual cause is often toward the bottom. Claude can handle length.
Show it as a screenshot
For UI breakage, layout problems, or anything that's hard to describe in words — capture the screen and paste it with Ctrl+V directly in the chat. Even for terminal errors, sometimes a full-screen screenshot is faster than copying text.
Describe the situation in words
When there's no error message and it's just "it doesn't work," include these three things:
Since when: "started after I added the login feature yesterday afternoon"
What triggers it: "when I click the login button"
What happens: "the screen goes white and nothing shows"
These three elements dramatically increase how fast Claude can narrow down the cause.
💡 Here's something that actually happened. A student next to me had been wrestling with a TypeScript error for two hours. They were searching Stack Overflow after reading the error message. I was watching from the side and said "just paste it into Claude." Thirty seconds later: "the type of this variable is
string | undefinedand there's no handling for whenundefinedcomes in." A two-hour problem solved in thirty seconds. Their first reaction was "why didn't I do that from the start?"
When There's No Error Message: Only Symptoms
"It just doesn't work" is the hardest case. Especially "it worked yesterday, doesn't work today" — two approaches for finding the cause.
Approach ①: Check what changed most recently
Show me the diff for the files that were just changed.
Then estimate which of those changes could be causing the issue.
Knowing what changed just before the error started is the starting point for finding the cause. Even if you can't remember, Claude can read git diff or the change history.
Approach ②: Roll back to when it worked
/rewind
or
Esc Esc (twice)
Go back to the working state, then re-apply changes one at a time to find the point where it breaks.
Approach ③: Narrow the scope
If only the login function is broken, check whether registration works first.
Then add a console log to verify whether the login API call itself succeeds.
Narrowing the scope is the fastest path to finding the cause.
A Real Example: Walking Through a "White Screen" Bug
Here's how a debugging conversation actually flows.
Initial report
[Situation]
When I refresh the product list page, I get a white screen.
The dev server is running, and the browser console shows this error:

TypeError: Cannot read properties of undefined (reading 'map')
at ProductList (src/components/ProductList.tsx:23:19)

[Request]
Before making any changes, read the relevant files and summarize
the possible causes of this error in two or three hypotheses.
Asking for the analysis
Which of those hypotheses has the highest probability,
and what file or command would confirm it?
This is the step that makes Claude narrow down the cause before fixing. State values, API timing, and data structure problems tend to get caught here.
The minimal fix
Fix only the most likely cause.
Don't change the UI structure or do any refactoring.
Apply only the smallest change that stops the white screen.
"Smallest change" is key. Changing multiple things at once means you can't tell which fix worked.
Requiring verification
After the fix, confirm these three things:
1. The product list page renders correctly in the dev server
2. The error is gone from the browser console
3. It doesn't break when the product list is empty (empty array test)
The most important thing in a bug fix request isn't "fix it" — it's clearly stating what success looks like.
When the Same Error Keeps Coming Back
If an error was fixed but came back, the approach needs to change.
Record the pattern in CLAUDE.md
Add to CLAUDE.md why this error happened and how it was fixed,
so next time we run into the same situation we can avoid it immediately.
Example:
# CLAUDE.md addition
## Common Error Patterns
- Dates: always use dayjs library (moment.js banned)
- API responses: always use Optional Chaining (?.) before accessing
- Images: use '/images/...' path for public/ folder, not './images/...'
As this accumulates, CLAUDE.md becomes an error reference for the project.
New session + essential context only
When the conversation gets long, Claude can get stuck trying the same direction repeatedly.
/quit   # exit current session
claude  # start fresh
Read @CLAUDE.md.
I'm having a recurring token expiration error in src/auth/LoginForm.tsx.
Try a completely different approach from what's been tried before.
A fresh perspective from a new session is effective.
💡 Here's something that actually happened. A student tried to fix the same error across three sessions and it kept coming back. Looking at the conversation history, Claude was attempting the same direction every time. Opening a new session and saying "everything I've tried hasn't worked, look for a completely different cause" — it found a different root cause immediately. If the same direction appears for a third attempt, that's a signal there's a different underlying cause.
Common Debugging Mistakes to Avoid
Mistake 1: Spending time trying to understand the error first
There's a tendency to analyze the error message before asking Claude. Do the opposite. Show it before understanding it, then understand Claude's explanation afterward. Much faster.
Mistake 2: Summarizing the error message
"I'm getting a type error" is far less useful than the full error message. Summarizing loses information.
Mistake 3: Requesting new features while errors are active
Adding new code on top of broken code means new code piles on a broken foundation. Tracing the cause later becomes twice as hard. Fix errors first, then new features.
# Pattern to avoid
[error present]
→ "now add the payment feature"
→ "now add email notifications"
→ errors get mixed in, impossible to trace root cause

# Correct pattern
[error present]
→ "fix this error first"
[error resolved]
→ "now add the payment feature"
Mistake 4: Trying the same method more than twice
If the same method doesn't work twice, the third attempt should be different.
> This method didn't work twice.
  If there's a completely different approach, suggest it.
  Consider switching to a different library if needed.
Quick Error Reference by Type
Knowing common error patterns in advance speeds up the first response.
| Error | What it usually means | Quick question |
|---|---|---|
Cannot read properties of undefined | Accessing a value that doesn't exist | "Find where undefined is coming from" |
is not a function | Calling something that isn't a function | "Confirm why this isn't a function" |
Module not found | Wrong import path | "Check the file structure and confirm this path" |
Unexpected token | Syntax error | "Find and fix the syntax error" |
Network Error | API request failed | "Find out why the API request is failing" |
Port already in use | Port conflict | "Run on a different port or kill the existing process" |
TypeScript type error | Type mismatch | "Find the type error and fix it with the correct type" |
Error Types: Clear vs Silent
Errors come in two main forms.
Clear errors (red messages)
Red text in the terminal or browser console. They have information, so they're actually easier to handle. Copy the whole thing and paste it to Claude.
Here's the full error:
[paste full error message]

Before fixing it, explain the possible causes in 2-3 hypotheses.
Silent errors (symptoms only)
"The button click does nothing," "numbers look wrong," "it's slow" — symptoms without error messages. When this happens, describing the phenomenon precisely is the first step.
No error messages, but here's what's happening:
- Clicking login button produces no visible response
- Nothing in the console
- No API requests visible in the network tab

Check whether the click event is properly connected.
Observing the phenomenon from multiple angles and writing it out helps Claude narrow down the cause much faster.
The Power of Documenting Errors
The difference between moving on after fixing an error and leaving a one-line record shows up three months later.
How to document:
Now that this error is fixed, add to CLAUDE.md:
- Error type: [error name]
- Cause: [what caused it, one line]
- Fix: [how it was fixed, one line]
- Prevention: [how to avoid this error going forward]
Example:
# Common Errors
## undefined.map() error
- Cause: rendering attempted before API data loads
- Fix: add Optional Chaining or early return
- Prevention: always initialize array data with an empty array as default value
As this builds up, CLAUDE.md becomes the project's error guide. New sessions read this guide and the same errors happen less often.
Debugging Prompt Template
When stuck, fill this out and send it as-is.
[Symptoms]
-

[Since when]
-

[How to reproduce]
1.
2.
3.

[Error message]
```
paste full error here
```

[Request]
First read the relevant files and summarize possible causes in max three hypotheses.
Then start with the most likely one, applying the smallest possible change first.
Include the verification steps after the fix.
Three Principles That Speed Up Debugging
Principle 1: Show first, understand later Trying to understand an error before asking Claude doubles the time. Show it first.
Principle 2: Ask scope-narrowing questions "Why doesn't it work?" vs "confirm that only the login is broken" — the second gets faster answers. Questions that narrow scope produce faster answers than broad questions.
Principle 3: Fix one thing at a time Changing multiple things simultaneously means you can't tell which fix worked. Slower-looking, but actually faster overall.
Before You Close This Chapter
- Practiced the habit of copying the full error message and sending it to Claude immediately
- Wrote an error description using all three elements: "since when / what triggers it / what happens"
- Bookmarked the debugging prompt template (ready to use when stuck)
- Left a one-line record in CLAUDE.md after fixing an error
- Tried the new session + essential context approach for a repeating error
The next chapter (14 Useful Features) covers features that make Claude Code more comfortable beyond error scenarios — image input, voice, auto-recovery, and permission settings.
What Claude Does Well vs What You Need to Do
Splitting responsibilities between Claude and yourself in debugging produces better outcomes than handing everything over.
What Claude does well
- Decoding and explaining error messages
- Recognizing the same error pattern across similar cases
- Listing possible causes
- Analyzing code in specific files
- Writing verification code after a fix
What you need to do
- Actually test "did this work?"
- Judge "is this fix the direction I want?"
- Explain the business context behind why this is the environment for this error
- Check "does this solution affect other parts?"
Throwing an error at Claude and saying "fix it" leads to repeating the same errors. Understanding the cause together means you're faster the next time.
Frequently Asked Questions
"The error message is too long to copy all of it"
Copy all of it anyway. In most errors, the real cause is in the middle or bottom. With only the first line, Claude has to guess — and guessing means more wrong turns.
"I fixed the error but it came back"
Two possibilities: the fix was incomplete, or there's a different underlying cause. Try opening a new session and saying "I fixed it this way but the error came back. Look for a different cause, not the approach tried before."
"I don't understand English error messages"
That's fine. Paste them in as-is. Claude handles the interpretation. Trying to understand them yourself before asking can actually lead to missing the point.
"Errors are piling up — which one do I fix first?"
When dozens of build or type errors appear at once, ask like this:
Too many errors. Here's the full list.
Analyze which order to fix them in, and which errors are caused by other errors.
Start with the most root-level cause.
Errors are often a chain reaction. Fixing one root cause can make twenty errors disappear simultaneously.
"The function works but behaves incorrectly"
"It works but it's wrong" is tricky because there's no error message. Use the "intended vs actual" format:
The login feature works but behaves incorrectly.
Intended: after successful login, redirect to /dashboard
Actual: after successful login, stays on /login page

Look at the code and find why the redirect isn't happening.
"Intended vs actual" is one of the fastest formats for Claude to locate a bug.
Useful Features to Know
Image input, voice commands, undo, auto-compact and more features to enhance your terminal experience.
14. Useful Features to Know — Things That Get Easier the More You Use Them
No need to know all of these from day one. These are tools you pull out when the right moment comes — and over time, you start reaching for them naturally.
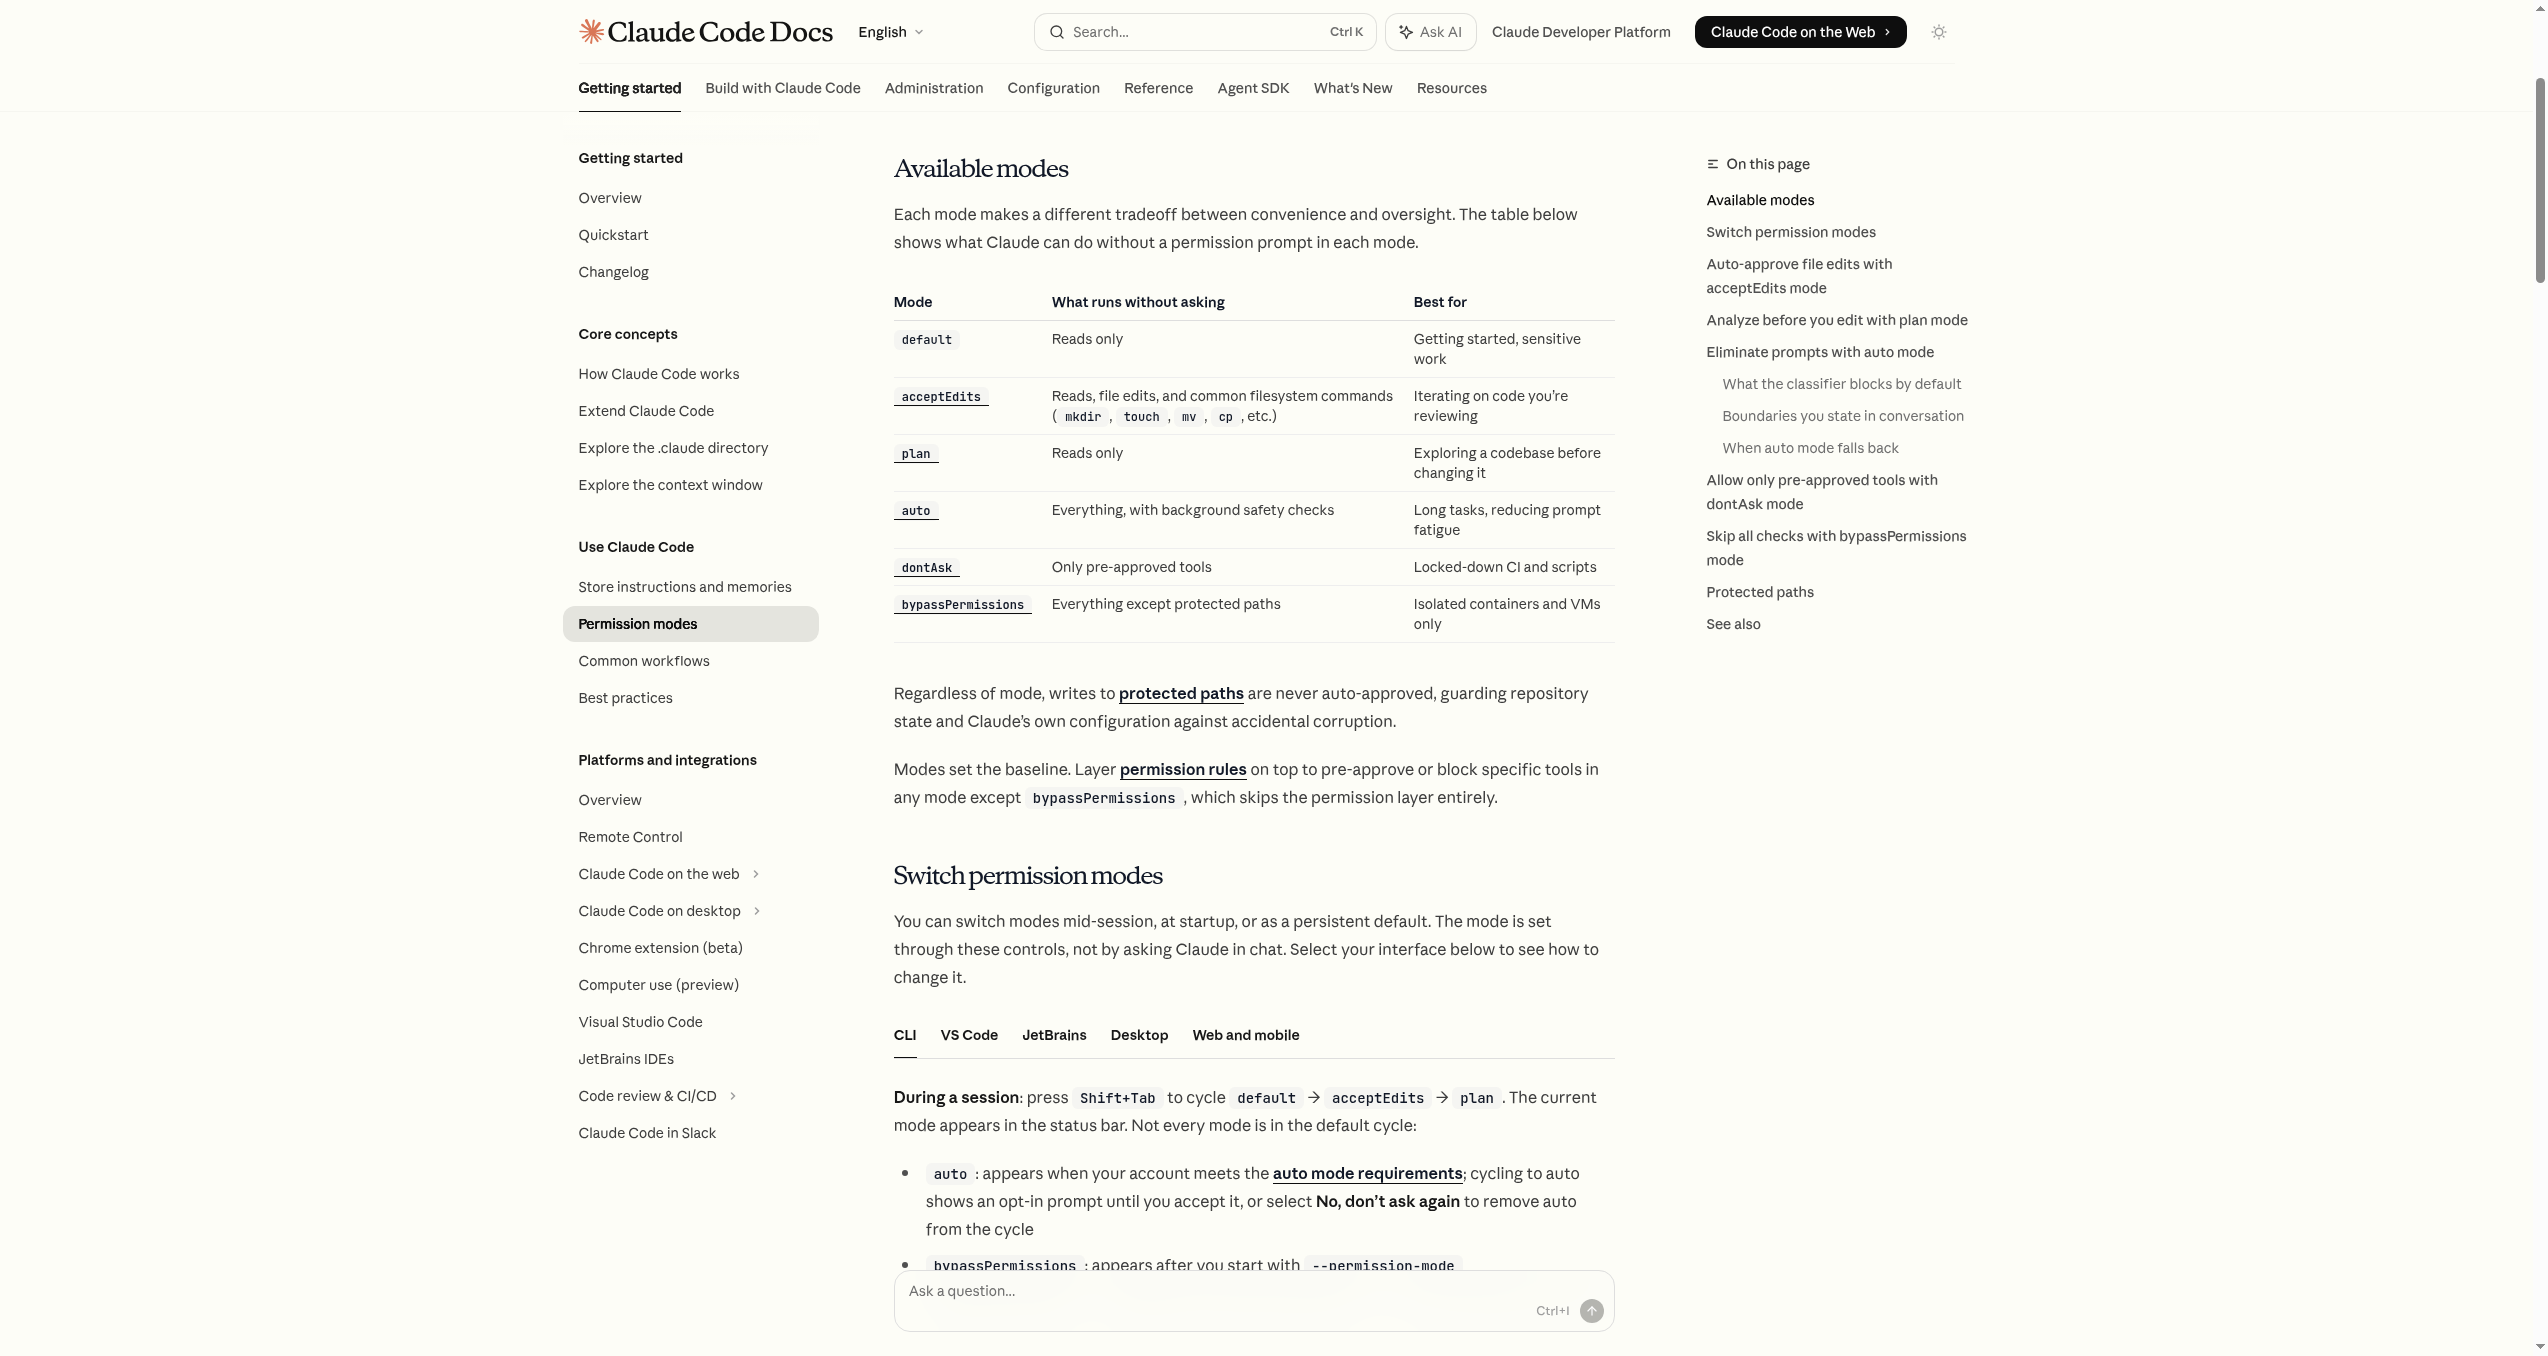 Source: Permission Modes — Anthropic Docs
Easier Input
Show screenshots or designs directly, use voice for long explanations.
Mistake Recovery
Revert a wrong change by one step or multiple steps.
Long Sessions
Auto-summarize and remember near the context limit.
Safe Operation
Isolate sensitive commands, permissions in stages.
Showing Images Directly
Screenshots and design mockups can be sent to Claude directly. Visual problems or visual requirements that are hard to describe in words work much faster as images.
Three ways to paste:
Ctrl+V          : paste image from clipboard directly
Drag and drop   : drag an image file into the terminal window
File path       : "@screenshot.png look at this and analyze it"
Supported formats: JPEG, PNG, GIF, WebP (max 5MB per file)
The first time I used this, the first thing I tried was pasting an error screen capture. Something that would take three lines of text to describe was handled with one image.
Patterns That Work Well for Image Requests
"Image only" vs "image + what to look for" produces dramatically different results.
Less effective:
[paste image with nothing else]

More effective:
[paste image]
"Find why the text overlaps on mobile in this screenshot.
 Explain the cause first before making any changes."
Three situations where images really shine:
- UI breakage: layout, overlap, and color misalignment are faster with images than text
- Error screens: error popups that are hard to copy can be sent as-is
- Design implementation requests: margins, font sizes, and color hierarchy all in one
💡 Here's something that actually happened. In a workshop, a student spent twenty minutes trying to describe a mobile layout issue in text. "The button overlaps" — and Claude kept asking follow-up questions because it didn't know how it overlapped. After taking a screenshot and pasting it, thirty seconds later: "the flex container is missing a min-width, causing overflow." Twenty minutes became thirty seconds.
Explaining with Your Voice
For long explanations where typing is a burden, you can speak instead. Voice input lives in the iOS Claude app and on the web (claude.ai/code) via the microphone button. (The terminal Claude Code has no dedicated /voice slash command.)
Tap the microphone → speak → it's transcribed and sent
Supports Korean and many other languages. Mixing voice and typing in the same message works too.
Where voice input shines: describing "what kind of feeling" you want without needing exact filenames or variable names. Then follow up with typing for precision.
By voice:
"The login screen looks too complicated. I want to move social logins to the bottom and keep only email at the top."

Follow up by typing:
"Scope: only src/app/login/page.tsx. Don't touch other files."
When You Don't Like What Just Changed: Esc Esc
Claude automatically saves a snapshot just before modifying files. Press Esc twice in a row to return to that pre-modification state.
Works automatically without any configuration. No need for Git.
Press it immediately when:
- Claude started modifying files you didn't ask it to touch
- The design change went in a direction you didn't want
- Trying to fix an error created more errors
Esc Esc goes back one step. For going back multiple steps, /rewind is the right tool.
Going Further Back: /rewind
Rewinds both the conversation history and file changes to any earlier point.
/rewind → view list of restore points → select the one you want
If Esc Esc is "just one step back," /rewind is "any point you choose."
After rewinding, check the current state before starting new work — don't jump straight to a new request.
> /rewind
(select point)
> Show me which files are currently in a modified state
Two Ways Context Gets Managed Automatically
Auto-compact
When context approaches its limit, Claude automatically trims older content. Works without any configuration.
But auto-compact leaves what Claude judges to be important. Context you care about might get cut. For important sessions, manually running /compact focus on [specific context] before hitting 70% is safer.
Auto Memory
During work, Claude automatically saves important-seeming information to memory. New sessions can read this memory to pick up context.
Check or edit saved memories with /memory.
But relying on Auto Memory for project rules is risky. Critical rules belong in CLAUDE.md where they're always in scope.
| What to put where | Recommended location |
|---|---|
| Personal work preferences | Auto Memory |
| Project-specific rules | ./CLAUDE.md |
| Team-wide conventions | ./CLAUDE.md in Git |
| One-off session notes | Current session or /compact summary |
Controlling Thinking Depth: /effort
For difficult problems or complex design decisions, you can tell Claude to think more deeply.
/effort low     → simple tasks, fast answers
/effort high    → complex problems, deeper reasoning
/effort xhigh   → Opus 4.7 only, deepest thinking
Available levels: low · medium · high · xhigh (Opus 4.7 only) · max. Which levels are usable depends on the current model — run /effort once to see what your model exposes.
Running /effort without an argument opens an interactive slider to choose the level.
Deeper thinking isn't always better. Using xhigh for a simple text correction or file rename just makes things slower.
| Task type | Recommended level |
|---|---|
| Typo fix, format conversion | low or default |
| General feature work, documentation | default |
| Architecture design, tricky bugs | high |
| Complex algorithms, high-stakes decisions | high or xhigh |
Permission Modes: Controlling What Claude Can Do
Controls how Claude asks for confirmation before modifying files or running commands.
| Mode | How it works | Best situation |
|---|---|---|
default | Confirm every change | Starting out, unfamiliar projects |
acceptEdits | Auto-approve file edits, confirm commands | Trusted projects where speed matters |
plan | Show plan only, never touch files | Reviewing before big changes |
auto | Auto-approve with background safety check (Pro: not available) | Automated workflows |
bypassPermissions | Skip all confirmations | Containers and isolated environments only |
How to apply:
# At session start
claude --permission-mode acceptEdits

# During a session
/permissions
💡 Here's something that actually happened. Working on a large project in WSL2, permission requests for every file broke my rhythm. Switching to
acceptEditsmode meant file edits were auto-approved and only shell commands needed confirmation. Speed improved significantly. But for new projects or team environments, I still always start withdefault. The sequence is: first understand what's being allowed, get comfortable, then change modes.
Extended Features: Research Preview Stage
These features are still available to select users or in preview. You don't need them right now, but knowing "this is the direction things are heading" is useful.
Computer Use: Claude looks at your screen directly and operates the mouse and keyboard. Used for GUI testing and repetitive click automation. (Research Preview, macOS priority) · Note: Computer Use is a Claude API tool — it's a separate product from the Claude Code CLI itself.
Remote Control: Scan a QR code and you can continue the current Claude Code session from your phone. For sending instructions or checking results while on the move.
Chrome Integration: Claude controls the Chrome browser directly. Used for webpage testing, extracting specific data, and automated form filling.
Scheduled Execution (Routines · /schedule): A specified prompt runs automatically at a set time or interval. Used for scheduled checks, status monitoring, and recurring report generation. (/loop is not a built-in — it ships as part of some plugins, e.g. superpowers.)
Quick Reference: What to Use When
The question "what should I use right now?" answered directly.
| If you're in this situation | Use this feature |
|---|---|
| Hard to describe a UI issue in words | Image input (Ctrl+V) |
| Too much to type out | Microphone button on iOS / web |
| Claude just made a change you don't like | Esc Esc |
| Need to go back multiple steps | /rewind |
| Responses slowing down, context getting hazy | /compact |
| Complex design problem to tackle | /effort high |
| Claude is touching files too freely | Check permissions with /permissions |
| Need to test real behavior in a browser | Chrome integration |
Knowing what to reach for in a given situation matters more than memorizing all the features.
Usage Frequency from Real Experience
After six months of actual use, here's how each feature actually gets used:
Daily: image input, Esc Esc
A few times per week: manual /compact, adjusting /effort
As needed: /rewind, iOS/web voice input, permission modes
Special situations: Computer Use, Remote Control, Chrome integration, Routines (/schedule)
Trying to learn all of these from the start means ending up using none of them. Begin with image input and Esc Esc first — those cover the most common cases.
The Relationship Between Features
Two axes help sort out when to use what.
Axis 1: When something went wrong vs making good things better
For when something went wrong:
Esc Esc: Claude just made a change you don't like/rewind: need to go back multiple stepsCtrl+C: need to stop something running right now
For making things that are already working better:
- Image input: communicate faster and more precisely
- Voice input on iOS / web: explain without typing
/effort high: tackle harder problems more deeply
Axis 2: This session vs across sessions
Affects the current session:
/compact, auto-compact: context management/effort: thinking depthEsc Esc,/rewind: mistake recovery
Persists across sessions:
- CLAUDE.md: project rules
- Auto Memory: automatic recall
- Git commits: code history
With these two axes in mind, when you encounter a new feature you can quickly classify "which side does this belong to?"
Before You Close This Chapter
- Tried pasting a screenshot with
Ctrl+Vinto the chat - Pressed
Esc Escand experienced returning to a pre-modification state - Ran
/rewindand saw the list of restore points appear - Ran
/permissionsor/effortonce to see current settings - Scanned the quick reference table and picked a feature for a current situation
The core sections of this guide end here. The chapters ahead cover more advanced features — MCP, Hooks, Worktrees, and more. With the foundation you've built to here, the rest follows naturally.
Writing Effective Prompts
80% of result quality comes from your prompt. Four elements, templates, anti-patterns.
15. When the Prompt is Wrong, the Model Doesn't Matter
When results disappoint, the instinct is to blame the model. Most of the time, it's the prompt.
In workshops, the first question I ask is: "Did you have a moment this week where Claude's output wasn't what you wanted?" Nearly everyone raises their hand. Then I ask: "Did you re-read your prompt?" Hands go down.
That moment is the most important learning point. A prompt is code. Just as a compiler won't ignore a missing semicolon, Claude fills gaps in context with guesses. When those guesses land, it looks like genius. When they miss, it looks like a failure. Neither is about the model — it's about information.
This section covers what belongs in a prompt, which patterns break results, and how the same request written differently produces entirely different outcomes.
The gap between someone new to Claude Code and someone two months in isn't model choice. It's whether they include those four elements — one line each.
The 4 Elements: Context · Scope · Examples · Verification
Context — "Why" are you doing this?
Claude doesn't know what project you're working on, where this function lives, or what background you bring. Without context, it produces the most generic answer. The most generic answer is rarely the one you need.
Context is where you put the "why." Why does this task exist, where is this code used, what constraints are you operating under.
Bad)  Fix this function.

Good) This function exists to reduce payment failures.
      Network timeouts are common, so we need retry logic.
      It touches external payment APIs, so side effects matter.
💡 Here's something that actually happened. During a session, a student typed "fix the login bug" and watched Claude rewrite the entire login function. What the student wanted was a single line of email validation. Claude, acting in good faith, decided to "improve" the password hashing logic while it was there. That day the student started writing every prompt with both "what I want" and "what I don't want." Results changed immediately.
Scope — How far may Claude go?
Without scope, Claude touches everything that "looks related." This is the most common reason a task spirals out of control. You ask to fix one file and three are modified. You ask to change logic and the file structure shifts.
Scope is more powerful when it's short and specific.
Good) Modify only validateEmail inside src/auth/login.ts.
      Do not touch any other file.
      Do not change the function signature.
This feels excessive at first. After experiencing scope creep twice, it becomes automatic.
Examples — One input/output pair beats a paragraph
"Make it look like this" over 100 lines of description loses every time to one input and one expected output. Claude is excellent at generalizing from patterns, and a single example pair replaces an entire explanatory paragraph.
Input:    "kim.user@example.com"
Expected: { valid: true, domain: "example.com" }

Input:    "wrong@email"
Expected: { valid: false, reason: "missing TLD" }
Examples also handle edge cases faster than any description.
Verification — How will we know it worked?
Adding "write the test too" or "run lint until it passes" at the end raises output quality by a noticeable step. Claude includes a self-check in its process.
Good) After the fix, run npm test until it passes.
      If anything fails, tell me where and why.

Or) After the change, show me two examples so I can verify myself.
Before / After: Same Request, Different Outcomes
The difference seems exaggerated until you try it.
| Before (vague) | After (4 elements) |
|---|---|
| "Make this code cleaner" | "Refactor only parseDate in src/utils/parser.ts. Keep behavior identical, replace if-else with early returns. Confirm existing tests still pass." |
| "There's a bug somewhere" | "On /login, passwords 5 characters or fewer should show an error but don't. Input: 'abc' → Expect: error visible. Actual: form submits. Find the root cause." |
| "Make me a report" | "Read @meeting-notes.md and produce a Markdown table of action items grouped by owner. Drop chitchat. Mark unknowns as 'TBD'." |
Prompt Templates You'll Actually Reuse
These are structures I reach for repeatedly. Fill in the blanks.
Template 1 — Add a feature
[Context] This project is building ___ and
[Goal]    I want to add ___ now.
[Scope]   Modify only ___ files.
[Example] Input ___ should produce ___.
[Verify]  After adding, run ___ tests until they pass.
Template 2 — Fix a bug
[Symptom]    When I do ___, ___ happens.
[Expected]   It should ___.
[Reproduce]  Steps: ___.
[Constraint] Fix only inside ___.
             No unrelated refactors.
Template 3 — Refactor
[Target] Only ___ in ___ file.
[Goal]   Readability / performance / testability — pick one.
[Forbid] Do not change the external interface (function signature).
[Verify] Existing tests pass unchanged.
Template 4 — Docs / research (non-coding)
[Context] I'm researching ___ in the field of ___.
[Input]   Use @file1.pdf and @file2.md as sources.
[Format]  Output as a table / paragraphs / slide outline.
[Filter]  Exclude ___, keep only ___.
[Length]  Under ___ words.
Anti-Patterns: These Will Sink Your Output
| Anti-pattern | What actually happens | Instead |
|---|---|---|
| "Just figure it out" | Claude guesses. When guesses are wrong, debugging takes twice as long | Pick one specific task |
| "Make it good" | "Good" has no definition, so Claude applies its own arbitrary standard | Pick one axis: readability, speed, line count |
| "Improve the whole thing" | Change explosion, impossible to review | Split by file or function |
| "There's a bug, fix it" | No symptom shown, Claude fixes the wrong thing | Symptom + expected + repro |
| "Use the latest trend" | Trend isn't defined, results are inconsistent | Provide a link or example |
💡 Here's something that actually happened. I once sent "refactor the auth module" and Claude replaced the JWT library and restructured the middleware. The result looked better but broke the interface other modules depended on, and it conflicted with a teammate's in-progress work. Fixing took 30 minutes. Since that day, refactoring prompts always start with what must NOT change. Listing prohibitions is more effective than listing permissions.
Reinforce with Inputs
When text isn't enough to describe what you need, attach other input types.
| Situation | Tool to use |
|---|---|
| Hard to describe a UI or layout | Paste a screenshot (Ctrl+V) |
| Long requirement to explain verbally | /voice voice input |
| Need to analyze an existing file | @filename reference |
| Want to ground in external docs | Attach a URL |
These connect naturally with the features from section 14.
Real Example — Same Task, Three Versions
Task: "I want to build a daily report of my stock holdings."
Vague (1/10)
Tidy up my stocks.
Claude doesn't know what "tidy up" means. The result could be a table, text summary, or a chart.
Average (5/10)
Read @portfolio.csv and summarize my holdings as a table.
Format specified, but number of columns, sort order, and handling of empty fields are still unclear.
4-Element Version (9/10)
[Context] I want to scan my holdings each morning quickly.
[Input]   @portfolio.csv has ticker and quantity.
[Scope]   No external API calls. Use only the file.
[Format]  One Markdown table:
          | Name | Ticker | Qty | Avg Cost | Note |
          Sort by ticker alphabetically.
[Filter]  Skip rows with quantity 0.
[Verify]  Add a "Total positions: N" line below the table
          so I can sanity-check at a glance.
Same tool, same model — the 9/10 version needs no post-processing. The 1/10 version needs three more rounds.
One Quick Check Before Sending
Two questions before you hit Enter:
- "Could someone who only reads this prompt figure out what I want?"
- "What happens if Claude goes too wide — and is there a constraint to prevent that?"
If both answers are yes, send it.
💡 Here's something that actually happened. At the end of a session a student said: "Writing prompts makes me think harder than writing email." Exactly. A good prompt is an act of clarifying what you actually want — not just for Claude but for yourself. People who write good prompts don't just get better results. They think more clearly about the work.
Before You Close This Chapter
- Pulled up a prompt you sent recently and checked whether it had context, scope, examples, and verification
- Added an explicit constraint ("do not touch X") to at least one prompt
- Wrote one prompt using the After column from the Before/After table
- When a result was unsatisfying, checked the prompt before blaming the model
The next chapter (16 Plan Mode & Safe Recovery) covers something distinct from good prompting: reviewing the plan before execution starts. Even a perfect prompt sometimes precedes a change large enough that you want a preview first. That's what Plan Mode is for.
Plan Mode & Safe Recovery
Knowing you can undo is what gives you speed. Plan Mode, Checkpoint, /rewind.
16. How to Stop Once Before Pressing Execute
"Knowing you can undo" creates the safety to move faster. "Fearing you can't undo" stops experiments cold.
When I first started using Claude Code, I hesitated before large changes. "What if rearranging the folder structure goes too far? What if refactoring the payment module breaks all the tests?" That hesitation slowed experiments — and experiments are what produce results.
Later I understood: the hesitation wasn't a capability problem. It was the absence of a safety net. Now before any large change I use three things: pre-execution plan agreement (Plan Mode), step-by-step rewind (/rewind), and a recovery anchor that survives session gaps (git commit). After adopting all three, "what if this breaks?" stopped being the first thought. "Let's try it" became the first thought.
The reason people hesitate before large changes is almost always the same: "It feels hard to undo if something goes wrong." Plan Mode and Checkpoint make that feeling disappear.
Plan Mode: Plan First, Execute Later
What Plan Mode Does
A mode where Claude shows its plan without touching a single line of files. If you like the plan, you execute. If you don't, you adjust at the planning stage.
Why this matters: mid-execution course corrections require reverting already-modified files. Planning-stage course corrections require reverting nothing.
Activating It
Shift + Tab  (cycles through permission modes until you reach plan)

Or:

claude --permission-mode plan

Or within a session: /permissions → plan
Two Shift+Tabs usually does it initially. Watch the bottom-left indicator to confirm "plan" appears.
When to Turn It On
- Refactoring that modifies multiple files simultaneously
- Data migrations, schema changes (high revert cost)
- Introducing a library or framework for the first time
- Operations with many external API calls (hard-to-cancel side effects)
- Large structural changes on a team codebase
The Plan Mode Workflow
1) Activate Plan Mode (Shift+Tab)
2) "I want to add retry logic to the payment module — show me a plan first"
3) Claude outputs a step-by-step plan — which files, what changes
4) If the plan looks good → return to normal mode and execute
5) If something's missing → add instructions at the planning stage, re-review
💡 Here's something that actually happened. I started a payment module retry logic task without Plan Mode. Claude not only added retry logic but rewrote the entire error handling pattern. The result looked better in isolation, but it changed interfaces other modules depended on, and it conflicted with a teammate's in-progress branch. That afternoon I added Plan Mode to my standard large-change procedure. Catching "oh, it wants to touch that file too" in the planning stage is far cheaper than catching it after execution.
opusplan: Design with Opus, Execute with Sonnet
/model opusplan is an official alias that automatically switches Plan phase to Opus and execution phase to Sonnet.
/model opusplan
Cost structure:
- Plan happens once, briefly (Opus pricing, fewer tokens used)
- Execution runs long (Sonnet pricing, many tokens used)
- Net result: well under half the cost of running Opus throughout
The name signals the intent: let the best model make the design decisions, then hand off execution to a lighter model.
💡 Note: opusplan's Plan phase uses 200K context. The 1M context window doesn't apply automatically. Very large codebases being analyzed may need a separate consideration.
Esc Esc: Undo the Last Thing Instantly
Claude automatically saves a snapshot just before modifying files. No configuration required.
Press Esc twice → restores the immediately previous state
Use this immediately when:
- Files start being modified in ways you didn't intend
- You changed a design and the previous version looked better
- You tried to fix an error and more errors appeared
- You notice the scope expanding beyond what you planned
Anyone who doesn't know git can use this. It's the fastest recovery method available.
💡 Here's something that actually happened. In a class session, a student was changing navigation component styles when Claude started touching the shared layout. Two files had already been modified, and the student had forgotten what the originals looked like. Two presses of Esc brought everything back instantly. "Wait, it really works?" was the response. Since then, Esc Esc is the first shortcut I teach.
/rewind: Roll Back to a Chosen Point
If Esc Esc is "undo the last one action," /rewind rolls back both conversation and code to any point you choose.
/rewind
→ A list of checkpoints appears
→ Select the one you want
Natural language time references work: "before the login UI change," "before the tests were added."
After rewinding, check the current state once before starting new work. Jumping straight into the next task from an unclear state leads to doing things twice.
> Check whether there are remaining changes or a clean state right now
/checkpoint and /undo are aliases for the same command. All three do the same thing.
For moments when you know you want to return to a specific point: an explicit git commit at that moment is the safest bet.
> Commit the current state with message 'checkpoint: before payment refactor'
Three Recovery Tools Compared
Esc Esc
- ScopeLast 1 step
- SpeedInstant
- Use whenLast change isn't what you wanted
/rewind
- ScopeAny earlier point
- SpeedFast
- Use whenNeed to go back several steps
git revert / reset
- ScopeAny commit
- SpeedNormal
- Use whenRecovery beyond the current session
| Tool | Scope | Speed | Best for |
|---|---|---|---|
| Esc Esc | Last 1 step | Instant | The last change wasn't what you wanted |
| /rewind | Any earlier point | Fast | Need to go back several steps |
| git revert / reset | Any commit | Normal | Recovery beyond the current session |
Using all three in combination is the standard practice. Esc Esc for spontaneous reversals, /rewind as an in-session time machine, git as permanent record across sessions.
The Three-Part Safety Net
Before a large task, recall this sequence.
- git commit: The final safety net that survives even a disconnected session. With a commit in place, any situation is recoverable.
- Plan Mode: Agree on the approach before execution — prevents big surprises from ever happening.
- Checkpoint / /rewind: Small mistakes during execution get recalled immediately.
After having all three, the phrase "large change" stops feeling heavy. Experiment speed becomes result speed.
Full Workflow: Large Refactor from Start to Finish
1) Check git status → commit all changes
"I'm starting changes from here. Commit to a clean state first."
2) Activate Plan Mode (Shift+Tab)
"Refactor all of src/payment/ to include retry logic structure.
Show me only the plan — what files, what changes."
3) Review plan → if scope is larger than expected, narrow it → return to normal mode
4) Begin execution → Claude modifies files
If something feels off mid-way: Esc Esc to revert last step
5) Verify result → check tests, build
6) OK → git commit
Not right → /rewind back to the starting point
Once this sequence is in your body, the phrase "large change" no longer triggers automatic hesitation.
Common Mistakes
| Mistake | What actually happens |
|---|---|
| Executing without a Plan | Unintended changes spread across multiple files. High revert cost. |
| Accepting Plan without scrutiny | Hidden assumptions in the plan go unnoticed. Discovered during execution means more complexity. |
| New task immediately after /rewind | Confusion about starting point leads to doing the same work twice. Check state first. |
| Starting large work without git commit | Session disconnects leave no recovery path. Git is the only safety net outside sessions. |
| Not knowing Esc Esc only undoes one step | If you need to go back further, /rewind is the right tool. |
Before You Close This Chapter
- Pressed Shift+Tab and confirmed the Plan Mode indicator appears at the bottom
- Started a small test change and pressed Esc twice to verify recovery works
- Typed
/rewindand saw what a checkpoint list looks like - Made a git commit before a large task at least once as deliberate practice
The next chapter (17 Statusline & Cost Visibility) covers something equally important alongside planning and recovery: making cost visible. Experimenting safely requires seeing what you're spending.
Statusline & Cost Visibility
Costs you cannot see are costs you cannot control. Turn the status line into a cost dashboard.
17. Costs Must Be Visible to Be Controlled
No one drives on the highway without a dashboard. The terminal is no different.
In my first month on the Max plan, a limit-warning email was the first moment I asked "how much have I used today?" Working deep in a task, you don't notice tokens accumulating. Then one day responses slow down, or the end-of-month bill surprises you. Both happen because things were invisible.
The fix is simpler than any optimization strategy. Put the current model, token usage, and session cost on a single line at the bottom of the terminal. That one line means you glance at it unconsciously before starting a big task. That unconscious glance, repeated every day, reshapes the monthly bill.
You can only control what you can see. To control cost, start by making it visible.
The Statusline: A Cost Dashboard at the Bottom of Your Terminal
The persistent one-line status display at the bottom of the Claude Code terminal is the Statusline. You might not consciously notice it at first, but once you start looking, it becomes automatic.
Default items:
| Item | Meaning |
|---|---|
| Model | The model currently in use (sonnet / opus / opusplan, etc.) |
| Token usage | What percentage of the current context window is filled |
| Session cost | Cost accumulated this session (subscription users see it vs. limit) |
| Current mode | default / acceptEdits / plan / auto, etc. |
It appears automatically. No setup required.
What Happens When You Stop Looking
Pairing "ignoring the Statusline" with "watching it" makes the difference concrete:
| Not watching | Watching |
|---|---|
| Tokens hit 90% unnoticed → auto-compact fires → partial context loss | Reach 80% → intentionally /compact |
| Opus running on simple tasks for 30 minutes → surprise bill | See 'opus' in Statusline → switch to sonnet |
| AcceptEdits mode undetected when running a risky command | Mode display → immediate awareness |
| Session stretching without realizing it | See accumulated cost → decide to split sessions |
The difference is simple: what you see, you act on. What you don't see, you let slide.
💡 Here's something that actually happened. During a class session, a student realized — after two hours of work — that the model had been Opus the entire time, not Sonnet. It was a subscription plan so there was no direct extra cost, but the realization that the model had been running without any awareness was unsettling. After that, the first thing the student checked at the start of each session was the model indicator. Deliberate choices require visible information.
/statusline: Customize What You See
If the defaults aren't enough, or you want to add more, open the interactive menu with /statusline.
/statusline
You can toggle which items to display:
- Model · token usage · session cost · current mode
- Current directory · git branch · elapsed time
- 5-hour usage window · 7-day usage window
Color and emphasis settings are also available. Settings persist in ~/.claude/settings.json or the project .claude/settings.json.
Plugins can also define
subagentStatusLineto render a separate statusline for subagents.
/usage: When You Want the Full Picture
/usage (alias: /cost, /stats) is an on-demand detailed report command. Statusline is always-on; /usage is called when needed.
| Tool | When | How much info |
|---|---|---|
| Statusline | Always | 4–6 key items |
/usage | On demand | Full session cost, limit position, activity stats, model breakdown |
The standard flow: Statusline signals something unusual → /usage for precise diagnosis. Statusline gives you the sense that "something looks high" — /usage shows you exactly where and how much.
A Cost-Reduction Workflow
Responding to these four triggers while watching the Statusline eliminates 90% of token waste.
| Trigger | Action |
|---|---|
| Token usage 80% | /compact keep only the essentials |
| Token usage 95% | Immediate /clear or git commit then new session |
| Model is opus but task is simple | /model sonnet |
| Session cost is double usual | Pause briefly and check what caused the spike |
Once these four responses are habit, unexpected bills become rare.
5-Hour / 7-Day Usage Windows
Subscription plans (Pro, Max, Team) tie Claude Code usage to a 5-hour window and a 7-day window. As you approach limits, responses slow or stop.
Displaying these two values in the Statusline lets you answer "can I do more today?" at a glance.
/statusline → enable "5h limit" and "7d limit" items
💡 Limit display is meaningful for subscription plans. API users will find the token and cost items more relevant.
Non-Coding Work Needs This Too
The Statusline might seem relevant only to coding tasks. It matters just as much for research and document work. Long texts and many file reads consume tokens faster than expected.
Stock Research Session
9:00 AM: Statusline shows 'sonnet · 12% · $0.04 · default'
→ Start summarizing news for 10 holdings
10:30 AM: 'sonnet · 78% · $0.31 · default'
→ Getting close to 80%. Time to compact.
"/compact keep only the per-ticker conclusions, drop the news text"
11:00 AM: 'sonnet · 22% · $0.31 · default'
→ Clean context again, start financial statement analysis
Without the Statusline, by 11:00 AM responses would have slowed and context would have been trimmed silently without knowing where.
Real Estate Listing Comparison
When input data is large — dozens of listings — tokens fill up fast. When the Statusline hits 50%, splitting listings into groups across new sessions and doing the final comparison at the end in one shot is a stable approach.
💡 Here's something that actually happened. I was summarizing recent blog posts from 10 competitor companies. Around the seventh company, the quality of responses started to feel off. Later I checked and discovered tokens had exceeded 95%, triggering auto-compact. The earlier summaries had been quietly truncated while work continued. Since that day, I check the Statusline token item first when starting any research session.
Common Mistakes
| Mistake | What actually happens |
|---|---|
| Hiding / turning off Statusline | Token limit exceeded without awareness. Context loss is undetectable. |
| Only watching session cost | Tokens measure limit position; cost measures accumulation. Both need watching. |
| Too many display items | Information overload → you stop looking. Keep it to 4–5 core items. |
| Never updating the setup | Different tasks need different items. Research and coding sessions need different views. |
Recommended Setup by Task Type
| Task | Recommended items |
|---|---|
| General coding | Model · token% · mode |
| Cost-sensitive work (Opus, long context) | + Session cost · 5h limit |
| Non-coding research/docs | Model · token% · 7d limit |
| Automation/headless | Model · mode · session cost |
Start with defaults. After a week you'll naturally notice which items you wish you could see and add them one at a time.
Before You Close This Chapter
- Checked what items are currently shown in the Claude Code terminal Statusline
- Opened
/statuslineand explored what can be toggled - Ran
/usageand looked at the detailed report for the current session - Picked one trigger — "when tokens hit 80%, I'll run /compact" — and committed to it
The next chapter (15 MCP & External Tool Connections) covers what comes after controlling cost: connecting Claude to the outside world. Once you're watching what you're spending, connecting external tools to automate repetitive copy-pasting becomes the natural next step.
MCP & Integrations
Connect external tools like GitHub, Slack, and databases via MCP.
15. Extending Claude's Reach
Notion · Slack · Google Sheets · GitHub · DB. One connection and the copy-pasting stops. The first time I connected Notion MCP, my immediate thought was: why did I ever move this by hand?
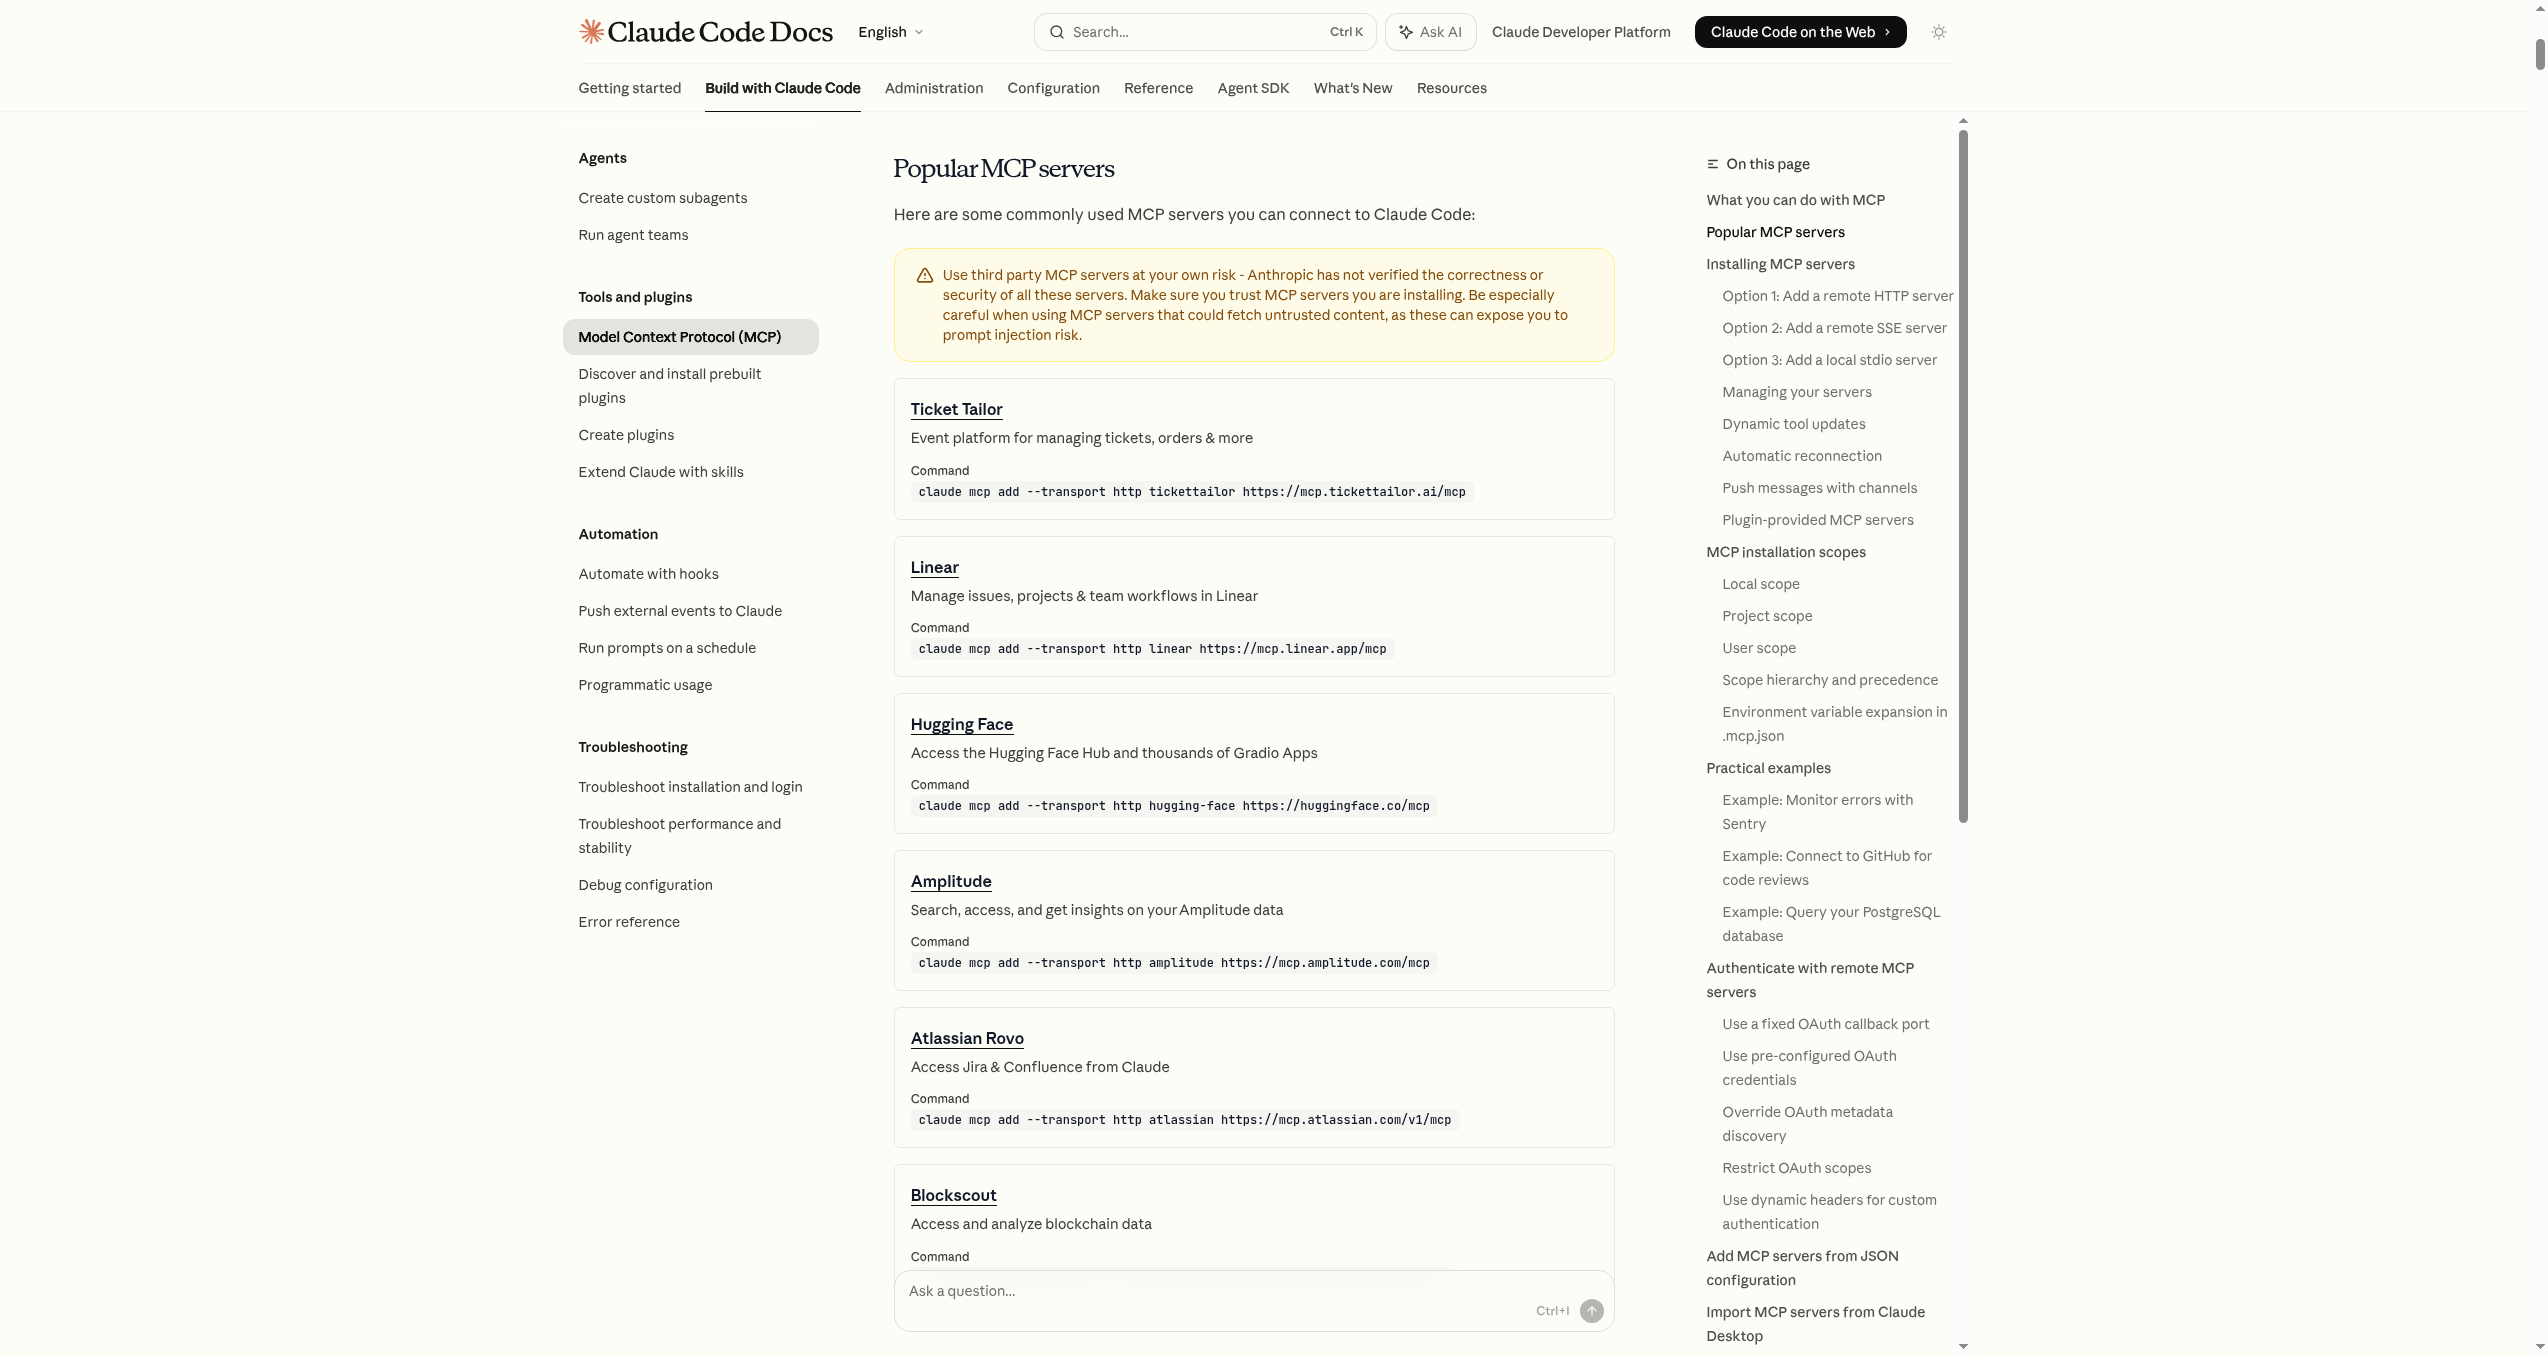 Source: MCP & Integrations — Anthropic official docs
MCP in One Line
MCP (Model Context Protocol) is an open standard that lets Claude talk directly to external tools and data sources. Basic Claude Code handles only local files and the terminal. With MCP connected, Claude can read Notion pages directly, summarize Slack messages, update Sheets, and open GitHub PRs. Developers gain DB queries, Sentry error analysis, and CI result checking.
Think of it as giving Claude a USB port. Plug in and it works immediately. Unplug and things go back to how they were. Multiple ports can be active at once, or just the one you need for the current task.
💡 Here's something that actually happened. Preparing a workshop, I needed research comparing landing pages for five competing services. Previously: open each site, copy the key copy, paste into a spreadsheet, arrange by category. An hour or more. After connecting Chrome MCP: "Visit these five sites, collect the main copy, pricing, and CTA button text in a table." Done in five minutes. That was the moment MCP stopped feeling like a convenience feature and started feeling like it changed how work happens.
Where the Copy-Paste Grind Disappears
Looking at what changes before and after MCP makes the difference clear.
Scenes knowledge workers and researchers hit regularly:
- Manually copying Notion meeting-notes pages → "Add today's meeting to the Notion page" in one phrase
- Manually entering data into Google Sheets → "Organize this data in Sheets"
- Visiting sites and copy-pasting information → "Build a comparison table of these 5 sites"
- Copying a Slack thread to ask for a summary → "Summarize today's discussion in #marketing and draft an announcement"
- Copying an email thread to ask for a draft reply → "Read this email thread and draft a reply"
🖥️ Developer version
- Pasting JIRA tickets → "Implement ENG-4521"
- Manually copying Sentry stack traces → "Analyze the major errors from the last 24 hours"
- Explaining DB schema before each query → "Find users who haven't purchased in 90 days"
- Copying PR content to request review → "Review PR #456"
- Manually checking CI results → "List failed tests since the last deploy"
What's Possible: Five Categories
GitHub: Working with PRs and Issues Directly
claude mcp add --transport http github https://api.githubcopilot.com/mcp/
# What becomes possible
> "Review PR #456 and suggest improvements"
> "Create a new issue for this bug I just found"
> "Show me my open PRs"
> "Show me the 3 largest changes merged this week"
The first thing I stopped at after connecting was "my open PRs." Watching that come back from the terminal — instead of opening GitHub, scanning notifications, switching tabs — made me realize the context-switching cost had been higher than I thought.
Sentry: Analyzing Production Errors
claude mcp add --transport http sentry https://mcp.sentry.dev/mcp
# After authenticating via /mcp
> "What were the major errors in the last 24 hours?"
> "Show me the stack trace for error ID abc123"
> "Which deploy did these errors start in?"
> "Analyze the top 5 most frequent errors"
PostgreSQL: Direct DB Queries
# Use a read-only account if at all possible
claude mcp add --transport stdio db -- npx -y @bytebase/dbhub \
--dsn "postgresql://readonly:pass@prod.db.com:5432/analytics"
# After connecting
> "What's total revenue this month?"
> "Show me the orders table schema"
> "Find customers who haven't purchased in 90 days"
> "Calculate the conversion rate for new signups over the past 7 days"
Of these, schema lookup and inactive user analysis are the ones I use daily. Schema comes up constantly during development. Inactive user analysis connects directly to marketing work. The key is asking in natural language rather than writing queries directly.
Slack: Reading and Sending Messages
Full channel context flows straight in. When a bug report thread comes in, the whole history can be read and worked into immediately. "Pull out only the unresolved questions from today's discussion in #marketing" works fine.
Notion, Asana, Figma, and More
The official MCP guide lists available servers and connection methods in one place. The server count keeps growing — check back a month later and there will be new additions.
Installation: Four Entry Points
Remote HTTP server
Most official MCPs use this method.
Local stdio server
Direct connection to local tools and DBs.
SSE server
For cases where results stream in real-time.
JSON all at once
Register multiple servers via a config file.
Entry ① · Remote HTTP Server (Most Common)
Most official MCP servers use this method. A URL is all you need.
# Basic syntax
claude mcp add --transport http <name> <URL>
# Notion example
claude mcp add --transport http notion https://mcp.notion.com/mcp
# With an auth header
claude mcp add --transport http secure-api https://api.example.com/mcp \
--header "Authorization: Bearer your-token"
Entry ② · Local stdio Server
Runs directly on your machine. Best for local system access or custom scripts.
# Basic syntax
claude mcp add [options] <name> -- <command> [args...]
# Airtable example
claude mcp add --transport stdio --env AIRTABLE_API_KEY=YOUR_KEY airtable \
-- npx -y airtable-mcp-server
Seems complex at first. Once familiar, it's the most direct method for connecting local tools.
Entry ③ · SSE Server (Streaming)
claude mcp add --transport sse <name> <URL> \
--header "Authorization: Bearer <TOKEN>"
Entry ④ · JSON All at Once
Useful when options are complex or multiple servers need to be configured at once.
# HTTP server with OAuth
claude mcp add-json my-server '{"type":"http","url":"https://mcp.example.com/mcp","oauth":{"clientId":"your-client-id","callbackPort":8080}}' --client-secret
# stdio server with env vars
claude mcp add-json local-weather '{"type":"stdio","command":"/path/to/weather-cli","args":["--api-key","abc123"],"env":{"CACHE_DIR":"/tmp"}}'
--client-secret stores the OAuth client secret in a separate safe location.
Daily Management Commands
claude mcp list # List registered servers
claude mcp get github # Details for a specific server
claude mcp remove github # Remove a server
/mcp # Check status within a session
Where Settings Are Stored: Three Scopes
Specify with --scope <local|project|user>. Location determines who it applies to.
local(default):~/.claude.json(current project section). Applies only to the current project on your account.project:.mcp.json(project root). Git-commit to share with the team.user:~/.claude.json(global section). Applies to all projects on your account.
ℹ️
localandusergo into the same file but different sections. When confused, runclaude mcp listto see which section it's in.
# For team sharing
claude mcp add --transport http paypal --scope project https://mcp.paypal.com/mcp
# Personal global for all projects
claude mcp add --transport http hubspot --scope user https://mcp.hubspot.com/anthropic
For team projects, committing .mcp.json to Git means everyone starts with the same environment. New teammates who clone the repo get the MCP setup automatically. Keeping scopes clean reduces "works on my machine" issues.
Three to Start With
For getting a feel with one or two:
Recommended ㉠ · Notion MCP
claude mcp add --transport http notion https://mcp.notion.com/mcp
What disappears: Manually copying meeting notes, pasting research results, updating DBs by hand.
Example requests:
- "Get items from the Notion 'Meeting Notes' DB from the past 7 days and collect decisions and action items into weekly.md"
- "Add this research result to the Notion 'Competitor Analysis' page"
- "Pull tasks assigned to me in Notion and make a today's to-do list"
The moment that surprised me most with Notion MCP was page creation. Saying "organize the meeting results" resulted in a Notion page being created directly. Before that, the flow had been two-step: Claude generates text, I copy and paste. That second step vanished.
Recommended ㉡ · Slack MCP
Log into your claude.ai account and set up at claude.ai/settings/connectors.
What disappears: Manually reading channel threads, copy-pasting for summaries, writing announcement drafts yourself.
Example requests:
- "Read today's threads in #marketing, identify 3 key issues and the agreed next actions, and create a Slack announcement draft"
- "Collect today's bug reports mentioned in #dev"
- "List DMs from last week that I haven't replied to"
Recommended ㉢ · Google Chrome (Web Research)
Enable on the same connectors page.
What disappears: Manually visiting sites and copying information, switching tabs to compare multiple sources.
Example requests:
- "Visit these 5 competitor sites and summarize today's changes, new features, and pricing changes in a table"
- "Read 20 reviews of this product and identify the 3 most common complaints"
- "Compare the themes and unique perspectives across these 10 blog posts"
🖥️ Developer trio: GitHub · PostgreSQL · Sentry
GitHub MCP
claude mcp add --transport http github https://api.githubcopilot.com/mcp/
PR copy-pasting, manual issue lookup, and passing review context all disappear.
Of these, PR review is the daily one. "Review PR #123" from inside the terminal — without opening a browser — eliminates context-switching cost. Leaving PR comments can also be delegated to Claude.
PostgreSQL · DB MCP
claude mcp add --transport stdio db -- npx -y @bytebase/dbhub \
--dsn "postgresql://user:pass@localhost:5432/mydb"
Schema explanation, copying query results, and manual SQL execution shrink significantly.
Strongly recommend creating a separate read-only account. Analysis and reporting rarely need write access. One mistake with write access beats the cost of setting up the restriction upfront.
Sentry MCP
claude mcp add --transport http sentry https://mcp.sentry.dev/mcp
Stack trace copy-pasting and manual error-time lookups shrink. Authentication via /mcp opens the browser and completes automatically.
Official Connectors: One Click
If you're logged into claude.ai, servers enabled at claude.ai/settings/connectors follow Claude Code automatically. Currently supported:
- Slack: Read and write channel messages
- Google Chrome: Browser automation (Playwright-based)
Both are a few clicks to enable. For anyone trying MCP for the first time, these two have the lowest barrier — no command line needed.
OAuth-Required Servers: Two Beats
Cloud servers like Sentry and GitHub need OAuth authentication.
# Beat 1 — Add the server
claude mcp add --transport http sentry https://mcp.sentry.dev/mcp
# Beat 2 — Authenticate from within Claude Code
> /mcp
# Browser opens → log in → completes automatically
Tokens are saved and refreshed automatically. Once authenticated, no need to repeat. If the token expires, Claude will tell you re-authentication is needed.
MCP Prompts as Direct Commands
When an MCP server provides prompt templates, they run directly as /mcp__servername__promptname.
> /mcp__github__list_prs
> /mcp__github__pr_review 456
> /mcp__jira__create_issue "Login bug" high
For frequently used MCP commands, remembering this format is faster than explaining in natural language each time.
Before Installing: What to Check
Don't install servers you can't trust. An MCP server can access your files, DB, and external services through Claude. Servers that fetch external content carry prompt injection risks too.
Run through this checklist before installing:
□ Is this an officially provided server, or managed by a trustworthy org?
□ Is the GitHub repo's last commit reasonably recent?
□ Does the README explain required permissions and data access scope?
□ Is it clear where tokens and keys are stored?
□ Can the DB connection use a read-only account?
□ If a team project, was .mcp.json shared with teammates before committing?
For DB MCP, create a separate read-only account wherever possible. Analysis and reporting rarely require write access.
# Project-scope servers show teammates a confirmation prompt
# (automatic safety check for security review)
💡 Here's something that actually happened. I installed an MCP server shared in a community thread without checking it. Later I realized the server was requesting access to read my
~/.claude.json. Since then, I either read the source code directly or at minimum check GitHub star count and last commit date before installing. Starting with servers registered in the official MCP registry is the safest approach.
Where Two Weeks Becomes the Turning Point
From experience, the first two weeks are critical. The first week you use MCP enthusiastically because it's new. The second week, "I've gotten used to it" can send you back to doing things by hand.
The way to keep using it past week two is to build a request into a Skill or note it in CLAUDE.md the moment you notice repetition. "Oh, I did this last week too" — capture that. Stored once, you never think about it again. The workflow runs automatically.
What MCP Changes About How You See Work
After a few weeks with MCP, something shifts beyond workflow speed. The way you perceive problems changes.
Previously: checking Slack meant opening Slack. Seeing open PRs meant opening GitHub. Adding something to Notion meant switching to Notion.
After MCP: all of it became "ask Claude in the terminal." Context switching drops. Work flow stops breaking.
The more important change: when you hit a repetitive task, you automatically start wondering whether a connection exists for it. Things you assumed had to be done by hand start showing up as connection opportunities. That's the biggest change MCP creates.
Real Workflow Changes After One Week
After connecting MCP, the changes that show up over a week look like this — in the order I actually noticed them.
After meetings end: before MCP, summarizing meeting notes took 30 minutes. Open a note-taking app, extract decisions, match them against a Notion template, separate action items by owner. With Notion MCP connected: paste the meeting notes and say "add this as today's entry in the Notion 'Meeting Notes' database, put decisions in the decisions field and owner-specific tasks in the action items field." Under five minutes. Meeting notes time became review time instead of transcription time.
Competitor monitoring: every Monday morning I'd check competitor blogs, Twitter, and job posts. Usually an hour. With Chrome MCP: "Visit these five sites and summarize changes from the last seven days." Fifteen minutes. The remaining time is for thinking about how to respond to what was found.
Slack thread processing: dozens of threads hit team channels daily. With Slack MCP: "Collect all messages mentioning me today and sort them — needs reply vs. reference only." A 15-minute channel sweep became three minutes.
Using Multiple MCPs Together
MCP gets more powerful when several are connected at once than any single one alone.
Example with Slack + Notion + GitHub simultaneously active:
Say a bug report comes in on #dev. "Read today's bug reports on #dev, register each as a GitHub issue with priority high, add the same content to the Notion bug tracker database, and reply to #dev with 'Bug reports received, issue numbers: [numbers].'" Without MCP, this workflow done manually would take 30+ minutes of copy-pasting across three services. With MCP, it's one request.
One note when using multiple servers together: each server's responses accumulate in context. Requests that pull large amounts of data back-to-back can fill tokens quickly. Keep an eye on the Statusline token item.
MCP Starting Guide for Non-Developers
If you don't have a developer background, MCP might seem like it's not for you. The answer is: "If you use Notion or Slack, you can start right now."
Nothing to install. Go to claude.ai/settings/connectors and click to enable Slack or Chrome in a few clicks. No command line knowledge needed at all.
First request to try: "Read messages from this week in #teamchannel and list everything I need to reply to today."
That one request is enough to understand what MCP is worth.
Clicking a few times completes setup, and natural language sends requests. No need to open dedicated apps or websites. The context switch from Slack tab back to Claude disappears. That small change, repeated dozens of times a day, adds up to more time saved than you'd expect.
People who try MCP for the first time are often surprised it's this straightforward. You don't need complex setup. Start with one server that connects by clicking, and expand from there. The first connection is the hardest part. After that, each additional server takes just a minute or two to set up.
Before You Close This Chapter
- Chose one of Notion, Slack, or Chrome and connected MCP directly
- Ran
claude mcp listand saw the registered server list - Sent one actual read request to the connected server
- If planning to use DB MCP, created a separate read-only account
The next chapter (16 Hooks: Automation Core) covers what Hooks do where MCP was about "connecting to the outside world" — controlling Claude Code's own behavior. Blocking dangerous commands before execution and getting notifications when work finishes come from here.
Hooks: Automation Core
Customize Claude Code with event-driven automation using Hooks.
16. Hooks: The Safety Belt That Catches Claude Before the Mistake
What if AI runs
rm -rfor wipes history withgit push --force? Hooks intercept that before execution. Not LLM judgment — code that blocks 100% of the matched pattern.
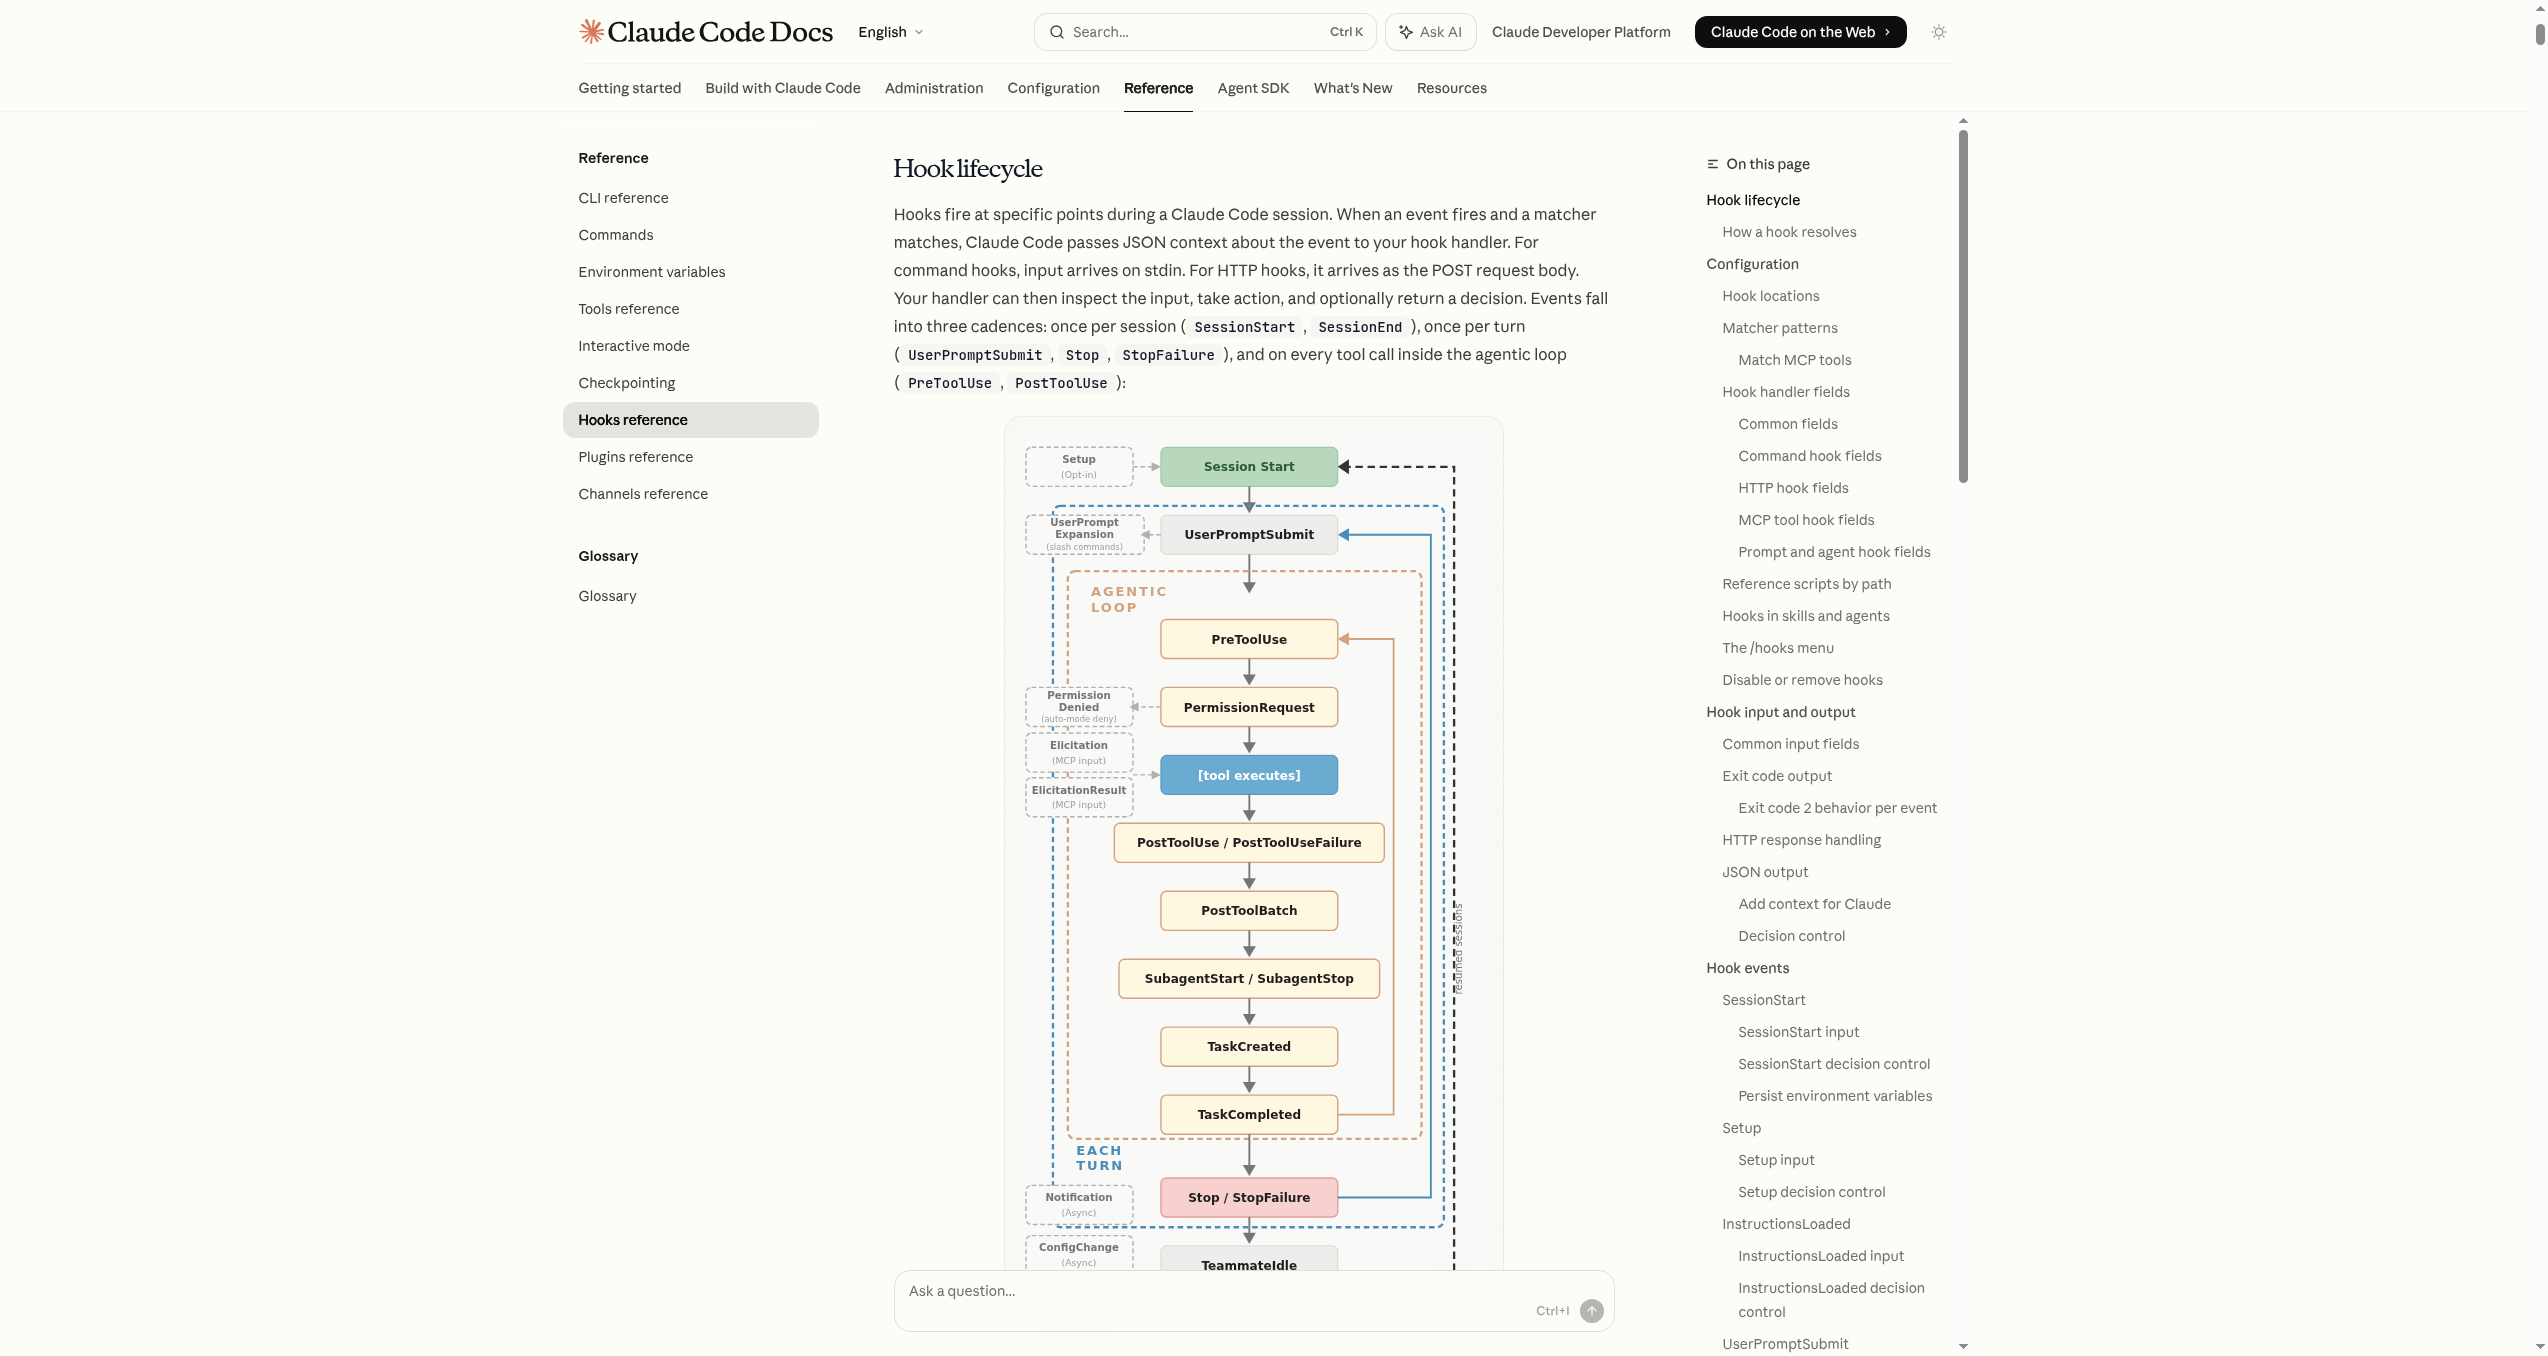 Source: Hooks — Anthropic official docs
What Happened Before Hooks Existed
Vibe-coding means giving Claude wide latitude — "figure out the best way to do this." Most of the time it works. Occasionally, something you didn't expect happens.
rm -rfdeletes the entire project folder in one shotgit reset --hardwipes uncommitted work completelygit push --forceoverwrites a teammate's code on the remoteDROP TABLEdestroys a database
When any of these hit, it's not just that day's work that ends. It's days of work that end. Claude didn't mean harm. It reasoned "this must be right" and was wrong. The one-time cost of that wrong reasoning is devastating.
Hooks intercept dangerous commands before execution with code. Not AI judgment, not human judgment: a simple safety belt that stops when the pattern matches. Patterns don't get tired. They work even during peak flow states.
What Does a Hook Actually Do
A Hook is a shell command that runs automatically when a specific Claude Code event fires. The official Hooks page defines around 20-some events. The ten worth knowing as a beginner:
PreToolUse: Just before a tool executes (block dangerous commands)PostToolUse: Just after a tool executes (auto-format, log)Stop: When Claude finishes responding (completion alert)Notification: When Claude sends a notification (desktop alert)SessionStart: When a session starts or resumes (inject context)SessionEnd: When a session ends (cleanup, usage logging)UserPromptSubmit: When a prompt is submitted (preprocess input)PreCompact: Before context is compressed (preserve critical info)SubagentStart: When a subagent starts (delegation log, budget check)SubagentStop: When a subagent stops (validate result, summarize)WorktreeCreate: When a worktree is being created (--worktreeorisolation: "worktree"). Can replace default git behaviorWorktreeRemove: When a worktree is being removed (at session exit or when a subagent finishes)
ℹ️ Event cadence: Once per session (
SessionStart/SessionEnd), once per turn (UserPromptSubmit/Stop), per tool call (PreToolUse/PostToolUse).The key contract:
exit 0= allow,exit 2= block (stderr message is sent to Claude). Blocking only works for "pre" events —PreToolUse,UserPromptSubmit,Stop,PreCompact,SubagentStop. Events likePostToolUsethat have already executed cannot be blocked.
Where to Put the Settings
Three locations, each with a different scope:
~/.claude/settings.json: All my projects (personal only).claude/settings.json: Current project (shared with team via Git).claude/settings.local.json: Current project (personal only)
💡 The
/hookscommand opens an interactive setup, but copying the examples below is faster.
First Hook ㉠: Safety Hook (Block Dangerous Commands)
This one Hook blocks most accidents. Start light.
- Minimal version: Block only
rm,git reset --hard,git push --force(for first-time Hook users) - Extended version: Block Git, DB, and production access too (for those who'll use it on real projects long-term)
The example below is the extended version. If it feels like too much, the three above are genuinely sufficient.
Create the script
Create ~/.claude/hooks/block_dangerous.py
Set executable permission
Run chmod +x to make the script executable
Register in settings
Connect it in the hooks section of ~/.claude/settings.json
Step ① · Create the Script File
Create ~/.claude/hooks/block_dangerous.py:
#!/usr/bin/env python3
"""Safety Hook — automatically blocks dangerous commands"""
import json, re, sys
BLOCKED_PATTERNS = [
# File deletion — use trash instead of rm (recoverable)
(r"\brm\s+", "Use trash instead of rm (brew install trash)"),
(r"\bunlink\s+", "Use trash instead of unlink"),
# Git history destruction
(r"git\s+reset\s+--hard", "git reset --hard deletes uncommitted work"),
(r"git\s+push\s+.*--force", "git push --force overwrites remote history"),
(r"git\s+push\s+.*-f\b", "git push -f overwrites remote history"),
(r"git\s+clean\s+-.*f", "git clean -f permanently deletes untracked files"),
(r"git\s+checkout\s+\.\s*$", "git checkout . discards all changes"),
(r"git\s+stash\s+drop", "git stash drop permanently removes a stash"),
(r"git\s+branch\s+-D", "git branch -D force-deletes a branch"),
# Database destruction
(r"DROP\s+(DATABASE|TABLE)", "DROP permanently deletes data"),
(r"TRUNCATE\s+TABLE", "TRUNCATE deletes all data"),
]
data = json.load(sys.stdin)
if data.get("tool_name") != "Bash":
sys.exit(0)
command = data.get("tool_input", {}).get("command", "")
for pattern, reason in BLOCKED_PATTERNS:
if re.search(pattern, command, re.IGNORECASE):
print(f"Blocked: {reason}", file=sys.stderr)
sys.exit(2)
sys.exit(0)
Step ② · Set Executable Permission
chmod +x ~/.claude/hooks/block_dangerous.py
Step ③ · Register in ~/.claude/settings.json
{
"hooks": {
"PreToolUse": [
{
"matcher": "Bash",
"hooks": [
{
"type": "command",
"command": "python3 ~/.claude/hooks/block_dangerous.py"
}
]
}
]
}
}
Execution Flow: When rm -rf node_modules Comes In
PreToolUseevent →block_dangerous.pyruns- Command matches
rmpattern exit 2blocks + "Use trash instead of rm" message sent to Claude- Claude receives the message and tries
trash node_modulesinstead
💡 trash sends files to the recycle bin so mistakes are recoverable. macOS:
brew install trash. Other systems:npm install -g trash-cli.
💡 Here's something that actually happened. During a build optimization session, Claude planned to delete and reinstall node_modules:
rm -rf node_modules && npm install. Without Safety Hook it would have run. The Hook caught thermpattern and stopped. Claude received "Use trash instead" and rantrash node_modules && npm install. The difference is recoverability.rmmeans unrecoverable;trashmeans you can undo a mistake.
Adding Blocked Patterns
Just append a line to the BLOCKED_PATTERNS list:
# Example: block chmod 777
(r"chmod\s+777", "chmod 777 is a security risk"),
# Example: block production SSH
(r"ssh\s+.*prod", "Production server access is blocked"),
# Example: block exposing env vars
(r"echo\s+\$\w*TOKEN", "Don't print tokens to the terminal"),
# Example: block direct production DB access
(r"psql.*prod\.db\.com", "Direct prod DB access blocked. Use staging."),
Patterns are Python regular expressions. Add one whenever something new needs blocking.
First Hook ㉡: Completion Alert
Hear when Claude finishes responding. Running a long task in Claude and checking back repeatedly — "done yet?" — stops. A sound tells you immediately.
💡 Here's something that actually happened. Context analysis assigned to Claude, switch to another window, look back five minutes later: "done already?" That five-minute wait, Claude had already finished and was waiting. After installing the completion alert Hook, I come back the instant the sound plays. Wait time disappeared.
macOS: System Sound
{
"hooks": {
"Stop": [
{
"matcher": "",
"hooks": [
{
"type": "command",
"command": "afplay /System/Library/Sounds/Glass.aiff"
}
]
}
],
"Notification": [
{
"matcher": "",
"hooks": [
{
"type": "command",
"command": "afplay /System/Library/Sounds/Frog.aiff"
}
]
}
]
}
}
Different sounds for Stop and Notification let you tell "finished" from "needs your attention" by ear.
Available macOS sounds:
ls /System/Library/Sounds/
macOS: Desktop Notification Popup
{
"type": "command",
"command": "osascript -e 'display notification \"Task complete\" with title \"Claude Code\"'"
}
Linux
{
"type": "command",
"command": "notify-send 'Claude Code' 'Task complete'"
}
WSL2: Windows Notification
{
"type": "command",
"command": "powershell.exe -Command \"New-BurntToastNotification -Text 'Claude Code', 'Task complete'\""
}
Both Hooks Together
Safety Hook + completion alert in one settings.json:
{
"hooks": {
"PreToolUse": [
{
"matcher": "Bash",
"hooks": [
{
"type": "command",
"command": "python3 ~/.claude/hooks/block_dangerous.py"
}
]
}
],
"Stop": [
{
"matcher": "",
"hooks": [
{
"type": "command",
"command": "afplay /System/Library/Sounds/Glass.aiff"
}
]
}
],
"Notification": [
{
"matcher": "",
"hooks": [
{
"type": "command",
"command": "afplay /System/Library/Sounds/Frog.aiff"
}
]
}
]
}
}
If you have other settings already, just add or merge the hooks key. Use /hooks to confirm what's registered.
Going further: Additional Hook examples
Protecting Sensitive Folders
Block Claude from touching customers/ or invoices/:
{
"hooks": {
"PreToolUse": [
{
"matcher": "Edit|Write",
"hooks": [
{
"type": "command",
"command": "FILE=\"$(jq -r '.tool_input.file_path // empty')\"; if [[ \"$FILE\" == customers/* || \"$FILE\" == invoices/* ]]; then echo \"Blocked: sensitive folder\" >&2; exit 2; fi"
}
]
}
]
}
}
Auto-inject Work Context on Session Start
{
"hooks": {
"SessionStart": [
{
"matcher": "",
"hooks": [
{
"type": "command",
"command": "cat ~/work-rules.txt"
}
]
}
]
}
}
Work rules automatically become part of Claude's context every session. No need to explain "in our team we…" every time.
Prompt-based Hook
When judgment is needed, type: "prompt" Hooks are a good fit.
{
"hooks": {
"Stop": [
{
"hooks": [
{
"type": "prompt",
"prompt": "Verify all tasks are complete. If anything is unfinished, continue working."
}
]
}
]
}
}
HTTP Hook: Call an External Validation Service
Send events to an HTTP endpoint instead of running a command. Useful for internal security validation servers or audit log collectors.
{
"hooks": {
"PreToolUse": [
{
"matcher": "Bash",
"hooks": [
{
"type": "http",
"url": "http://localhost:8080/hooks/pre-tool-use",
"timeout": 30,
"headers": {
"Authorization": "Bearer $MY_TOKEN"
},
"allowedEnvVars": ["MY_TOKEN"]
}
]
}
]
}
}
allowedEnvVars is a safety control that explicitly allows env variables to be interpolated into headers and URLs.
What Happens When a Hook Blocks
When a Hook blocks with exit 2 and sends a message to stderr, Claude receives that message and tries a different approach. This is the core behavior of Hooks. Not simply blocking — redirecting toward a better path.
The flow: I say "delete all these temp files." Claude tries to run a delete command. Safety Hook detects the pattern, sends exit 2 + "Use trash instead." Claude receives: "Sorry, that was blocked. I'll use trash." Then runs the trash version instead. Work doesn't stop. Claude re-routes.
This is why a specific alternative in the error message matters. With "Blocked" only, Claude doesn't know what to try next. With "Use trash instead of rm", Claude retries immediately.
Hooks aren't a firewall. They're a coaching tool. "Not that. Use this instead."
How Claude Responds to Hooks
Hooks don't reduce Claude's autonomy. They redirect it toward safer options. After an rm block in a session, Claude will mostly use trash spontaneously from that point on — it's learned from the message.
The result isn't less capable Claude. It's Claude whose capability is aligned with safer patterns.
Troubleshooting: Four Common Issues
- Hook doesn't run → Check event name in
/hooks, check matcher capitalization (Bashnotbash) - Script doesn't execute → Run
chmod +xto set executable permission. Check withls -la ~/.claude/hooks/ - JSON parse error → If
~/.zshrcor~/.bashrchas echo statements, wrap them in interactive-shell conditions. Hooks run in non-interactive shells. - All file edits are blocked → Check
exit 2conditions in thePreToolUseHook. An overly broad pattern may be catching things it shouldn't.
Debug with claude --debug or Ctrl+O to see Hook execution logs.
How to Introduce Hooks Gradually
Starting with a complete Hook setup from day one can feel like too much. A gradual approach is more practical.
Week one: completion alert only. Zero risk, immediate value. You get a feel for how Hooks work and why they matter. If something goes wrong, the worst outcome is that you don't hear a sound.
Week two: Safety Hook minimal version. Block only rm, git reset --hard, and git push --force. Three patterns are easy to understand and manage. If a pattern is too broad and blocks something it shouldn't, the short list makes it easy to identify and fix.
Weeks three and four: add patterns based on real experience. "I wish this had been blocked" moments from your actual work are more valuable than patterns from imagination. Add one new pattern each time you have that thought.
After a month: share with the team. Hook settings that have been verified through real use go into .claude/settings.json and get committed to Git. Team members add patterns from their own experience and the Safety Hook becomes a record of the team's accumulated knowledge.
Hooks and the Safety Net Together
Hooks work best as part of the full safety net from chapter 16. Plan Mode stops surprises before execution. Hooks catch accidental dangerous commands during execution. Checkpoints and git commits provide recovery if something does go wrong.
Each layer handles different failure modes. Plan Mode prevents "Claude goes too wide." Hooks prevent "Claude makes a destructive action by mistake." Checkpoints and git handle "something went wrong anyway."
With all three layers, the mental model shifts from "be careful" to "go ahead, it's covered." That shift is what makes experimentation faster.
The order matters too. Commit to git first — that's the outer safety net covering everything. Then Plan Mode before large changes — that's proactive prevention. Then Hooks running during execution — that's reactive interception. Each catches what the one before it might miss. Together they form a complete defense in depth.
What Hooks Give You That You Didn't Expect
Installing Safety Hook and running the same session afterward, something shifts. You hand more to Claude. "What if this goes wrong" fades. The safety net is there — verified by the sound of the first block.
That shift in trust translates into bolder experiments. Bolder experiments produce results faster. Safety nets don't slow you down. They let you go faster.
The Story of Introducing Hooks on Our Team
When we started using Claude Code as a team, the first official policy was "Safety Hook required." The reason was simple: one teammate ran git push --force and overwrote a remote branch. Recovery took two hours.
After that incident, Safety Hook went into .claude/settings.json and got committed to Git. New teammates cloning the repo automatically had the Hook applied. No additional explanation needed — everyone had the same safety net from day one.
A few things changed:
The first was that git push --force attempts simply disappeared. Not because the Hook blocked them — teammates had learned to use --force-with-lease or merge-based workflows instead. The Hook became a teaching tool.
The second was that when Claude tried rm, "Use trash instead" came up and Claude naturally switched to trash. As that happened repeatedly, teammates started using trash manually too instead of rm.
The third was that teammates experimented more freely. Without "what if something gets wiped," bolder changes and more complex automations got attempted. Those experiments accumulated and changed how the team worked.
Two months later, a teammate said: "It looked complex at first, but now I'd feel unsafe without it." That's what Hooks do.
A Complete Safety Hook
Here's the full version of the Safety Hook I actually recommend. One file covers most dangerous situations.
The pattern list covers: file deletion that bypasses recovery, Git history destruction including force pushes and hard resets, Git branch force-deletion, database destruction commands, and system-level risky operations. Each blocked pattern includes an alternative so Claude knows what to try next. The script handles both Bash tool calls and file edit operations.
The installation is three steps: create the script file, set executable permission, and register it in settings.json. The whole process takes 15 minutes at most. Once done, it runs silently on every tool call, requiring no further attention.
Hook Event Reference: What Fires When
The events break into two categories: pre-execution (blockable) and post-execution (processing only).
Pre-execution events worth knowing: PreToolUse fires before every tool call. UserPromptSubmit fires when you submit a prompt — useful for filtering dangerous natural-language requests like "delete the entire database." Stop fires when Claude finishes a response — you can force continuation if work is incomplete. PreCompact fires before context compression — preserve critical information here.
Post-execution events: PostToolUse fires after a tool completes — auto-format, log changes, run tests. SessionStart fires at session open or resume — auto-inject work context. SessionEnd fires when a session closes — record usage, run cleanup. Notification fires when Claude sends an alert — convert to desktop notification or sound.
Understanding this split determines which events to use for which goals. Anything you want to prevent goes in a pre-execution event. Anything you want to happen automatically after an action goes in a post-execution event.
How to Write Good Block Messages
When a Hook blocks with exit 2 and sends a message to stderr, that message reaches Claude. What you write in it determines what Claude does next.
Three components of a good block message: explain why it was blocked, provide a specific alternative, keep it to two lines or less.
Without an alternative, Claude asks "what should I do?" and work pauses. With "Use trash instead of rm", Claude retries immediately with the safer command. The block doesn't interrupt work flow — it redirects it.
Conciseness matters. Long explanations bury the alternative. "Blocked: rm permanently deletes files. Use trash instead (brew install trash)." is better than a three-sentence explanation followed by the alternative at the end.
The Cascade of Benefits
Hooks deliver benefits beyond the immediate safety function.
Learning by doing: every blocked pattern in the Safety Hook teaches something. Understanding why rm is risky, what the difference between force push and force-with-lease is, what git reset --hard actually destroys — these get learned through the context of the block message, faster than any documentation.
Transparency: reading the JSON that PreToolUse receives makes Claude's process visible. "Oh, Claude uses the Edit tool to modify files and Bash for terminal commands" becomes understood by experience rather than theory.
Team knowledge as code: "How does this team write commit messages?" becomes answerable by showing the SKILL.md. "What commands are we guarding against?" becomes answerable by showing the Safety Hook. The team's working practices get written down.
For Non-Developers: Hooks Are Useful Too
Hooks might seem like a developer concern. They're useful for anyone working with sensitive data.
Protecting important document folders: create a Hook that blocks Claude from modifying contracts, financial reports, or legal documents folders. "Only I touch these directly" enforced in code rather than relying on Claude's judgment.
Work completion notification: the completion alert Hook tells you when any long Claude task finishes, whether you're doing data analysis, writing research summaries, or generating comparison tables. No need to watch the screen.
Session context injection: each morning when a session starts, work rules or today's task list loads automatically. No need to explain "what we're working on today" every session.
Hooks in Practice: Patterns to Take It Further
Once the two basics (Safety Hook + completion alert) feel natural, you can start building custom Hooks that match your real workflow. These are patterns I've used in practice and found genuinely useful.
Pattern 1: Auto git commit before a large operation
Take a checkpoint snapshot before kicking off any large task.
#!/usr/bin/env python3
"""Auto checkpoint commit before a large operation"""
import json, sys, subprocess, re
data = json.load(sys.stdin)
if data.get("tool_name") not in ["Edit", "Write"]:
sys.exit(0)
# If 5+ files are being modified, take a checkpoint commit
files = data.get("tool_input", {}).get("file_path", "")
if files:
result = subprocess.run(
["git", "diff", "--name-only"],
capture_output=True, text=True
)
changed = len(result.stdout.strip().split('\n')) if result.stdout.strip() else 0
if changed >= 5:
subprocess.run(
["git", "commit", "-am", "auto: checkpoint before large edit"],
capture_output=True
)
sys.exit(0)
Pattern 2: Prevent secret leaks
Catch attempts to hardcode API keys or passwords into code.
#!/usr/bin/env python3
"""Hook to detect hardcoded secrets"""
import json, re, sys
SECRET_PATTERNS = [
(r'(?i)(api_key|secret|password|token)\s*=\s*["\'][^"\']{8,}["\']',
"A secret is about to be hardcoded. Use an environment variable instead."),
(r'sk-[a-zA-Z0-9]{20,}',
"This looks like an OpenAI API key."),
(r'ghp_[a-zA-Z0-9]{36}',
"This looks like a GitHub token."),
]
data = json.load(sys.stdin)
if data.get("tool_name") not in ["Edit", "Write"]:
sys.exit(0)
content = data.get("tool_input", {}).get("new_content", "") or \
data.get("tool_input", {}).get("content", "")
for pattern, msg in SECRET_PATTERNS:
if re.search(pattern, content):
print(f"Security warning: {msg}", file=sys.stderr)
sys.exit(2)
sys.exit(0)
Pattern 3: Auto-backup before editing critical files
Back up important config files before they get modified.
#!/bin/bash
# Auto-backup before editing critical files
FILE=$(echo "$1" | python3 -c "import json,sys; d=json.load(sys.stdin); print(d.get('tool_input',{}).get('file_path',''))" 2>/dev/null)
IMPORTANT_FILES=("config.json" ".env.production" "nginx.conf" "docker-compose.yml")
for f in "${IMPORTANT_FILES[@]}"; do
if [[ "$FILE" == *"$f"* ]]; then
BACKUP="$FILE.backup.$(date +%Y%m%d_%H%M%S)"
cp "$FILE" "$BACKUP" 2>/dev/null
echo "Backup created: $BACKUP" >&2
break
fi
done
exit 0
Pattern 4: Auto-log cost
Log /usage info to a file every time a session ends.
{
"hooks": {
"SessionEnd": [
{
"matcher": "",
"hooks": [
{
"type": "command",
"command": "echo \"$(date '+%Y-%m-%d %H:%M') - Session ended\" >> ~/.claude/cost-log.txt"
}
]
}
]
}
}
A Field Report: What Changed After Our Team Adopted Hooks
When our team started using Claude Code seriously, the first official policy was "install the Safety Hook." The reason was simple. A teammate had wiped a remote branch with git push --force, and recovery took two hours.
After that, we put the Safety Hook in .claude/settings.json and managed it through Git. When a new teammate joins, the Hook applies automatically the moment they git clone. Without any extra explanation, everyone has the same safety net.
A few things changed:
First: attempts to git push --force simply stopped. Not because the Hook blocks them — but because people picked up the habit of using --force-with-lease or merge-based workflows. The Hook became a teaching tool.
Second: when Claude tries to run rm, the message "use trash instead" comes back, and Claude switches naturally to trash. As this repeated, team members also picked up the habit of using trash instead of rm in their own manual work.
Third: people experiment more freely. When the fear of "what if something gets wiped" fades, bolder experiments increase. The Hook creates speed.
Two Principles for Hook Design
After building and maintaining several Hooks, two principles stand out.
Principle 1 — keep Hooks lightweight: a slow Hook makes every Claude operation slow. PreToolUse runs on every tool call. For Python scripts, keep module imports minimal and avoid unnecessary external calls. Aim for under 50ms.
Principle 2 — keep Hooks clear: when you block with exit 2, the stderr message reaches Claude. If you only write "blocked," Claude doesn't know why. Spell out a concrete alternative — like "use trash instead of rm" — and Claude immediately retries the right way.
# Bad
print("blocked", file=sys.stderr)
sys.exit(2)
# Good
print("blocked: use trash instead of rm (brew install trash)", file=sys.stderr)
sys.exit(2)
Hook Monitoring: How to Make Sure It Still Works
A configured Hook isn't necessarily a working Hook. Here are ways to keep an eye on them.
1) Check the list with /hooks: inside a session, /hooks shows currently registered Hooks. If yours isn't in the list, re-check the settings file.
2) Send a test request: ask for something that should be blocked, like "run echo 'test rm command'". Use a harmless command that won't touch real files, just to verify the Hook fires.
3) --debug mode: start with claude --debug to see Hook execution logs. You can trace which Hook ran when and what exit code it returned.
claude --debug
When You Have Too Many Hooks
As you write more Hooks, management can get messy. A few organizing tips.
Organize by script folder: split scripts under ~/.claude/hooks/ by purpose.
~/.claude/hooks/
├── safety/
│ ├── block_dangerous_commands.py
│ ├── block_sensitive_folders.sh
│ └── check_hardcoded_secrets.py
├── notifications/
│ ├── desktop_notify.sh
│ └── slack_notify.sh
└── automation/
├── auto_format.sh
└── auto_backup.py
Unified Hook script: roll multiple checks into one script.
#!/usr/bin/env python3
"""Unified Safety Hook"""
import json, re, sys
data = json.load(sys.stdin)
tool_name = data.get("tool_name", "")
tool_input = data.get("tool_input", {})
# Bash command checks
if tool_name == "Bash":
command = tool_input.get("command", "")
BLOCKED = [
(r"\brm\s+", "rm -> trash"),
(r"git\s+push\s+.*--force", "blocked: push --force"),
(r"DROP\s+TABLE", "blocked: DROP TABLE"),
]
for pattern, msg in BLOCKED:
if re.search(pattern, command, re.IGNORECASE):
print(f"blocked: {msg}", file=sys.stderr)
sys.exit(2)
# Edit/Write file checks
if tool_name in ["Edit", "Write"]:
file_path = tool_input.get("file_path", "")
PROTECTED = ["/contracts/", "/legal/", "/.env.production"]
for p in PROTECTED:
if p in file_path:
print(f"blocked: protected path ({p})", file=sys.stderr)
sys.exit(2)
sys.exit(0)
The Full Safety Hook: Final Version
This is the production-ready Safety Hook I actually recommend, built from everything covered above. One file covers most of the dangerous situations you'll encounter.
~/.claude/hooks/safety.py:
#!/usr/bin/env python3
"""
Claude Code Safety Hook
Blocks dangerous commands just before they execute.
"""
import json, re, sys
# --- Block patterns ----------------------------------------------------
# (pattern, reason, alternative)
BASH_BLOCKED = [
# File deletion
(r"\brm\s+-[rfRF]*\s", "rm -rf is not allowed", "use the trash command"),
(r"\brm\s+[^-]", "rm is not allowed", "use the trash command"),
# Git history destruction
(r"git\s+reset\s+--hard", "git reset --hard is not allowed",
"use git stash or git revert"),
(r"git\s+push\s+.*--force(?!-with-lease)", "git push --force is not allowed",
"use --force-with-lease"),
(r"git\s+push\s+.*-f\b", "git push -f is not allowed",
"use --force-with-lease"),
(r"git\s+clean\s+-[a-zA-Z]*f", "git clean -f is not allowed",
"stash first with git stash"),
# Database destruction
(r"DROP\s+(DATABASE|TABLE)\s+", "DROP DATABASE/TABLE is not allowed",
"back up first, or confirm with an admin"),
(r"TRUNCATE\s+TABLE\s+", "TRUNCATE TABLE is not allowed",
"verify your filter and use DELETE with a WHERE clause"),
# System risks
(r"chmod\s+777", "chmod 777 is not allowed",
"apply least privilege (e.g. chmod 644)"),
(r">\s*/etc/", "writing directly to /etc is not allowed",
"use admin privilege and back up before changing system config"),
]
FILE_PROTECTED = [
"/etc/passwd", "/etc/hosts", ".env.production",
"id_rsa", "id_ed25519",
]
def check_bash(command: str):
for pattern, reason, alt in BASH_BLOCKED:
if re.search(pattern, command, re.IGNORECASE):
msg = f"blocked: {reason}"
if alt:
msg += f"\n-> alternative: {alt}"
print(msg, file=sys.stderr)
sys.exit(2)
def check_file(file_path: str):
for protected in FILE_PROTECTED:
if protected in file_path:
print(f"blocked: access to protected file ({protected})", file=sys.stderr)
sys.exit(2)
def main():
try:
data = json.load(sys.stdin)
except Exception:
sys.exit(0)
tool_name = data.get("tool_name", "")
tool_input = data.get("tool_input", {})
if tool_name == "Bash":
command = tool_input.get("command", "")
if command:
check_bash(command)
elif tool_name in ("Edit", "Write"):
file_path = tool_input.get("file_path", "")
if file_path:
check_file(file_path)
sys.exit(0)
if __name__ == "__main__":
main()
Install:
# Create the script
mkdir -p ~/.claude/hooks
# Save the content above to ~/.claude/hooks/safety.py
chmod +x ~/.claude/hooks/safety.py
# Register in settings.json
{
"hooks": {
"PreToolUse": [
{
"matcher": "Bash|Edit|Write",
"hooks": [
{
"type": "command",
"command": "python3 ~/.claude/hooks/safety.py"
}
]
}
]
}
}
Automating Repetitive Work with Hooks
Beyond safety and notifications, Hooks are also great for automating repetitive tasks.
Run tests automatically on save
Trigger tests whenever a Python file is saved.
{
"hooks": {
"PostToolUse": [
{
"matcher": "Edit|Write",
"hooks": [
{
"type": "command",
"command": "bash ~/.claude/hooks/auto-test.sh"
}
]
}
]
}
}
#!/bin/bash
# auto-test.sh
FILE=$(python3 -c "import json,sys; print(json.load(sys.stdin).get('tool_input',{}).get('file_path',''))" 2>/dev/null)
if [[ "$FILE" == *.py ]]; then
cd "$(dirname "$FILE")" && python3 -m pytest -x -q 2>&1 | tail -5
fi
exit 0
Inject today's date and todo list at session start
#!/bin/bash
# morning-context.sh - inject context at session start
echo "=== Today: $(date '+%Y-%m-%d %A') ==="
echo ""
# Pull today's todos from Notion or a local file
if [ -f ~/today.md ]; then
echo "=== Today's tasks ==="
cat ~/today.md
fi
exit 0
{
"hooks": {
"SessionStart": [
{
"matcher": "",
"hooks": [
{
"type": "command",
"command": "bash ~/.claude/hooks/morning-context.sh"
}
]
}
]
}
}
With this Hook, every time a session starts, today's date and todo list get auto-injected into Claude's context. No more explaining "what we're working on today" from scratch.
Common Questions
My Hook is taking too long to run.
Hooks run on every tool call. For Python scripts, module imports can be the slow part. Stick to built-in modules (json, re, sys) and avoid heavy third-party libraries when you can. The default timeout is 30 seconds, so it's usually fine, but Hooks that make network requests should set a shorter timeout explicitly.
I want my Hook to send information back to Claude.
If you exit 0 (allowing the action) and print to stdout, that output gets included in Claude's response. A PostToolUse Hook can feed analysis results back to Claude this way.
# Output to stdout -> Claude reads it
print("File analysis complete: 3 potential issues found")
sys.exit(0) # Allow and pass info back
Each teammate wants a different Hook.
Put team-wide Hooks in .claude/settings.json and personal Hooks in ~/.claude/settings.json. Both files merge — Hooks from both run.
Before and After: A Direct Comparison
Comparing the experience before and after installing a Hook makes the difference clear.
Without the Safety Hook
[me] "Delete node_modules and reinstall"
[Claude] runs rm -rf node_modules && npm install
[result] Done. No issues.
--- 3 weeks later ---
[me] "Wipe the build folder and caches"
[Claude] runs rm -rf dist/ .cache/ build/
[result] Wait, there was an important file in dist/...
[cost] 1 hour to recover
With the Safety Hook
[me] "Delete node_modules and reinstall"
[Claude] rm blocked -> runs trash node_modules && npm install
[result] Done. Even if it was a mistake, the trash can recover it.
--- 3 weeks later ---
[me] "Wipe the build folder and caches"
[Claude] rm blocked -> runs trash dist/ .cache/ build/
[result] Done. If anything important was in there, the trash has it.
The difference is recoverability. Most of the time things go fine even without a Hook. With a Hook, the bad cases are recoverable.
Things the Hook Actually Caught
Real blocks I've witnessed.
1) Preventing accidental deletion of production data
In the middle of a refactor, Claude tried to "clean up test data" by running a DELETE query that did have a date condition. A pattern blocking DELETE without a WHERE clause wouldn't have caught it, since there was a WHERE clause — but the rows it would have deleted were still important.
After that, I added a Hook that requires running COUNT(*) first before any DELETE on the production DB. It forces verification.
2) Preventing env-var leaks
Claude tried echo $DATABASE_URL while debugging. That command prints DB connection info straight to the terminal. I added a rule blocking echoes of sensitive env vars.
3) Preventing direct production access
I added a pattern that blocks ssh prod.server.com. We enforce the principle that production is always reached through staging — and the Hook makes that rule concrete.
As these cases accumulate, the Safety Hook becomes a record of the team's hard-earned rules. "This happened -> we added this pattern" becomes the changelog.
Hooks JSON Syntax Reference
The structure that often trips people up, cleaned up in one place.
{
"hooks": {
"<EventName>": [ // Event name (PreToolUse, Stop, etc.)
{
"matcher": "<pattern>", // Tool name match (empty string matches all)
"hooks": [
{
"type": "command", // "command" | "prompt" | "http" | "mcp_tool" | "agent"
"command": "...", // when type is command
"timeout": 30 // timeout in seconds (default: 30)
}
]
}
]
}
}
Matcher examples:
"": applies to all tools"Bash": applies only to the Bash tool"Edit|Write": applies to Edit or Write (note: the pipe is a literal regex alternation)"Read": applies only to the Read tool
Hook types:
command— run a shell command (most common)http— call an HTTP endpointmcp_tool— invoke an MCP toolprompt— inject a prompt into Claude's contextagent— delegate to a subagent
JSON input structure by event:
PreToolUse receives JSON like:
{
"tool_name": "Bash",
"tool_input": {
"command": "rm -rf node_modules"
}
}
Stop receives JSON like:
{
"session_id": "xxx",
"turn_count": 5,
"stop_reason": "end_turn"
}
How Hooks Relate to MCP and Skills
Hooks, MCP, and Skills each extend Claude Code at different layers.
| Feature | Role | Example |
|---|---|---|
| MCP | Connect to external tools | Read GitHub PRs, create Notion pages |
| Hooks | Control and monitor Claude's behavior | Block dangerous commands, completion alerts |
| Skills | Save repeatable workflows | /commit, /meeting, /translate |
It's not about which is most important — the power comes from using them together.
For example:
- Connect Slack via MCP
- Use a Hook to "confirm before sending to Slack"
- Save a Skill that "posts the weekly team summary to Slack"
When the three click together, a single Friday-afternoon /weekly-summary automates everything.
Hooks for Non-Developers
Hooks might look like a developer-only feature. There are patterns that help non-developers too.
Protect critical documents
Stop Claude from modifying folders that contain contracts, financial reports, or legal documents.
#!/bin/bash
FILE=$(python3 -c "import json,sys; print(json.load(sys.stdin).get('tool_input',{}).get('file_path',''))")
# Protected folder list
if [[ "$FILE" == *"/contracts/"* ]] || [[ "$FILE" == *"/legal/"* ]]; then
echo "blocked: the contracts folder is edit-only by hand" >&2
exit 2
fi
exit 0
Email or Slack notification on task completion
Get an email or Slack ping when a long analysis finishes.
{
"hooks": {
"Stop": [
{
"matcher": "",
"hooks": [
{
"type": "command",
"command": "curl -s -X POST $SLACK_WEBHOOK -d '{\"text\": \"Claude Code: task complete\"}'"
}
]
}
]
}
}
Set SLACK_WEBHOOK to your Slack Incoming Webhook URL.
The Full Hook Event List and What It's For
Out of all the events available, here are the ones a beginner is most likely to need. Look up the rest in the official docs when you need them.
Pre-execution events that can block (use exit 2 to stop the action):
PreToolUse — fires right before any tool runs. The heart of the Safety Hook. It receives the tool name and input, and decides whether to allow or block. Applies to Bash, Edit, Write, Read, and every other Claude tool.
UserPromptSubmit — fires the moment you submit a prompt. Useful for prompt preprocessing or blocking certain keywords. You can filter dangerous natural-language requests like "delete the entire database."
Stop — fires when Claude is about to end its response. You can force "if there are unfinished tasks, keep going." Useful in automation where you don't want it to stop midway.
PreCompact — fires right before context compression. Save critical info elsewhere first, or block compression entirely under certain conditions.
SubagentStop — fires when a subagent is about to stop. Useful for validating or post-processing subagent results.
WorktreeCreate — fires when a new Git worktree is created. Useful for auto-initializing the new working directory (installing dependencies, copying config files).
WorktreeRemove — fires before a worktree is removed. Useful for checking uncommitted changes first or running cleanup.
Post-execution events (can't block — only react):
PostToolUse — fires right after a tool runs. Auto-format, log file changes, run tests. You can't undo what already happened, but you can automate the next step.
SessionStart — fires when a session starts or resumes. Inject work context, verify environment, print a welcome message.
SessionEnd — fires when a session ends. Record usage, run cleanup, save a session summary.
Notification — fires when Claude sends a notification. Convert into a desktop notification or sound.
What JSON PreToolUse Receives
When building a Safety Hook, the most important thing is knowing what data flows in.
For Bash tool calls:
The tool name is "Bash", and the command being attempted is in tool_input.command. Run regex over that to decide whether to block.
For Edit tool calls:
The tool name is "Edit", the target file path is tool_input.file_path, and the new content is in tool_input.new_content.
For Write tool calls:
The tool name is "Write", the file path is tool_input.file_path, and the content is in tool_input.content.
Knowing these three structures gets you through most Safety Hook work. Other tools (Read, Glob, Grep, etc.) usually don't need blocking — just sys.exit(0) through them.
Hook Resolution Order
Knowing which Hooks fire in what order helps avoid confusion.
Claude Code reads settings from several places: global (~/.claude/settings.json), project (.claude/settings.json), and project-local (.claude/settings.local.json). All Hooks defined across those three files get merged and run.
When multiple Hooks register for the same event, they all run in order. If any one returns exit 2, the action is blocked. So if both your global Safety Hook and your project's folder-protection Hook are present, both must pass to allow the action. If either blocks, the action is blocked.
This structure is useful because team policy (project settings) and personal config (global or local) can be managed independently. Strengthening team policy doesn't require changing personal settings, and vice versa.
How to Write Hook Alert Messages Well
When a Hook blocks, the message it sends to stderr reaches Claude. How that message reads determines what Claude does next.
Three conditions for a good block message.
First, explain why it was blocked. Just "blocked" leaves Claude in the dark. Write something like "git push --force overwrites remote history."
Second, suggest an alternative. "Use --force-with-lease instead" — something Claude can immediately retry with. Without an alternative, Claude pauses and asks "what should I do?"
Third, keep it concise. Short and clear beats long and detailed. Past two lines, the message's core gets lost.
When these three are in place, every block becomes a useful redirect: Claude reads the message and retries the correct way.
Hook Combinations That Work Well in Practice
Some Hooks are stronger together than alone.
Safety Hook + completion alert is the foundational pair. Safety Hook stops the dangerous, completion alert tells you when work finishes. These two alone meaningfully change the vibe-coding experience.
Safety Hook + auto checkpoint commit is great for large operations. When more than a certain number of files are being modified, auto-create a git commit first. If something goes wrong mid-operation, you can roll back to that last checkpoint.
Completion alert + cost logging is useful for cost tracking. Every finished task triggers a notification and logs the session's cost. Later you can answer "how much did this task actually cost?"
SessionStart + auto context injection + today's todos is the morning-startup combo. The moment a session starts, today's date, project state, and todo list all flow into Claude. No more re-explaining the situation every time.
Introducing Hooks to a Teammate for the First Time
How best to explain Hooks to a new teammate getting started with Claude Code.
The most effective approach is a live demo. Show what happens when an rm command is attempted, and how the completion alert sounds. People understand within 30 seconds. Showing the behavior beats explaining the concept.
The second most effective approach is the "story of what happened when we didn't have this." A real incident — "this is what happened before" — is far more convincing than the abstract "this is why you need it." If the team has had a real incident, tell that story.
For setup, don't over-explain. Just give them a file. "Save this file to ~/.claude/hooks/safety.py and add this to settings.json" — most people are done in 10 minutes. They don't have to understand the code.
Balancing Hooks and Claude's Autonomy
When you first learn about Hooks, you might worry "if I block things, won't Claude be unable to do its job?" Let me put that worry to rest.
Hooks block specific dangerous patterns. When rm is blocked, trash becomes the alternative. When git push --force is blocked, --force-with-lease takes over. Claude reads the block message and finds another way. Work doesn't stop.
If anything, the opposite happens. Because Claude knows the Hook exists (via the block messages it learns from), it starts to use the safer approach from the beginning. In the same session, once rm has been blocked, Claude usually switches to trash on its own next time.
Claude's autonomy doesn't shrink. It just gets aligned with safer directions.
Advanced Scenarios Hooks Unlock
Patterns beyond basic usage. Knowing these exist means you can reach for them when the need arises.
Multi-agent safety gating: when a subagent completes a specific task, verify its result. If it falls short of the criteria, block at SubagentStop to force a retry.
Automatic cost ceiling: a PreToolUse Hook checks accumulated session cost and blocks further tool calls once a threshold is exceeded. Automatically prevents overspend.
Context-aware blocking: a PreToolUse Hook checks the current Git branch and blocks edits to certain files on main. Prevents direct work on main without a branch.
Audit log automation: log every tool call via PostToolUse. Later, this becomes the audit log answering "what did Claude actually do?"
These advanced scenarios can wait until you need them. At the start, Safety Hook + completion alert is enough.
A True Story: The Team's First Hooks Adoption
This is what happened when our team started using Claude Code seriously. The first few weeks we used it without Hooks. The thinking was "if everyone's careful, we'll be fine." The result was as expected.
One evening, mid long session, a teammate asked Claude to "clean up unused dependencies." Claude planned a broader cleanup, and in the process of clearing the build cache, ran rm -rf over a path that included some uncommitted environment config files. The files were gone. Recovery took two hours, and that was the rest of the evening.
The next morning I built the Safety Hook config. Added the rm pattern, ran chmod +x, registered it in settings.json. A 15-minute task. The same accident has not happened since.
The second change was the completion alert. There was a pattern of handing Claude long analysis work, switching windows, and checking back late. After the alert Hook went in, you could come back the moment it beeped. Wait time dropped.
The third change was the team's attitude. With a safety net in place, people experimented more boldly. The fear of "what if it gets wiped" faded, and bigger refactors and more complex automations got attempted. Those experiments accumulated into a different way of working.
Two months in, a teammate said: "At first it looked complicated and I didn't want to bother, but now I'd feel uneasy without it." That's the shift Hooks deliver.
What You Learn by Building Hooks
Things you pick up naturally while building and maintaining Hooks.
You learn which commands are dangerous. Going through the blocked patterns of the Safety Hook one by one, you start to grasp why rm is risky, why git reset --hard is risky, what the difference is between git push --force and git push --force-with-lease. The Hook becomes a learning tool. Because you're writing the patterns yourself, the lesson sticks far better than reading theory.
You start to understand Claude's behavior patterns. Watching the JSON that flows into PreToolUse, you can see how Claude routes each task to a specific tool. The black box of Claude's internals becomes a little more transparent. "So Claude uses the Edit tool to modify files, and Bash for terminal commands" — you learn that by feel.
You pick up Python scripting basics naturally. Someone who's never coded can edit a Safety Hook and learn, in context, what a regex is, what a process exit code is. Faster than following a book. Because the learning has a real purpose, it sticks.
How Long Does Setting Up Hooks Actually Take
"Isn't Hook setup complicated?" is a frequent question. In practice, it's shorter than you'd think.
Completion alert setup: 5 minutes. A few lines in settings.json. No coding knowledge needed — copy and paste the JSON from this guide.
Minimal Safety Hook: 15 minutes. Create one Python file, chmod +x it, register it in settings.json. You don't need to know Python. You just need to know how to create and save a file.
Extended Safety Hook: 30 minutes. Adding more patterns takes a bit longer than the minimal version, but it's still a matter of picking patterns from this guide's examples.
One hour of initial setup prevents dozens of incidents later. It's one of the highest-leverage Claude Code configurations you can do.
Documenting Hooks for the You of a Month From Now
A month after writing a Hook, you sometimes can't remember why a given pattern is there. Especially for the less obvious ones.
A good habit is to add a comment next to each blocked pattern explaining why it's blocked. In the Python script as a comment, or in CLAUDE.md as a dedicated section.
For example: "Why we block git push force: it overwrites commits on a remote branch and can wipe a teammate's work. We had an incident in March 2024 and recovery took two hours." With this written down, new teammates can understand why a pattern is in place.
It's a way the team's experience gets written into code. Hook patterns are not just rules — they're records of what the team has lived through.
FAQ: Common Questions About Using Hooks
What if a Hook stops Claude from doing legitimate work: if an over-broad pattern is causing unintended blocks, temporarily remove or comment out that pattern in settings.json. Hooks are always editable. If Claude can't do some task, narrow the pattern.
I want different Hooks for different projects: that's supported. Put a .claude/settings.json in each project. Put shared config in the global file and project-specific config in each project's file. Both sets of Hooks merge and run.
The Hook script feels slow: Python scripts spin up a new interpreter each run. Heavy library imports slow that down. Sticking to built-ins like json, re, and sys keeps it under 10ms. Trim unnecessary imports.
I want to disable Hooks entirely: remove the hooks section from settings.json, or set it to an empty object (JSON has no comments). The configuration is gone.
The Day I Built My First Safety Hook
I remember the day I built my first Safety Hook. I opened the Python file, started listing the patterns to block, with a quiet doubt: "Is this actually going to help?" Maybe Claude would just be careful on its own.
The first test was "delete the test file," and Claude tried to run rm. The Hook caught it. The message "use trash instead of rm" went to Claude, and Claude immediately said "got it, switching to trash" and retried with the trash command.
That's when it clicked. The Hook isn't limiting Claude — it's redirecting Claude to a safer path. Not blocking. Redirection.
The second realization was the psychological shift. After the Safety Hook, I started handing Claude larger tasks more comfortably. Before, the "what if I lose something" worry made me hand things over in small pieces. With the Hook in place, I felt fine going bigger.
That change directly affected speed. Working cautiously without a safety net is slower than working confidently with one.
Common Misconceptions About Hooks
A few common misconceptions worth clearing up.
First misconception: "Setting up Hooks will block too much of what Claude does." In reality, only a handful of dangerous commands get blocked. Most work is untouched. Reading files, analyzing code, modifying content — none of it is restricted. The Hook only kicks in for a very narrow set of risky patterns.
Second misconception: "If I'm careful, I don't need Hooks." Personal caution and automated safety nets are different things. Even careful people make mistakes when tired. Late in a long session, when focus has dropped, or in the moment you hit "OK" on Claude's plan a little too quickly — that's when accidents happen. The Hook still works in that moment.
Third misconception: "If you don't know Python, you can't build a Safety Hook." You can copy and use the scripts in this guide directly. You don't need Python knowledge. Learn it when you want to add custom patterns later. You don't have to understand everything before starting.
The Real Gift Hooks Give You Is Speed
A safety net lets you move faster. This sounds backwards at first. A safety mechanism speeding things up?
Yes. When fear disappears, experimentation increases. The hesitation of "is this okay to try?" turns into "let's just try it." More experiments means hitting the result you want faster.
The core of vibe-coding is a fast feedback loop. Try, observe, adjust — the faster the cycle, the better. But if "what if this breaks something?" sits inside the cycle, the cycle slows. Every decision takes an extra second of thought.
Hooks remove that anxiety. Knowing that breaks are recoverable, and that dangerous commands get auto-blocked, lets you hit execute without hesitation. That lack of hesitation is the speed.
The More You Use Hooks, the Safer Claude Code Becomes
The real value of Hooks isn't just preventing accidents. It's letting you trust Claude Code enough to use it boldly.
When the "what if this gets wiped" worry is gone, you attempt larger refactors, you experiment with more complex automation, you delegate more to Claude. That accumulation of experiments leads to better code and faster work.
People with a safety net climb higher. Hooks are that net.
One Line
Safety Hook + completion alert: these two alone make vibe-coding noticeably safer and more comfortable. Losing a project to a single
rmis preventable. Prevent it.
Before You Close This Chapter
- Created
~/.claude/hooks/block_dangerous.pyand set executable permission - Registered the PreToolUse Hook in
~/.claude/settings.json - Ran
/hooksand saw the registered Hook list - Set up a completion alert Hook and confirmed the sound plays when work finishes
The next section covers automating repetitive tasks with Skills.
Skills & Building Plugins
Create Skills to automate repetitive tasks and share them as plugins.
17. Skills: Write Once, Run Forever
Describe a repeated task once. After that, one line runs it. Same description typed twice is one too many.
 Source: Skills — Anthropic official docs
The Problem Skills Solve
Using Claude Code regularly, you end up making the same requests repeatedly. Summarize meeting notes after meetings, write commit messages after changes, generate weekly reports. Explaining each from scratch every time makes prompts longer, and slightly different explanations produce inconsistent results.
A Skill saves the repetitive procedure to a file. Write it well once and /meeting, /commit, /weekly-report runs it immediately. Results always come out in the same format.
💡 Here's something that actually happened. Running a workshop for ten weeks, I had a weekly task: collect student questions from Slack, categorize them by type, and reflect them in next week's content. For the first few weeks I explained it to Claude fresh each time: "Get the questions from Slack and organize them in this format." By week ten, the explanation had drifted. One day I moved that explanation to a SKILL.md and called it
/weekly-qa. From the next week on, the task ran in three words.
Skill in One Line
A Skill is a reusable workflow that adds a new capability to Claude Code. Create one SKILL.md file and Claude recognizes it as a tool. Run it directly with /skillname or configure it to activate automatically when the right situation occurs.
Simply put: document a frequently used work procedure once. That one-time documentation means you can trigger it with a single phrase from then on.
ℹ️ The official docs recommend Skills, but custom slash commands in
.claude/commands/are still fully supported and keep working. They are separate mechanisms that share the same frontmatter; if a skill and a command share a name, the skill takes precedence.
Regular Conversation vs. Skill
| Regular conversation | Skill | |
|---|---|---|
| Execution | Type description every time | /skill-name once |
| Consistency | Results vary slightly | Always the same procedure |
| Team sharing | Difficult | Natural via Git commit |
| Argument passing | Buried in description | Clear via $ARGUMENTS |
| Tool restriction | Left to Claude's judgment | Only the allowed tools |
The consistency difference is the biggest change in practice. The same prompt written slightly differently each time produces different results. Skills eliminate that variation.
Where the Repetition Disappears
- Meeting recording to clean notes every time →
/meeting filenameonce - Explaining weekly report format every time →
/weekly-reportonce - Specifying language and format every translation →
/translate ko en README.md - Explaining competitor analysis format every time →
/competitor-analysis company - Explaining brand voice every SNS post →
/sns-post topic - Entering company info every email →
/email-draft purpose
If anything in this list makes you think "I do that every time too" — that's the first Skill candidate.
Creating Your First Skill: Three Beats
Create directory
Create the ~/.claude/skills/<name>/ folder
Write SKILL.md
Define the behavior in one page with frontmatter and body
Run
Call it from the /skills menu or verify the auto-trigger
Beat ① · Create Directory
# For use across all projects (personal)
mkdir -p ~/.claude/skills/commit
# For use in current project only
mkdir -p .claude/skills/commit
Beat ② · Write SKILL.md
.claude/skills/commit/SKILL.md:
---
name: commit
description: Analyzes changes and writes a good commit message, then commits. Use when committing.
disable-model-invocation: true
---
Analyze the current staged changes and commit in Conventional Commits format:
1. Run `git diff --staged` to see the changes
2. Identify the change type (feat/fix/docs/refactor/test/chore)
3. Write a title under 50 characters
4. Add body details if needed
5. Run `git commit -m "..."`
Beat ③ · Run
# Direct execution
/commit
# Or natural language — Claude auto-detects
"Commit the changes"
What a Skill Folder Looks Like
my-skill/
├── SKILL.md # Main instructions (required)
├── template.md # Template for Claude to fill (optional)
├── examples/
│ └── sample.md # Example output (optional)
└── scripts/
└── validate.sh # Script for Claude to run (optional)
SKILL.md alone is enough to create a Skill. Other files get added when you need them.
💡 Keep SKILL.md under 500 lines. Moving details to separate files makes maintenance easier later.
Frontmatter Options: The Ones You'll Use
---
name: my-skill # Skill name (directory name is default)
description: explanation # How Claude decides when to use it (required)
disable-model-invocation: true # true means only user can run it
user-invocable: false # false = doesn't appear in menu (Claude only)
allowed-tools: Read, Grep, Glob # Specify only the tools to allow
context: fork # Run in an independent subagent context
model: sonnet # Model to use for this skill
argument-hint: [argument hint] # Hint shown during autocomplete
arguments: required # Whether arguments are required
effort: high # Thinking depth (low/medium/high/...)
agent: review-agent # Delegate to a specific subagent
hooks: [PreToolUse] # Hooks to attach at execution time
paths: ["src/**"] # Path patterns the skill applies to
shell: bash # Shell used to run `!` backtick commands
---
ℹ️ For the full set of fields and current behavior, see the official Skills docs. Field names and defaults can change between versions.
Three patterns are enough to memorize:
- (default): User can run it and Claude can auto-trigger it (standard workflow)
disable-model-invocation: true: User-only execution, auto-trigger blocked (deployment, sending, etc.)user-invocable: false: Doesn't appear in menu, Claude uses it automatically (background knowledge, conventions)
Four Practical Examples
Example ① · Meeting Notes Auto-Organization
.claude/skills/meeting/SKILL.md:
---
name: meeting
description: Takes a meeting recording, converts it to text, and organizes meeting notes and action items. Use after meetings.
argument-hint: [recording file path]
disable-model-invocation: true
---
Process $ARGUMENTS to create meeting notes:
1. Install voice conversion tool (whisper etc.) if not present
2. Convert $ARGUMENTS to text
3. Write meeting notes in this format:
- Date / attendees
- Key discussion points (3–5 line summary)
- Decisions made
- Action items by owner (name: task, deadline)
4. Save as .md with the same name as the source file
Running it:
/meeting ~/Downloads/meeting-260225.mp3
You don't need to know Python or conversion tools in advance. Claude Code installs what's needed and runs it. Output format is locked in SKILL.md so it comes out consistently every time.
Example ② · SNS Content Automation
.claude/skills/sns-post/SKILL.md:
---
name: sns-post
description: Converts given content to SNS posts. Use when posting to blog, Instagram, or LinkedIn.
argument-hint: [topic or content]
---
Convert $ARGUMENTS to SNS posts:
1. Instagram version (10 hashtags, emojis, friendly tone, under 300 characters)
2. LinkedIn version (professional tone, insight emphasis, under 500 characters)
3. Twitter/X version (under 140 characters, core points only)
Separate each version with a divider line.
Running it:
/sns-post Our team successfully launched a new product. After six months of development...
🖥️ Developer example: Code review automation
.claude/skills/review/SKILL.md:
---
name: review
description: Reviews code. Use when checking code quality, security, or performance.
---
Review code in this order:
1. Analyze `git diff HEAD~1` or the file specified in $ARGUMENTS
2. Check:
- Code readability and naming conventions
- Missing error handling
- Security vulnerabilities (SQL injection, XSS, hardcoded secrets)
- Duplicate code
- Test coverage
3. Organize by priority:
- Critical (must fix)
- Warning (fix recommended)
- Suggestion (to consider)
Running it:
/review src/auth/login.ts
🖥️ Developer example: GitHub issue handling
.claude/skills/fix-issue/SKILL.md:
---
name: fix-issue
description: Implements a GitHub issue. Pass an issue number and it will analyze, implement, test, and commit.
disable-model-invocation: true
allowed-tools: Bash(gh *), Read, Edit, Write
---
Handle GitHub issue $ARGUMENTS:
1. Check issue content with `gh issue view $ARGUMENTS`
2. Understand requirements and make an implementation plan
3. Find related files and implement the code
4. Write and run tests
5. Close issue with `gh issue close $ARGUMENTS` and create a commit
Running it:
/fix-issue 123
Example ③ · Translation Automation
.claude/skills/translate/SKILL.md:
---
name: translate
description: Translates a file or text.
argument-hint: [file path or text] [target language]
---
Translate $ARGUMENTS[0] to $ARGUMENTS[1].
- Keep technical terms in the original (code, commands, proper nouns)
- Preserve Markdown structure
- Save the translation with the language code appended to the original filename
Running it:
/translate README.md ko
One Level Up: Dynamic Context Injection
The ! + backtick syntax runs a shell command just before Skill execution and injects the result into the context. When referencing helper files inside the skill folder, use the ${CLAUDE_SKILL_DIR} environment variable.
---
name: pr-summary
description: Writes a PR summary.
context: fork
allowed-tools: Bash(gh *)
---
## PR Context
- Changes: !`gh pr diff`
- PR comments: !`gh pr view --comments`
- Changed files: !`gh pr diff --name-only`
Write a clear PR summary based on the above.
Execution flow: ① the command inside backticks runs first → ② actual data gets injected into the prompt → ③ Claude sees that PR content and writes the summary.
Where Skills Are Stored: Priority Order
- Enterprise: Managed settings (applies org-wide)
- Personal:
~/.claude/skills/<name>/SKILL.md(all my projects) - Project:
.claude/skills/<name>/SKILL.md(current project) - Plugin:
<plugin>/skills/<name>/SKILL.md(when plugin is active)
When a Skill with the same name exists in multiple locations, enterprise > personal > project applies in order.
💡 If building from scratch feels daunting: run one small Skill personally first, and when it gets used across two or three projects, package it as a plugin then. That flow is safe.
Packaging as a Plugin
For reusing the same Skill bundle across multiple projects, plugin packaging is natural.
Folder Structure
my-plugin/
├── .claude-plugin/
│ └── plugin.json # Plugin metadata
├── skills/
│ ├── review/
│ │ └── SKILL.md
│ └── commit/
│ └── SKILL.md
└── hooks/
└── hooks.json # Plugin-specific Hooks
plugin.json
{
"name": "my-plugin",
"description": "Team common workflow collection",
"version": "1.0.0",
"author": {
"name": "Your Name"
}
}
Local Testing
# Run with plugin directory
claude --plugin-dir ./my-plugin
# Run a skill (with plugin namespace)
/my-plugin:review
/my-plugin:commit
Standalone vs. Plugin: Which Path?
- Personal workflow, quick experiments → Standalone (
.claude/skills/) - Reuse across multiple projects → Plugin
- Before shipping: test thoroughly in a personal environment first
How Claude Finds Skills Automatically
Claude looks at the description field to judge when to use a given Skill. The clearer "when to use this" is stated, the better Claude finds it.
# Well-written
description: Reviews code. Use when reviewing PRs, checking code quality, or doing security analysis.
# Underwhelming
description: review tool
To prevent auto-execution, add disable-model-invocation: true.
When Something Isn't Working
- Skill doesn't trigger → Include expressions users will actually type in description
- Skill triggers too often → Make description more specific
- Claude can't see the Skill → Check context limit status in
/context - Want to stop auto-execution → Add
disable-model-invocation: true
Skills for Non-Developers
Skills might look like a developer feature. They're genuinely useful for non-developers too.
If there's a document task at work that repeats every week, that's a Skill candidate. Weekly status reports, meeting summaries, customer email reply drafts, competitor monitoring summaries — these have fixed formats and repeat. Exactly where Skills shine.
Writing SKILL.md requires no Python or JavaScript. Just write "do this like this" in English. List the procedure with numbers and describe the output format. That's all SKILL.md is.
Starting out: take a good prompt you've already sent to Claude and move it to SKILL.md. No need to create anything new. Move a prompt that worked well and add $ARGUMENTS. Done.
The Value of Automating Repetition
If the same explanation takes one minute every time, ten times is ten minutes. Five days a week, daily repetition, and a month loses roughly an hour. That hour could go elsewhere.
But the real value of Skills isn't time saving. It's consistency. Meeting notes in different formats day to day are hard to search or compare later. Skills make every meeting note the same structure. That consistency compounds over time.
Second: cognitive load reduction. No need to think each time "how do I word this to get a good result." A working Skill already exists — just call /skillname. Good results with no thought required.
Third: team knowledge documentation. "How does this team write commit messages?" becomes answerable by showing SKILL.md. The team's workflow gets written down in files.
Finding Your First Skill Candidate
"Which Skill should I make first?" is a question I hear often. The simplest method: think back over the past week and recall whether you made the same request to Claude twice or more.
If the same request happened twice, it's a Skill candidate. Three or more times: make it now.
My first Skill was /commit. Writing commit messages came up daily, and "look at staged changes and commit in Conventional Commits format" got typed every time. After the SKILL.md existed, that typing disappeared. That was enough.
💡 Here's something that actually happened. When I first introduced Skills to a teammate, the response was: "It's just a text file. What's the big deal?" A month later that teammate had built more than ten Skills used across the team and packaged them as a plugin. Things that look simple at first reveal their value after actually using them. Skills are like that.
What Changes After You Make Your First Skill
After creating your first Skill, changes show up in a predictable order.
The first week you mostly move existing prompts that work well into SKILL.md files. "Oh, this could be a Skill too" becomes a recurring thought.
From the second week you start checking "is there a Skill for this" before starting a task. If there is, use it. If not, do it directly and leave a note: "make this a Skill next time."
After a month you have your own Skill library. Roughly 80% of repeated work is covered. The remaining 20% is genuinely new requests each time — either too unique for a Skill or not worth the overhead.
After three months teammates start asking "which Skills do you use?" Showing your Skills starts a conversation about building a shared library for the team.
None of this needs forcing. Apply it only where repetition shows up. That's enough.
What Makes a Good SKILL.md
The quality of SKILL.md determines the quality of Skill output. A few principles:
Specify the output format precisely. "Write a report" is weaker than "write a report in this format: 1. Summary (3 lines), 2. Key decisions, 3. Next actions." The more specific the format, the more consistent the output. No format specification means Claude chooses one differently each time.
Number the steps. If there's a process, number it 1, 2, 3. Claude follows numbered instructions more accurately than unnumbered prose.
Write constraints. "Don't call external APIs," "don't modify the file," "write in English only" — if there's something you don't want, say so explicitly. Without it, Claude uses its own judgment.
Include output examples. If possible, put an example of the expected output in an examples/ subfolder. Claude sees that file and follows the format more precisely.
When Skills Aren't the Right Tool
Skills aren't universal. Some cases don't fit well.
One-time tasks don't need a Skill. "Only done once" creates more management overhead than it saves. Make one when you're confident it'll repeat at least twice.
Work where context changes dramatically each time doesn't template well. Strategic planning, creative writing, solving genuinely new problems — these need different context each time and resist templating. For these, prompting fresh is better.
A Skill that grows too large becomes hard to manage. When SKILL.md starts exceeding 200 lines, consider splitting into smaller units or moving details to separate files. The simpler the Skill, the easier the maintenance.
Skills Combined with Other Features
Skills produce the most value in combination with other Claude Code features.
Skills plus MCP: connect an external tool with MCP, then save the workflow that uses it as a Skill. Connect Slack MCP and create a /weekly-summary Skill — the entire "generate and send weekly summary" flow becomes one line.
Skills plus Hooks: add a safety check with a Hook when a Skill executes. A deployment Skill where the Safety Hook blocks dangerous commands before they run.
Skills plus CLAUDE.md: write guidance in CLAUDE.md about "which Skill to use in which situation" and Claude makes better automatic Skill selections.
What Happens When You Turn a Prompt into a Skill
The prompt you send for the first time and the prompt you save as a Skill are different. The first time is exploratory. You don't know what output will come, and you refine through iterations until you get close to what you want.
The moment to save as a Skill is when you feel "this prompt always produces the result I want." When that confidence arrives, moving it to SKILL.md is natural.
Missing that moment means rediscovering the good version from scratch later. Saving the version that worked at the time is much safer than relying on memory.
One rule when saving: don't spend too long trying to make it "perfect." If it's 80% right, save it and improve through use. A Skill that never gets made because you're optimizing too long is worse than an 80% Skill you actually use.
Skills Development Stages
A big-picture view of how to evolve Skills from first creation:
Stage 1 is personal automation. Make one or two Skills for daily repeating tasks. Install in your personal environment. In this stage you learn SKILL.md writing and understand how the system works.
Stage 2 is team sharing. Move Skills that have been verified through real use into the project folder and commit to Git. As teammates use them, improvement ideas come in — update SKILL.md to incorporate them.
Stage 3 is plugin packaging. When a Skill bundle worth reusing across projects or sharing externally builds up, package it as a plugin. A plugin can be managed as one repository used consistently across multiple projects.
Stage 4 is custom extension. For more complex workflows: add script files, use dynamic context injection, connect to MCP.
Most users are fully served by stages 1 and 2. Stage 3 and beyond is for when the need arises naturally.
The Moment a Skill Starts Mattering
That moment is different for everyone. For some it's the first successful /commit. For others it's realizing the same explanation got written for the third time and immediately making a Skill out of it.
Once the first Skill exists and works, your relationship with repeated work changes. Before: "I need to explain this again." After: "There's a Skill for this." That shift is small in any single instance. Accumulated over months, it's substantial.
Skills are simple. A text file with instructions. That simplicity is their strength. Easy to modify, easy to understand, easy to share. When a teammate asks "how does this work?" opening SKILL.md answers the question. The file is its own explanation.
Start with one. The second comes naturally after the first. Small steps, compounding.
If you're reading this and thinking "oh, I should automate that thing I do every day" — that's the Skill to make today. Don't leave it as a thought. Open a terminal, create the directory, write the SKILL.md. It takes ten minutes. Ten minutes invested now means the next hundred times that task happens in one command.
The commit Skill is a good universal starting point. Developers need it daily. Anyone using git benefits from it. You can copy the example from this guide directly to start. Making the first Skill teaches you how the system works. Each one after that gets faster to create. The hundredth Skill takes under two minutes from idea to working command.
Skills accumulate quietly. One month in you have a handful. Six months in, a library. A year in, colleagues ask where to find your setup. That compounding is why it's worth starting today rather than later. The only requirement is making the first one.
One Line
Skill = a record that turns frequently done work into a single
/command. To share with a team, package as a plugin.
The next section enters the world of sub-agents: running the Skills you've built with multiple Claudes simultaneously.
Before You Close This Chapter
- Created
~/.claude/skills/commit/SKILL.mdand tested it - Ran
/commitand executed one actual commit - Recalled a request made more than twice in the past week and planned it as a Skill
- Ran
/skillsand saw the list of currently available Skills - Thought about whether any Skill is worth sharing with a team or project
Sub-agents
Understand basic sub-agents for delegating focused work without cluttering the main conversation.
18. When Claude Delegates to Claude — A Sub-Agents Primer
When you're overwhelmed, you divide the work. Claude does the same. One Claude instance delegates specific roles to other Claude instances — that's Sub-agents. The main conversation stays clean, and the work runs in parallel. It feels strange at first, but once you've used it, you'll wonder how you managed without it.
 Source: Sub-agents — Anthropic Docs
💡 Here's something that happened once. During a class, a student tried to summarize 20 documents in a single session and the context exploded — the session froze. We split the work into 4 sub-agents, each handling 5 documents. The session became lightweight and the processing time dropped to a quarter. "This actually works?" The look on their face stays with me.
What Sub-Agents Are
Sub-agents are separate Claude instances that the main Claude delegates specific tasks to. Each instance handles only its assigned piece of work with four key traits:
- Independent context window: Separated from main — no interference
- Custom system prompt: Designed to focus on one specific role
- Restricted tools: Only read, only write, only what's needed
- Summary return only: When done, only the essentials come back to main
Think of a project manager who assigns research to A, translation to B, and proofreading to C. Sub-agents work exactly like that.
The Picture
Main Claude (Orchestrator)
│
├──► Sub-agent A: Explore (read-only)
│ └── File reading and code search only
│
├──► Sub-agent B: general-purpose
│ └── Read + write files
│
└──► Sub-agent C: custom test runner
└── Bash execution only
Each sub-agent runs in isolated context,
only result summaries return to main → main conversation stays clean
When I first drew this out, what stopped me was "summary return only." Even if the exploration log is thousands of lines, only 5 lines of summary come back to the main window. That single design decision solves the mess-in-main-context problem in one go.
When Sub-Agents Fit, When They Don't
Sub-agents help when
Big outputs, independent files, restricted tools, exploration vs. implementation.
Stay in main thread when
Frequent corrections, quick edits, tightly shared context.
When sub-agents win
- Tasks producing large output: Test logs and doc fetch results would waste main context. Get just the summary instead
- Processing independent files simultaneously: Three agents working on three modules in parallel versus sequential — the time difference is real
- When you need tool restrictions: Read-only reviewers, DB-query-only agents — lock down what an agent can touch
- Separating exploration from implementation: Keep exploration noise from polluting the implementation flow
When the main conversation is better
- Frequent feedback needed: Sub-agents run independently — mid-task intervention is limited
- Quick simple fixes: Agent initialization overhead can exceed the task itself
- Phases that share context tightly: Plan → implement → test flows that need to stay connected
Three Built-In Sub-Agents You Already Have
Claude Code ships with three by default. They're already working without you doing anything.
- Explore · Codebase exploration · Read-only (Glob/Grep/Read)
- Plan · Inherits main model · Read-only: Context gathering in Plan mode
- general-purpose · Inherits main model · All tools: Complex multi-step work
When Claude needs to explore a codebase, it automatically launches Explore. Thousands of lines of discovery results never hit the main context — only the summary returns.
💡 Here's something that happened once. Working in WSL2, I asked Claude to analyze a monorepo all at once. The Explore agent automatically kicked in and all I got back was "13 modules, 5 key dependencies." Before that I was running
findmanually and copy-pasting results. It took that moment to see how inefficient that had been.
Creating Your Own Sub-Agent: Two Ways
Method ㉠ · /agents Interactive Menu (recommended)
/agents
Create directly from the conversation. Steps:
- Select Create new agent
- Choose User-level (all projects) or Project-level (this project only)
- Select Generate with Claude → describe the role in plain language
- Choose allowed tools
- Choose a model (Haiku / Sonnet / Opus)
- Save
If this is your first time, this method is fastest. Describe the role and Claude fills in the rest.
Method ㉡ · Write the File Directly
Place a markdown file in .claude/agents/ and it's recognized immediately. Three examples I actually use:
Research summary agent (.claude/agents/researcher.md):
---
name: researcher
description: Reads reference folders and organizes key summaries, insights, and follow-up questions. Use automatically when research is needed.
tools: Read, Grep, Glob
model: sonnet
---
You are a research assistant.
- Summarize conclusions first in 5 lines
- Include the source filename for each supporting claim
- Label "estimates/assumptions" clearly
- Propose 5 follow-up research questions at the end
The key here is "Use automatically when research is needed" in the description. Main Claude sees research-related requests and routes to this agent on its own.
Translation agent (.claude/agents/translator.md):
---
name: translator
description: Translates files or text into a specified language while preserving markdown structure.
tools: Read, Write
model: sonnet
---
Translation rules:
- Keep proper nouns, product names, code, commands in original language
- Tone: "friendly but not over-enthusiastic"
- Preserve table, TOC, and link structure
QA review agent (.claude/agents/editor-qa.md):
---
name: editor-qa
description: Checks final documents for typos, inconsistent terminology, forbidden words, and broken links.
tools: Read, Grep, Glob
model: haiku
---
Review checklist:
- Consistent date/number formatting (e.g., 2026-02-26)
- Forbidden words detection ("perfect", "revolutionary", "guaranteed")
- Flag suspicious broken links (https://)
- Suggest adding "next action" if missing
Haiku for the QA agent — simple pattern matching doesn't need a high-powered model, and the cost savings add up.
🖥️ Developer: code-reviewer agent
.claude/agents/code-reviewer.md:
---
name: code-reviewer
description: Reviews code for quality, security, and performance. Use automatically after code changes.
tools: Read, Grep, Glob, Bash
model: sonnet
---
You are a senior code reviewer.
Steps:
1. Run `git diff` to see recent changes
2. Focus on modified files
Checklist:
- Readability and naming conventions
- Error handling
- Security vulnerabilities (exposed secrets, missing input validation)
- Test coverage
Feedback format:
- Critical (must fix)
- Warning (should fix)
- Suggestion (consider)
Frontmatter: Four Key Fields
The four fields you must understand: name, description, tools, model. Other options may change by version — check the official sub-agents guide for details.
---
name: my-agent # lowercase + hyphens (required)
description: description # When Claude decides to delegate (required)
tools: Read, Grep, Glob # Allowed tools (inherits main if omitted)
model: sonnet # haiku · sonnet · opus · inherit
---
System prompt goes here (role, rules, checklist)
inherit follows whatever model the main conversation uses. Haiku is fast and cheap for read-only exploration and summaries. Complex reasoning calls for Sonnet or Opus.
description is not just a label. It's the routing criterion — how main Claude decides "which agent handles this?" If it's vague, automatic invocation won't happen or the wrong agent gets called.
Good vs. bad descriptions
| Bad | Good |
|---|---|
| "Handles files" | "Reads CSV files and generates data analysis reports. Use automatically for data-related requests." |
| "Does translation" | "Translates Korean markdown to English. Preserves structure and code blocks. Use automatically for translation requests." |
| "Code work" | "Reviews Python code for bugs. Use automatically before PR merges for code review." |
Storage Locations and Priority
- CLI flag:
--agents '{...}'(highest priority) - Project:
.claude/agents/(2nd) - User:
~/.claude/agents/(3rd) - Plugin:
<plugin>/agents/(4th)
Team-shared agents go in .claude/agents/ committed to Git. Personal agents for all your work go in ~/.claude/agents/. Name conflicts resolve by priority order — first wins.
Three Real Scenarios
Scenario ① · Competitive Analysis in Parallel
"Analyze competitors A, B, and C simultaneously using separate agents.
Each agent covers website, pricing, and reviews.
Combine into one comparison table."
Three research agents run at once, results merge into one table. About 3x faster than sequential. What surprised me the first time wasn't just the speed — each agent's output was more focused than a single-session analysis. Narrower scope, less noise.
Scenario ② · Parallel PDF Summarization
"Divide the 20 PDFs in Downloads into groups of 5.
Run 4 agents simultaneously, each summarizing their group.
Merge into one report."
Massive summary logs never touch main context. About 4x faster. Used this for course prep — what used to take an hour took 15 minutes. But 4 agents running simultaneously means costs close to 4x as well, so for smaller volumes the simple approach is more economical.
Scenario ③ · Role-Chain Processing
"Use the researcher agent to read sources/ and produce a 1-page summary"
"Use the editor-qa agent to check the final/ folder — list issues only, don't modify"
"Use the translator agent to translate drafts/post.md to English as drafts/post.en.md"
Each dedicated agent handles its own role, main Claude coordinates the flow. Clear role separation makes it easy to trace where things went wrong.
🖥️ Developer: codebase exploration / testing / debugging
Parallel codebase exploration
"Analyze the auth, DB, and API modules in parallel using separate sub-agents"
→ Three Explore agents run simultaneously, module-level summaries only return to main.
Code review + fix chain
"Use code-reviewer to find performance issues, then use optimizer to fix them"
Isolated test execution
"Run the full test suite in a sub-agent and report only failures"
→ Thousands of lines of test logs never clutter main.
Persistent Memory: Learning That Follows You
Claude Code automatically records what it learns to ~/.claude/projects/<project>/memory/ (Auto Memory). Sub-agents can maintain their own memory too. For exact frontmatter fields and storage paths, see the "Enable persistent memory" section in the official guide — field names may change by version.
Foreground vs. Background Execution
- Foreground: Waits until complete. Permission prompts pass through to you
- Background: Runs concurrently. You can keep working
# Request background
"Run this in the background"
# Switch a running task to background
Ctrl+B
⚠️ Background sub-agents cannot use MCP tools.
The Cost Reality: Every Agent Means a Separate Bill
Sub-agents are independent Claude instances. Each agent consumes tokens separately. Three realities to know going in:
- 3 parallel agents = token usage at least 3x higher
- Results returning to main consume additional tokens
- Unchecked spawning escalates costs fast
The first time I got excited about sub-agents, I ran 5 simultaneously and burned 30% of my monthly budget in a day. My rule since then: if a single session can handle it, don't open a sub-agent.
Cost-saving habits:
- Assign Haiku for read-only exploration
- Specify how much to return ("top 5 findings only", "3-line summary only")
- Keep simple work in the main conversation
Debugging Agents: When Things Don't Work as Expected
When you first build sub-agents, "why isn't it using my agent?" is common. The causes I've run into:
| Symptom | Cause | Fix |
|---|---|---|
| Agent never auto-invokes | Description is vague | Add "Use automatically when..." phrase |
| Agent uses wrong tools | tools field omitted → inherits main | List only the needed tools explicitly |
| Returns too much | No output length limit in system prompt | Add "summarize in 5 lines" etc. |
| Agent not recognized | File location or name wrong | Check .claude/agents/ for lowercase-hyphen filename |
For Beginners: Start with a Single Claude
Sub-agents become necessary when three specific signals appear. Until you see them, there's no need to introduce sub-agents at all.
- Main context keeps overflowing,
/compactruns repeatedly - You run the same exploration work over and over
- You need a tool-restricted reviewer that can't touch files
Your first custom agent: a read-only reviewer
A read-only reviewer is a much safer starting point than anything that writes or modifies. If something goes wrong, the original is untouched.
/agents
→ Create new agent
→ Project-level
→ Role: "A reviewer that only finds typos, missing links, and inconsistent terminology"
→ Tools: Read, Grep, Glob
→ Model: Haiku or Sonnet
Usage example:
"Use the editor-qa agent to read the content/en folder
and report only typos, missing heading numbers, and suspicious broken links.
Don't modify anything — just give me the list."
Get comfortable with read-only review first, then expand to writing and implementation roles gradually.
Agent Team Design: Moving to More Complex Structures
Once you've used sub-agents for a while, the natural next question is "how do I structure this better?" Here's how I design agent teams.
Distribute roles by phase
For complex work, divide by phase and assign an agent to each.
Gather phase → researcher agent (Read, Grep only)
↓
Organize phase → editor-qa agent (Read, Write)
↓
Translate phase → translator agent (Read, Write)
↓
QA phase → reviewer agent (Read only)
Main Claude coordinates this flow and passes each phase's summary to the next. Main context only accumulates phase summaries.
Don't let agent count grow unchecked
Three to four is the right size, in my experience. Beyond five you hit:
- Hard to trace which agent did what
- Costs grow geometrically
- Integration conflicts between agent results
💡 Here's something that happened once. I designed a 7-agent content pipeline for our operations. On the first run, three agents tried to modify the same file simultaneously, and the orchestrator hit its context limit at the merge stage. That day's lesson: "minimum agents, maximum clarity." The same pipeline now runs on 3 agents.
Patterns for Non-Developers
Sub-agents aren't just for developers. Three patterns that work well in everyday work:
Pattern ① · Research → Organize → Publish Pipeline
For marketers and content creators:
1) researcher agent: Gather related materials (Read, Glob)
2) writer agent: Write draft from gathered materials (Read, Write)
3) editor agent: Fix spelling, tone, format (Read, Write)
Set this up once for a weekly newsletter, get consistent-quality drafts automatically every week.
Pattern ② · Data Analysis → Summary → Report
For finance or operations:
1) data-reader agent: Read CSV, Excel files and extract stats (Read)
2) analyst agent: Pattern analysis and anomaly detection (Read)
3) reporter agent: Format as executive summary (Read, Write)
Pattern ③ · Multi-Language Translation in Parallel
"Translate the Korean source simultaneously into English, Japanese, and Chinese
using separate agents. Preserve structure and code blocks."
Three languages sequentially might take 15 minutes. Three agents simultaneously: 5 minutes.
Sub-Agents × MCP: More Powerful Together
Pairing MCP (Model Context Protocol) with sub-agents dramatically expands their reach. An agent with an MCP tool can send Slack messages, fetch GitHub PRs, or query a database. Only foreground agents can use MCP tools — background agents have MCP calls blocked.
MCP connection details are in 15. MCP & Integrations.
Frequently Asked
What if I don't like what the sub-agent produced?
Tell main Claude "rework that agent's result." The agent's output is just input to main, which can reprocess it. The first run often falls short — refining description and the system prompt is faster than rerunning.
I want to use the same agent across multiple projects.
Put it in ~/.claude/agents/. For project-specific agents, .claude/agents/ with a Git commit.
Can an agent accidentally delete a file?
Restrict tools to Read only and writes and execution are blocked. Always start minimal. Bash especially — file deletion and system changes are possible, so leave it out until you're sure.
Can agents communicate directly with each other?
Not directly. All communication goes through main Claude. Pass agent A's results to agent B through main, or save intermediate results to a file for B to read.
Can I keep working while an agent runs?
Press Ctrl+B to background it. Note: background agents can't use MCP tools. For plain file work and analysis, background is fine.
A Full Day with Sub-Agents
Here's how a day of work actually looks when sub-agents are part of the flow.
8:30 AM — News briefing agent
"Use the news-digest agent to read inputs/links.txt
and save today's industry news briefing to brief/today.md"
The agent reads and summarizes while I make coffee. Five minutes later, brief/today.md exists.
10:00 AM — Parallel competitor analysis
"Analyze recent announcements from three competitors using separate agents.
Each one: 3 lines on key changes and impact on us.
Combine into one comparison table."
Three agents run simultaneously. Sequential processing time cut to a third.
2:00 PM — Meeting notes → report pipeline
"Read meetings/today-strategy.md:
1) Use meeting-notes agent to organize action items and decisions
2) Use weekly-wrap agent to integrate with this week's work
Save to reports/weekly-YYYY-MM-DD.md"
Draft report in 5 minutes after the meeting. I just review and adjust.
5:30 PM — QA agent before end of day
"Use the editor-qa agent to check today's reports/ folder
for typos, links, and consistency. Just give me the list — don't change anything."
Read-only scan. Original untouched. I fix only what matters.
Six or more agents ran that day, but the main conversation stayed clean, and my role of reviewing and approving never changed. Agents don't replace my judgment — they clear the way for it.
Three Principles of Agent Design
After building and discarding dozens of agents, three principles remain.
First, one role per agent. Multiple roles in one agent make description complex and confuse Claude's routing. Three agents each doing one thing beats one agent trying to do three things.
Second, minimum tools. More tools than needed leads to unexpected behavior. I once gave an agent Write when it only needed Read, and it modified source files. Start with Read. Add tools only when needed.
Third, short and specific system prompts. Long prompts dilute focus. The pattern that works best: 3–5 core rules, explicit output format, 1–2 prohibited behaviors.
Agent Versioning: When Working in Teams
Managing agents alone versus with a team is different.
Solo use: ~/.claude/agents/ — outside Git, personal settings preserved. Great for experimental agents.
Team use: .claude/agents/ committed to Git. Agent files version-controlled alongside code. Everyone uses the same configuration.
For changes, going through PR review is good practice. Expanding an agent's tools permissions deserves the same scrutiny as changing code.
Leave short change notes in the frontmatter:
---
name: researcher
description: Reads reference materials and organizes key summaries.
# 2026-04-15: Initial creation
# 2026-05-01: Changed sonnet → haiku (speed improvement)
# 2026-05-10: Added follow-up questions section
tools: Read, Grep, Glob
model: haiku
---
Git blame tells you who changed what and when. Treating agents like code — with discipline — matters especially in team settings.
Readiness Levels
Where you naturally land on sub-agent usage by time spent:
Week 1–2: Observe the built-in agents (Explore, Plan) firing automatically. Notice when and why Claude uses which agent.
Month 1: Create your first custom agent via /agents. Start read-only. Get comfortable with single-agent calls.
Month 3: Connect 2–3 agents into a pipeline. Build a cost-monitoring habit. Share agents with team.
6 months+: Your personal agent team has stabilized. Starting new projects includes agent design. Agent collaboration patterns come naturally.
No need to rush any stage. Moving up when you need to is the approach that lasts.
Agent Operations Checklist
Before deploying an agent to real work:
When creating
□ name: lowercase + hyphens, under 15 characters
□ description: clearly states when and in what situation to use
□ tools: minimal — only what's truly needed
□ model: appropriate for task complexity (simple → Haiku, complex → Sonnet/Opus)
□ system prompt: 1-line role + output format + prohibited actions
First run
□ Test with small input first (1 file, not a whole folder)
□ If result is unexpected, refine description or system prompt
□ Check cost with /usage
□ Verify where output files were saved
Monthly review
□ Keep only agents you're actively using (delete what you don't use)
□ Update descriptions (actual usage often drifts from original intent)
□ Revisit model selection (cost vs. performance check)
□ Move team-useful agents from ~/.claude/agents/ to .claude/agents/
Tool Reference for Agent Design
When unsure which tools to allow, this table helps.
| Tool | Role | Caution |
|---|---|---|
| Read | File reading | Safest. Default for read-only agents |
| Write | File writing/modification | Originals can change — only when certain |
| Bash | Terminal command execution | Most powerful and dangerous. Keep minimal |
| Grep | Text pattern search | Safe. Useful for search-focused agents |
| Glob | File list search | Safe. Useful for folder exploration |
| Edit | Partial file modification | Same caution as Write |
If the role is "read and analyze," Read, Grep, Glob is enough. "Write and save" adds Read, Write. Bash only when necessary, and only specific commands.
💡 When you do need Bash, restrict to specific commands:
Bash(git log *),Bash(grep -r *). Full Bash access can lead to accidental file deletion or system changes.
Before You Close This Chapter
- Remembered the three signals that mean sub-agents are genuinely needed (context overflow, repeated exploration, tool restriction)
- Confirmed the three built-in agents (Explore, Plan, general-purpose) are already working
- Built a read-only reviewer via the
/agentsmenu - Understood that
descriptionis the routing criterion — vague means no auto-invoke - Internalized that every agent means more token cost
Next chapter (19. Designing Your Personal AI Workspace) covers combining Sub-agents, CLAUDE.md, Skills, and Hooks into one automated office. You know the parts — now it's time to connect them.
The Bottom Line on Automation and Judgment
The most important thing about sub-agents isn't the technology — it's how you position yourself in the flow. Every agent that runs should produce output that a human reviews before acting on. Automation compounds errors when there's no human checkpoint. Speed without oversight isn't productivity.
The pattern that works: agents handle the volume, you handle the judgment. Agents read, gather, summarize, format. You decide what matters, what ships, what changes direction. That boundary, kept clear, is what makes sub-agents a reliable multiplier rather than a liability.
When it becomes second nature, you stop thinking about "using sub-agents" and start thinking about "what role should handle this part of the work?" That's the shift. And once you've felt it, there's no going back to doing everything in one long conversation.
One-Line Summary
Sub-agent = Claude delegating to Claude. Independent context means a clean main conversation and parallel processing. But every agent means more token cost, and a vague
descriptionmeans no auto-invoke. Start with a read-only reviewer and add one at a time as real need appears.
Designing Your Personal AI Workspace
Combine CLAUDE.md, Skills, and Hooks to build your personal automated AI office.
19. Designing Your Personal AI Workspace — One Folder Is Enough to Start
If you've used CLAUDE.md and built one Skill, it's time to bring them together. This isn't about grand automation. It's about building an AI office that runs consistently on your rules. One folder and one CLAUDE.md is enough to start.
💡 Here's something that happened once. In a class, someone said: "I'm using AI properly, so why do I have to explain the same thing every time?" They were opening Claude every morning and re-explaining "you're an AI for content marketers, always use this tone and this format." Without a workspace, AI always starts from zero. With a workspace, AI already knows. That difference was 30 minutes every day.
What a Workspace Is
Typical AI use is a "question → answer" one-time flow. Context has to be explained fresh each time. A workspace, by contrast, is a system where an AI with a defined role operates on your rules, consistently. Set it up once and the same standards carry forward tomorrow, next month, indefinitely.
What it's made of, in one line each:
- CLAUDE.md: Long-term memory — role, rules, project knowledge
- Folder structure: Where work naturally accumulates
- Skills: Recurring tasks bundled as
/commandshortcuts - Hooks: Quality standards that can't slip, enforced in code
When these four work together, AI understands "what I should do here" and acts consistently without being told each time.
Design Philosophy: Three Roles
"Don't cram everything into CLAUDE.md. Distribute to Skills, enforce with Hooks."
The role of each component:
| Component | Role | When to touch it |
|---|---|---|
| CLAUDE.md | Unchanging role and principles | When project character changes |
| Skills | Recurring task workflows | When you've done the same thing 3+ times |
| Hooks | Quality standards that keep getting missed | When the same mistake repeats |
Putting everything into CLAUDE.md creates two problems. The longer the file, the more tokens Claude reads every single response. And the more rules, the harder it is to know which ones are actually being applied.
Domain Blueprints: Three Starter Designs
Market & Real Estate Research
Listings, prices, news in one place. Built for gathering and comparing.
Content Creation
Automates the idea → draft → edit → publish flow.
Business Operations
CRM, documents, and recurring admin — all in one folder.
Blueprint ㉠ · Market & Real Estate Research
When I first drew up this blueprint, the part that made me stop was "source grade labeling." Treating AI-generated claims the same as official statistics distorts analysis. One line in CLAUDE.md prevents that distortion.
CLAUDE.md essentials:
- No claims without sources
- Tag every figure with source grade (A–E)
- Quarterly reports auto-save to reports/ folder
Folder structure:
inbox/ → raw data from official statistics agencies
reports/ → completed quarterly reports
sources/ → source collection and reliability records
Skills:
/quarterly [region] → regional quarterly price analysis
/summary [file] → convert report to 1-page brief
Blueprint ㉡ · Content Creation
The most wasted time in content work is the recurring "hmm, how did I write this for that channel?" CLAUDE.md with per-channel format templates eliminates that question entirely.
CLAUDE.md essentials:
- Brand tone definition (friendly, practical, minimal jargon)
- Target audience definition
- Per-channel content format templates
Folder structure:
drafts/ → drafts
published/ → completed and published
templates/ → reusable formats
Skills:
/blog [topic] → blog post draft
/newsletter [content] → newsletter format conversion
/sns [content] → Instagram/Twitter version
💡 For research workspaces, consider multi-agent configuration. For content work, pair with official documentation-based source gathering.
Blueprint ㉢ · Business Operations
CLAUDE.md essentials:
- Company and team info, key project status
- Email tone (formal vs. casual level)
- Report format template
Skills:
/meeting [transcript] → summary + decisions + action items
/report [topic] → weekly report draft
/email [context] → email draft
Real Example: This Guide's Workspace
Here's the actual workspace structure that produced this guide (cc101). Not a design document or ideal example — this is what's still running today.
CLAUDE.md Core
# Ideation Workspace
## Role
AI partner for discovering, validating, and executing ideas
## Core principles
- Korean only
- No claims without research (anti-hallucination)
- Tag all sources A–E for reliability
- No "seems like it would work" statements without validation
- All ideas must be documented (prevent evaporation)
## Validation framework — 4 persona Council
- Visionary: potential and vision
- Pragmatist: feasibility and resources
- Critic: risks and weaknesses
- User Advocate: user value
## Folder structure
10-inbox/ → reference materials
20-sparks/ → idea capture
30-research/ → research results
40-foundry/ → validation results
50-blueprints/ → MVP design
60-ventures/ → active execution
70-playbook/ → accumulated experience
90-shelf/ → parked ideas
Four Active Skills
/spark [idea] → idea capture + ICE score evaluation
/research [topic] → 7-step deep research
/validate → 4-persona Council validation
/insight [note] → save to experience Playbook
What This Workspace Actually Produced
Real outputs from running this structure:
- Multiple new project ideas captured and validated
- agent-council experiment: 3 AIs debating section structure
- 57-page deep research through official documentation
- Next.js site built and deployed to Vercel
- This guide itself, continuously refined
A well-designed workspace keeps producing results. "When did I do all this?" — that feeling is the workspace doing its job.
Building Your Workspace: Four Beats
No need to start grand. Four steps, in order.
Beat ① · Narrow the Purpose First
Ask yourself these before anything else.
□ What work am I repeating?
□ What role do I want to hand to AI?
□ What rules should stay consistent?
□ Where should output accumulate?
If you can answer each in one sentence, you're ready to write CLAUDE.md.
Beat ② · One Page of CLAUDE.md
This template is enough to start. Fill in the blanks.
# [Workspace Name]
## Role
[Role and purpose for the AI — 1–2 sentences]
## Core rules
- [Non-negotiable rule 1]
- [Non-negotiable rule 2]
- [What must never happen]
## Folder structure
- [folder]/ → [purpose]
- [folder]/ → [purpose]
## How we work
[Description of the recurring workflow]
Shorter is better at the start. Beginning with 5 rules and adding one at a time produces a CLAUDE.md that actually lasts — far better than 20 rules written upfront that slowly stop being applied.
Beat ③ · Folder Structure: Numbered Prefixes Are Easiest
mkdir -p 01-inbox 02-work 03-output 04-archive
Numbered prefixes keep sort order automatic. The workflow is visible at a glance, and there's no confusion about where to put what.
Beat ④ · Three Repetitions = Skill Candidate
When you do the same task three or more times, that's a Skill candidate. The moment you think "oh, I'm doing this again" — make it a Skill. Detailed instructions are in section 17.
30-Minute Practice: Your First Workspace
A meeting-notes and report workspace in 30 minutes.
1) Create the folders
mkdir -p ~/Documents/ai-workspace/{inbox,meetings,reports,templates,archive}
cd ~/Documents/ai-workspace
claude
2) Create CLAUDE.md
Tell Claude this:
"This folder is a work document management workspace.
inbox is for raw materials, meetings for meeting notes, reports for finished reports,
templates holds recurring formats.
Meeting notes always follow: decisions → action items → open issues.
Reports always follow: 5-line summary → key evidence → next actions.
Create this as CLAUDE.md."
3) First Skill: Meeting Summarizer
"Create a meeting-summary Skill that takes a meeting notes file from meetings/
and formats it as decisions, action items, and open issues."
4) First run
"/meeting-summary meetings/2026-04-29-team.md"
5) If the result isn't quite right, refine on the spot
"Action items should always include assignee and deadline columns.
Update CLAUDE.md and the meeting-summary Skill."
Run one cycle and the core of what a workspace does becomes tangible. Folder structure collects output. CLAUDE.md holds the standard. Skills cut repetition.
Growing a Workspace: Expanding in Phases
Trying to design a perfect system from the start leads to never starting. Growing it in phases is the right direction.
Phase 1: Core folders + CLAUDE.md (first week)
Start minimal.
workspace/
├── CLAUDE.md ← role, rules, folder descriptions
├── inbox/ ← incoming materials
└── output/ ← outgoing results
This alone eliminates the time spent re-explaining context every session.
Phase 2: Add Skills for recurring work (weeks 2–4)
Add a Skill when you catch yourself doing the same thing again.
.claude/
└── skills/
└── weekly-report/
└── SKILL.md ← weekly report generation recipe
Phase 3: Add quality-standard Hooks (months 1–2)
Automate the things that keep slipping.
.claude/
└── settings.json ← Hook configuration
→ pre-save typo check
→ warn if report has no sources
Phase 4: Add sub-agents (when needed)
When context keeps exploding or parallel processing becomes necessary.
.claude/
└── agents/
└── researcher.md ← dedicated research agent
Following this sequence produces a far more stable workspace than trying to design everything complex upfront.
MCP Combinations: Extending Your Reach
Adding MCP to a workspace dramatically expands what it can touch.
- Web Search: Automatic research, live information gathering
- GitHub: Code management automation, PR review
- Slack: Team communication integration, automated notifications
- Google Sheets: Automatic data aggregation, report sync
Connection details are in 15. MCP & Integrations.
Common Design Mistakes
Patterns I've seen repeatedly over years of designing workspaces and watching students do the same.
Mistake ① · Trying to be perfect upfront
Creating folders and rules for things "I might use someday." Unused folders create confusion about where to put what, and a long CLAUDE.md wastes tokens. Add things when they're genuinely needed.
Mistake ② · Putting everything in CLAUDE.md
CLAUDE.md is read on every single response. Longer means higher cost and murkier rule priority. Keep core unchanging principles here; move task-specific guidance into the SKILL.md inside Skills.
Mistake ③ · Folder structure that's too deep
# Bad
docs/2026/Q1/Jan/week1/drafts/
More than 3 levels deep and you'll forget where you put things. Two levels maximum is realistic.
Mistake ④ · Making Skills too complex
Skills are recipes. Recipes that are too long are hard to follow. If one Skill is trying to do five things, split it.
💡 Here's something that happened once. When I first built my workspace, I wrote 48 rules into CLAUDE.md. A month later I had no idea which rules were being applied and which were being ignored. Now I completely rewrite CLAUDE.md every six months. Only the rules that actually matter survive.
Keeping a Workspace Alive: Ongoing Maintenance
A workspace isn't built and forgotten. It needs to evolve as you use it.
Weekly check (5 minutes)
□ Anything I did 3+ times this week? → Skill candidate
□ Any rule in CLAUDE.md I wanted to break? → modify or delete
□ Are folders getting messy? → tidy up
Monthly check (15 minutes)
□ How many rules in CLAUDE.md are actually influencing output? → delete the rest
□ Any Skills I haven't used? → delete or update
□ New recurring work patterns? → add a Skill
□ Are Hooks being disruptive too often? → loosen the conditions
This ongoing practice is what turns a workspace from "something I built" to "a living tool."
Before You Close This Chapter
- Picked one recurring task to start with
- Created the folder structure for it
- Wrote a basic CLAUDE.md (role, rules, folder descriptions)
- Built or planned the first Skill
- Understood that a workspace doesn't need to be perfect from day one
Next chapter (20. Cost Management & Saving Tips) covers the reality of token costs and strategies for staying efficient — something you'll naturally encounter as you run a workspace. A well-designed workspace saves money too — the next chapter explains why.
The Real Pleasure of Workspace Design
When you first build a workspace, there's a natural doubt — "is this actually going to help?" Fair enough. An empty folder and a few lines of CLAUDE.md don't make anything happen automatically yet.
But two weeks in, with two Skills built. A month in, with one Hook added. There comes a day when you notice "oh, that just happened automatically." The context you used to re-explain is gone. Output format is consistent. Mistakes have gone down.
The key isn't building it all at once — it's letting it evolve as you use it. When you notice friction this week, fix CLAUDE.md. When you spot a repeat task next week, add one Skill. An office that gets a little better every week.
Imagine six months from now. The one folder you started today could be a system that handles half your daily work automatically. All you'll have done between then and now is write one line at a time: "this should be better."
Open the terminal. Make a folder. Write one line. That's where it starts.
Cost Management & Saving Tips
Understand token costs and learn how to use Claude Code efficiently.
20. Before the Token Bill Arrives — Understanding and Managing Cost
Getting the same result while spending less. Efficiency is the goal. Once these habits are in place, the cost curve visibly flattens. And here's the interesting part: the effort to reduce costs simultaneously makes Claude more focused.
 Source: Customize your status line — Anthropic Docs
Max comes in two tiers — "5x Pro" and "20x Pro." For exact pricing, see claude.com/pricing.
💡 Here's something that happened once. My first month on API pay-as-you-go, the bill came in at three times what I expected. When I broke it down, almost all of it was two things: vague requests to large codebases repeated over and over, and a CLAUDE.md that had grown long enough to consume tens of thousands of tokens per response. Fixed both — next month dropped to 65% of that cost for the same amount of work. Half the savings came purely from trimming CLAUDE.md.
Check Your Billing Structure First
Cost strategies split by how you're billed.
Subscription (Claude.ai Pro · Max)
Claude Code is included in your monthly plan. No separate API charges. Instead, two limits apply together: a 5-hour rolling session limit and a weekly limit (7-day window). Check your current standing anytime with /usage.
Pay-as-you-go (Anthropic API) Charged for tokens consumed — input and output at separate per-token rates. For exact prices, see claude.com/pricing.
This chapter focuses on how to reduce usage once you're already running — not which plan to buy. For plan selection, see 03. Plans & Pricing.
What Tokens Are
Tokens are the units Claude uses to process text. Roughly 1–2 tokens per English word. About 1 token per 2–3 Korean characters. Rule of thumb: 4 English characters ≈ 1 token.
Where tokens are consumed:
- Your message → input tokens
- Claude's response → output tokens
- CLAUDE.md content → input tokens on every single response
- Full conversation history → re-consumed as context per response
- Files Claude reads → input tokens equal to file size
If your CLAUDE.md is 5,000 tokens and you get 100 responses in a day, CLAUDE.md alone costs 500,000 tokens.
Four Patterns Where Costs Spike
Pattern ①: No scope — whole files, whole codebases
"Analyze this project comprehensively" is the most expensive request type. Claude tries to read everything it can see. Feeding a 100,000-line codebase whole can burn hundreds of thousands of tokens in one go.
Pattern ②: Unrelated tasks in the same session
Doing "add feature → write docs → fix different bug" in one session carries all the feature conversation as context into the docs step. Heavier context means more waste per response.
Pattern ③: Overpowered models for simple work
Using Opus to say hello. File summaries, format conversions, spell checks — Haiku handles these. Opus belongs on architecture design and complex reasoning.
Pattern ④: Unmonitored automation
In headless mode or cron jobs, if Claude errors and keeps retrying with no human watching, tokens accumulate fast. Without --max-turns and log checks, unexpected bills follow.
Seven Habits That Reduce Cost
Habit ① · /compact to breathe
When a conversation has grown long, compression is the fastest fix.
/compact Focus the summary on code changes and test results
Pre-bake compact instructions in CLAUDE.md:
# Compact instructions
When you are using compact, please focus on test output and code changes
/clear wipes context entirely — use it when switching to a completely different topic.
Habit ② · Narrower, specific requests
Vague request = excessive file scanning = unnecessary tokens.
- "Improve this codebase" → "Add input validation to the login function in auth.ts"
- "Find the bug" → "Find why login fails after session expiry, look in src/auth/"
The more specific the file and function, the fewer files Claude reads.
Habit ③ · Choose model by task
Cost difference between Opus and Haiku is ten times or more. Matching model to task is the biggest single savings lever.
/model haiku # Simple tasks, file summaries, quick checks
/model sonnet # General coding, document writing
/model opus # Complex reasoning, architecture design
Switch anytime during a session.
opusplan mode: Opus for Plan phase, Sonnet for execution. High-quality planning at reasonable execution cost.
/model opusplan
Habit ④ · Fast Mode only for critical moments
/fast speeds Opus by about 2.5x. Per-token cost rises too. Use briefly for real-time debugging where speed genuinely determines quality.
ℹ️ Fast Mode usage is billed outside your plan's base limits.
Habit ⑤ · Regular /usage checks
/usage
Session cost, plan limit status, activity stats — all at once. /cost and /stats are aliases.
Even once a day builds the habit. Patterns emerge: which work types cost the most. You can't control what you can't see.
Habit ⑥ · CLAUDE.md diet
CLAUDE.md is read every single response. Length equals cost. Measured: trimming from ~19,000 tokens to ~9,000 tokens cut the same work's cost nearly in half. And response focus actually improved.
[ Safe to delete ]
- Long background explanations ("This project started in 2023...")
- Obvious repetitions ("Always do your best")
- Multiple example code blocks (keep one or delete)
- Vague rules ("Write good code")
[ Must keep ]
- Prohibited actions (absolute don't-dos)
- Technology stack summary (1–3 lines)
- Frequently referenced file paths
- Language/format rules (specific ones only)
Every three months: re-read CLAUDE.md and ask "is this rule earning its tokens?"
Habit ⑦ · Deny rules to block large folders
node_modules, .next, dist — Claude can accidentally read these whole. Block them preemptively.
.claude/settings.json or ~/.claude/settings.json:
{
"permissions": {
"deny": [
"Read(./node_modules/**)",
"Read(./.next/**)",
"Read(./dist/**)",
"Read(./build/**)",
"Read(./coverage/**)"
]
},
"respectGitignore": true
}
respectGitignore: true (default) applies .gitignore patterns to Claude's file picker.
⚠️ Deny rules only block Claude's built-in file tools. Bash (
cat,grep) can still access those paths. For stronger isolation, enable sandboxing.
Model Cost Position
- Haiku: Fastest and cheapest. File summaries, quick checks
- Sonnet: Balanced. General coding, documents
- Opus: Highest performance. Complex reasoning, architecture (most expensive)
- Opus + Fast: 2.5x speed, higher per-token rate
Exact pricing: claude.com/pricing.
For Subscription Subscribers
Claude.ai Pro or Max includes Claude Code in the monthly plan. No separate API key needed, less cost anxiety, more freedom to experiment. Max offers higher usage limits.
⚠️ Fast Mode and 1M context overages may be charged as extra usage.
Team-Level Management
- Workspace spending limits: Set team caps at Anthropic Console
- Usage dashboard: Per-member cost and usage visible in Console
- Watch parallel work: Multiple sessions and sub-agents stack up fast
Cost Optimization Workflow: Daily Pattern
Morning: /usage to check yesterday's consumption
→ Identify any unexpectedly expensive sessions
Session start: New session or /clear
→ Don't carry yesterday's context into today
During work: Specify files → "@auth.ts, login function only"
Repeated exploration → isolate to Explore sub-agent
Simple checks → /model haiku
Session switch: /clear or new session when topic changes
During long sessions: /compact periodically
End of day: Final /usage check — spot any spikes
Two weeks of this and the previous month's bill starts looking different.
Practical Cost Analysis: What's Costing You
Step 1: Categorize task types
Explore: File reading, code search, understanding current state
Implement: Code writing, document generation, file modification
Review: Checking results, quality control, proofing
Exploration: Haiku usually fine. Implementation: Sonnet default. Review: read-only, Haiku or Sonnet. Opus: design and complex reasoning only.
Step 2: Examine session patterns
More "yes" answers here = more likely cost waste:
□ Fed the same file more than 3 times today
□ Did two unrelated tasks in the same session
□ Haven't cleaned CLAUDE.md in over a month
□ Saw errors related to node_modules or .next
□ Had automation silently fail and retry repeatedly
Sub-Agent Costs: Separate Calculation
Each agent is an independent instance — tokens consumed separately per agent.
Agents × per-agent work tokens = total cost
3 parallel agents isn't simply 3x — result aggregation adds tokens on top.
Agent model selection makes a large difference
Research agent on Haiku, coding on Sonnet, design on Opus. 3–5x cheaper than running everything on Opus.
Limiting return results reduces aggregation cost
"Top 5 findings only" in system prompts reduces what returns to main, which lowers aggregation-stage tokens.
CLAUDE.md Token Count: Do the Math
Ask Claude:
"Give me a rough token count estimate for the CLAUDE.md file"
Or estimate: English 4 chars ≈ 1 token, Korean 2–3 chars ≈ 1 token. A 1,000-token CLAUDE.md at 100 responses per day = 100,000 tokens from CLAUDE.md alone.
When Cost Suddenly Jumps: Diagnostic Order
/usageto find which session was most expensive- Recall what you were doing — long session? repeated large file reads? heavy sub-agents?
- Check CLAUDE.md size (
wc -c .claude/CLAUDE.md) - Check automation logs for silent error-retry loops
- Review tool permissions — too broad means Claude reads more than needed
For Students and Personal Users
First month: pay-as-you-go
Know your actual usage before committing to a plan.
When usage grows, consider subscription
1–2 hours per day regularly = Pro likely cheaper than pay-as-you-go.
Practice with small examples
Practicing on an entire large project burns tokens fast. Small files and specific functions work better for both learning and cost.
Stop if errors repeat
Same error three times in a row — change approach. Same request produces same result and wastes tokens.
The Status Bar: Real-Time Cost Visibility
Setting up the terminal status bar shows context usage without running /usage. Detailed setup is in section 17 (Statusline & Cost Visibility).
Configure it once and cost is always visible while you work. Numbers in front of you change behavior. This is the easiest way to automate cost awareness. Status bar settings live in CLAUDE.md or ~/.claude/settings.json. See the official Statusline guide for customization options.
Cost Awareness Becomes a Habit
At first it feels like extra work. After a few weeks, something shifts.
Requests get more specific — naming files, pinpointing functions. Not because you're trying to save money, but because that's also how Claude produces better results.
Sessions get cleaned more often. /clear and /compact become routine. Conversations stay clean, Claude's focus stays sharp.
CLAUDE.md gets lighter. Only rules that demonstrably affect output survive.
Cost awareness isn't just saving money — it's discovering how to collaborate with Claude more effectively.
💡 Here's something that happened once. A student reported back after a month: "Trying to cut costs ended up improving my prompting." Being specific, naming files, cutting unnecessary exploration — all of it also raised the quality of output. Savings and quality were pointing in the same direction the whole time.
Cost-Saving Checklist
✅ /clear after each task to reset context
✅ New session for unrelated work
✅ Specify exact filenames and function names
✅ Haiku for simple tasks
✅ Fast Mode only for critical moments
✅ Regular /usage checks (/cost and /stats are aliases)
✅ Set compact instructions in CLAUDE.md
✅ Periodic CLAUDE.md diet — keep only what earns its tokens
✅ permissions.deny + respectGitignore to block large folders
✅ Sub-agent model selection optimized per role
✅ Agent return results limited to "essentials only"
Before You Close This Chapter
- Confirmed whether you're on subscription or pay-as-you-go
- Ran
/usageto see current session cost directly - Found one rule in CLAUDE.md that could be deleted
- Set a model-selection standard based on task complexity
Next chapter (21. Headless & Automation Reference) covers unattended automated execution — where cost management becomes even more critical. Reading this chapter first was the right order.
Prompt Caching: Worth Knowing If You're on API
For those using the Anthropic API directly.
Claude supports prompt caching for repeated long context (CLAUDE.md, project files). After the first load, cached content is reused, reducing cost. Claude Code tries to leverage caching automatically, but efficiency varies by context structure.
If CLAUDE.md loads once per session and is then pulled from cache for all subsequent responses, savings can be substantial. Detailed caching behavior: official docs.
Subscription vs API: Which Is Cheaper?
This depends entirely on usage pattern.
Subscription tends to win when:
- Daily consistent use
- High monthly token volume
- Lots of exploratory, hard-to-predict work
Pay-as-you-go tends to win when:
- Occasional use
- Short-term project-based work with a clear end date
- Very low and predictable usage
If Claude Code is a primary daily tool, Pro or higher is almost always more economical. Using it 2–3 hours a day, pay-as-you-go costs surpass the subscription quickly.
Cost Optimization Experiment: Compare Directly
The fastest way to feel the difference is running the same task two ways.
Experiment method:
- Record current cost with
/usage - Run a task with a vague request ("analyze this folder")
- Note cost increase with
/usage - Reset with
/clear - Re-run the same task with a specific request ("explain the parse_data function logic in 01-main.py")
- Note cost increase again
The difference between the two shows the effect of specificity in numbers. First time I ran this experiment, the gap was 3–4x.
Headless & Automation Reference
Reference later automation patterns and the cautions around unattended runs.
21. Making Things Work Without You — Headless Mode & Automation Reference
Imagine leaving for the evening and coming back to briefings already waiting. Weekly reports finished before Friday ends. Headless mode opens that possibility. But before you open the door, you need to face the realities of cost and security.
 Source: Claude Code GitHub Actions — Anthropic Docs
💡 Here's something that happened once. When my workshops launched, I spent 30 minutes every Monday morning opening the feedback folder, reading files, and building summaries by hand. One day I put a headless script into cron. The following Monday I sat down, opened my laptop, and the summary file was already there. "Did this actually work?" I opened it — properly organized. Now I have three or four recurring tasks automated the same way.
What Headless Mode Is
Normal Claude Code is interactive — you type in a terminal, Claude responds. Headless mode is automatic execution without a human present. Claude Code gets called from a script like a program.
The official docs call this the non-interactive mode, invoked with claude -p (or --print). (The Agent SDK is a separate product — not the same as this CLI mode.) The core is the -p flag.
Interactive: claude (run in terminal, type to communicate)
Automated: claude -p "task instructions" (called from a script)
When Automation Makes Sense
Three conditions that suggest automation is the right fit:
① Repetition: Do you do the same task daily, weekly, or on a regular schedule?
② Predictability: Is the input format and expected output format consistent each time?
③ No immediate urgency: Can results wait until you check them later?
If all three are "yes," it's an automation candidate. If any is "no," doing it manually is safer.
Works well for automation:
- Collecting and summarizing industry news every morning
- Turning the week's meeting notes into a one-page report every Friday
- Batch-summarizing a folder of PDFs
- Generating a content calendar from an ideas folder
- Regular data file analysis and reporting
Not the right fit for automation:
- Work that requires active judgment or decision-making
- Tasks where direction needs to shift based on results
- Critical systems requiring immediate response when something goes wrong
Basic Usage
The -p Flag: The Key to Non-Interactive Execution
# Most basic form
claude -p "Summarize the files in this folder"
# With explicit tool permissions
claude -p "Read Downloads/ PDFs and save a summary as summary.md" \
--allowedTools "Read,Write"
# With specific model
claude -p "Summarize the meeting notes" \
--allowedTools "Read,Write" \
--model sonnet
Output Format Options
# Plain text (default)
claude -p "..."
# JSON struct (for script parsing)
claude -p "..." --output-format json
# Real-time streaming JSON
claude -p "..." --output-format stream-json
JSON format includes session ID, cost metadata, and structured response text — useful when a pipeline needs to pass the session ID to the next step.
Limit Maximum Turns
# Limit Claude to 5 tool calls maximum
claude -p "..." --max-turns 5
--max-turns is nearly essential for automation. Without it, when errors occur Claude can retry indefinitely, consuming tokens.
Five Automation Recipes
Verified patterns you can use directly.
Recipe ① · Daily News Briefing
#!/bin/bash
# Run every morning at 8am
DATE=$(date +%Y-%m-%d)
claude -p "Read inputs/links.txt and save today's industry news summary as daily/brief-${DATE}.md" \
--allowedTools "Read,Write" \
--max-turns 5 \
--model haiku
Haiku to keep costs down. News summaries don't need high-powered models.
Recipe ② · Weekly Meeting Notes Digest
#!/bin/bash
# Run every Friday at 5pm
WEEK=$(date +%Y-W%V)
claude -p "Read this week's meeting notes in meetings/ and organize
incomplete action items and decisions into weekly/${WEEK}-summary.md" \
--allowedTools "Read,Write" \
--max-turns 5 \
--model sonnet
Recipe ③ · Bulk PDF Summarization
#!/bin/bash
# Run manually when needed
FOLDER=$1 # folder specified as argument
claude -p "Read each PDF in ${FOLDER} and save a summary file
as filename_summary.md in the same folder" \
--allowedTools "Read,Write,Bash" \
--max-turns 10 \
--model haiku
Recipe ④ · Content Calendar Draft
#!/bin/bash
# Run every Thursday afternoon
claude -p "Read the ideas/ folder and create a 5-day weekday content
calendar for next week, save as drafts/calendar-next-week.md" \
--allowedTools "Read,Write" \
--max-turns 5
Recipe ⑤ · Continuing a Conversation
# First request
claude -p "Analyze the documents in this folder" --output-format json > result1.json
# Continue in the same session
claude -p "Organize just the key conclusions from that" --continue
# Choose from multiple sessions to resume
claude --resume
Setting Up Recurring Execution with cron
Setting up regular automation with cron on macOS and Linux.
crontab -e
Common cron expressions:
# Every day at 9am
0 9 * * *
# Every Monday at 9am
0 9 * * 1
# Every Friday at 5pm
0 17 * * 5
# Weekdays at 8am
0 8 * * 1-5
Always start by saving results to files only. Sending directly to Slack, email, or Notion should come after verifying file output quality for a few days first.
Pre-Launch Checklist
□ Results are saved to files only (not sent externally yet)?
□ --max-turns limits set?
□ No sensitive information going outside?
□ Is there a way to check logs if it fails?
□ Run manually at least once first?
□ Estimated cost impact?
Cost: Automated Runs Need Monitoring
The most dangerous moment in automation is "silent failure." Errors trigger retries with no notification, and tokens accumulate. Three controls:
--max-turns settings: Limits tool call count. Three to five for simple tasks, ten for complex ones.
Haiku model first: Automated information processing and summaries work fine with Haiku. Opus in automation stacks up costs fast.
Minimize frequency: "Once a day" is better than "every minute." Set only what's truly needed.
Security: Non-Negotiables in Automation Pipelines
API key management
# Wrong — hardcoded in code
ANTHROPIC_API_KEY="sk-ant-api03-..."
# Right — environment variable
export ANTHROPIC_API_KEY="$(cat ~/.config/anthropic-key)"
# In GitHub Actions
anthropic_api_key: ${{ secrets.ANTHROPIC_API_KEY }}
API keys in code end up in Git history, where they become security problems later.
Minimum necessary tool permissions
# Read and write only — right
--allowedTools "Read,Write"
# Only specific Bash commands if Bash is needed
--allowedTools "Read,Write,Bash(ls *),Bash(cat *)"
No automatic apply without result verification
Automated pipelines that push results externally, auto-commit, or auto-deploy without human review need careful design. For the first few weeks, always have a human check and approve results.
Automation Failure Patterns and Handling
Logging
claude -p "..." --allowedTools "Read,Write" \
>> logs/$(date +%Y-%m-%d).log 2>&1
Failure detection
if ! claude -p "..." --max-turns 5 > output.md; then
echo "$(date): Automation failed" >> error.log
fi
Common failures and fixes
| Cause | Symptom | Fix |
|---|---|---|
| Missing input file | Empty output or error | Check file existence first |
| Token limit exceeded | Output truncated mid-way | Reduce --max-turns or input scope |
| API key issue | Authentication error | Verify key validity |
| Missing output path | Save failure | Pre-create folders |
The Maturity Levels of Automation
Where you are today and what comes next:
Level 0: Manual execution — safest starting point. Run the script yourself, check results every time.
Level 1: File-save automation — cron runs, results save to files, you open them daily. Spend 2–4 weeks here verifying quality.
Level 2: Internal notifications — result files trigger Slack or email notifications. Humans still verify before acting.
Level 3: Selective auto-sending — for tasks where quality is verified and consistent, results sent or shared automatically.
Level 4: Connected pipelines — multiple automations feed into each other. Only attempt this when each stage is thoroughly validated.
Automation Ideas by Role
Marketers and content creators: Track competitor content weekly. Auto-generate content calendars from idea folders. Convert single content to platform-specific formats.
Founders and business owners: Weekly KPI report from data files. Categorize and trend customer feedback. Daily industry news briefing.
Researchers and analysts: Weekly paper/report PDF summaries. News collection and classification by keyword. Weekly data file change analysis and reporting.
Teachers and instructors: Categorize student questions and feedback. Convert course materials to different formats.
Three-Step Action Plan
Step 1: Pick a candidate task — list your recurring work, find something that takes 30+ minutes weekly with consistent input/output.
Step 2: Start with manual execution — before writing an automation script, run claude -p manually until you find a prompt that produces the result you want.
Step 3: Put it on cron — once the script is validated, add to cron. Check results daily for the first two weeks. When quality is consistent, you can trust it.
Automation and CLAUDE.md
In headless automation, you can't give Claude mid-session instructions. CLAUDE.md rules are all it has. Three tips:
Be specific about output format: Not "summarize this" but "save to this path in this exact structure: title, 3-line summary, decisions list, action items list."
Set error handling policy: What should happen when input files are missing? What message should be left when data is insufficient?
Be explicit about save paths: "results/YYYY-MM-DD-weekly.md format" is far clearer than "save to results/."
What Automation Actually Gives You
The real value of automation isn't time saved — it's mental peace.
No longer worrying whether you forgot to summarize meeting notes this Monday. No anxiety about missing a competitor update. The burden of daily news review reduced.
One student reported after adopting automation: "The anxiety about work piling up went down." Having recurring tasks processed automatically creates space to focus on higher-priority work. That mental relief is often worth more than the literal hours saved.
Automation creates space for more important work. Claude Code Headless mode is one tool for building that space. Start small. Expand gradually.
Troubleshooting: Common First-Time Obstacles
Environment variable issues: Works in terminal but not cron — cron doesn't inherit your shell's environment variables. Set them explicitly in crontab or use absolute paths in scripts.
Working directory issues: Claude uses the current directory as base. Cron may use home directory as default. Set working directory explicitly with cd at the start of scripts.
Permission issues: Can't write files? Check that the output folder exists and has write permissions. Pre-create folders with mkdir -p.
Unexpected API responses: More specific prompts or explicit output format instructions usually fix this. Detailed output format in CLAUDE.md helps too.
Before You Close This Chapter
- Understood that Headless mode = automated execution without a human present
- Know what the
-pflag and--max-turnsdo - Confirmed: API keys must not be hardcoded
- Committed: start with file-save only, add external sending after verification
Next chapter (23. Parallel Work with Git Worktrees) covers the context separation strategy that pairs powerfully with automation — how to run multiple Claude sessions simultaneously without conflicts.
Budget Planning for Automation
Once multiple automations are running, cost management matters. Set a monthly budget in advance and operate within it.
Anthropic Console lets you set Workspace spending limits. If you budget ten dollars monthly for automation, configure that limit so everything stops automatically when hit. Start conservatively and adjust upward based on actual usage.
How to estimate your budget: count how many automations run per day, estimate tokens each consumes, multiply by model cost per token, add 20–30% buffer. The first month this is guesswork — set a low limit, check actual usage after a month, then calibrate.
Connecting External Services: Slack, Email, Notion
Moving beyond file storage to external services is a second phase of automation maturity.
Slack notifications can be sent with a simple curl command after Claude generates a file. Your shell script calls the Slack Webhook URL with the result content or file link.
Email sending is possible with command-line mail clients like sendmail or msmtp. Attach the result file or include content in the body.
Notion API integration works by receiving claude -p output in JSON format and POST-ing to Notion API to create pages or add database entries.
All of these connections should come after the automation itself is thoroughly validated. An incorrect result going out externally is a much bigger problem than an incorrect file sitting in a folder.
Team Automation: Shared Pipelines
Team automation has additional considerations compared to personal use.
Ownership must be clear — someone is responsible for each automation. Automation scripts and configuration belong in Git for version control. Failure notification routing needs to be defined — who gets alerted when something breaks. Everyone on the team should understand how the automation works, not just one person.
In team environments, use a shared API key rather than individual keys, and monitor usage in Console. Automation script changes should go through code review before deployment.
Regular team reviews of automation output quality are valuable. An automation nobody actually reads is an automation that can silently fail for weeks without anyone noticing.
The Five Golden Rules of Automation Design
What stable, long-running automations have in common:
First, start small. Don't try to build a complex pipeline from the start. One single task is the right starting point.
Second, keep humans in the loop. Semi-automation — where humans review and approve output — outlasts full automation. Trust is built incrementally.
Third, expect failure. All automation fails eventually. Plan what happens when it does, before it does.
Fourth, measure results. Check periodically that the automation is actually saving time and maintaining quality. Don't assume — verify.
Fifth, keep it simple. Complex automations break more easily. When a simpler approach exists, take it.
These principles apply to all automation, not just Claude Code. Automation is a tool. Tools should serve people, not the other way around.
Automation vs AI Agents: Understanding the Difference
Headless mode automation and sub-agents serve different needs, and knowing which to use prevents confusion.
Headless automation is best when the task is scheduled, the input is predictable, and the result is a file or simple output. It runs on a timer and doesn't need back-and-forth. Think: daily briefing, weekly digest, batch file processing.
Sub-agents are best when the task is too complex for one conversation, different parts need different tools or permissions, or parallel execution would genuinely speed things up. They run within an active session with human oversight nearby.
The two can work together. A cron job could trigger a headless script that itself spawns sub-agents for parallel processing. But in practice, most automation needs are simple enough that headless alone is sufficient.
Practical Automation: A Real Week
What a week of running automation actually looks like when things are working properly.
Monday 9am: Feedback summary for the past week is already in the folder when you sit down. Review takes five minutes instead of thirty.
Tuesday: Nothing to do — no automation runs this day.
Wednesday: Competitor content update summary arrives. Quick scan over coffee to see if anything significant happened.
Thursday: Content calendar draft generated from the ideas folder. Edit and approve. Thirty minutes of work that used to be two hours.
Friday 5pm: Weekly meeting notes digest compiles itself. Add final decisions from today's meeting manually.
This rhythm didn't happen on day one. It was three or four iterations of "this worked, but the format needs adjustment" before it became reliable. The first two weeks are always about tuning, not trusting.
Troubleshooting That Silent Failure Problem
The hardest part of automation isn't setting it up — it's knowing when it's stopped working.
A simple pattern that catches most issues: after each automated run, write a timestamp to a status file. A separate daily check reads that file and alerts you if it's more than a day old. This two-minute addition to a setup has saved me from discovering multi-day failures many times.
For more serious automations, consider a "dead man's switch" approach: the automation sends a heartbeat notification every time it runs successfully. If you haven't received a heartbeat in 48 hours, something is wrong. This is more work to set up, but for automations that matter, it's worth it.
The output quality check is equally important. Automated output can technically succeed while silently degrading in quality — input data changes, prompts drift from what actually works, Claude's behavior shifts slightly with updates. Regular spot-checks of output samples keep this from becoming a problem you discover months later.
Parallel Work with Git Worktrees
Run multiple Claude sessions on one repo without conflicts: separate context, same code.
23. Parallel Work with Git Worktrees
The clean way to run multiple Claude sessions on one repo. Same code, separate context, no conflicts.
If you've ever juggled two or three threads of work in the same repo, you know the moment when you stare at the screen wondering "wait, what was I doing here?" For a while I'd just copy the whole folder to fake a split — then worktrees changed how I work. The same repo, unfolded into multiple directories, with a different Claude living in each one. No conflicts, just clean context separation. Design in one window, API in another, docs in a third — all running in parallel without stepping on each other.
Trying to run two Claude sessions in the same directory is risky. Worktrees solve this cleanly.
What Is a Git Worktree?
A first-class Git feature: check out one repository into multiple directories simultaneously.
# Default: one repo = one directory = one branch
~/repos/my-repo (main branch)
# With worktrees: more directories, same repo
~/repos/my-repo (main)
~/repos/my-repo-feat (feature-A)
~/repos/my-repo-fix (bugfix-X)
All three directories share the same .git, but each works on its own branch.
Why It Fits Claude Code
| Single directory | Worktree split |
|---|---|
| Two Claudes editing the same file → overwrite risk | Different directories → zero physical conflict |
| Context leaks (you're on A but B's files are visible) | Each tree sees only its branch |
| Branch switches need stashing in-progress work | No switching needed |
Same codebase, separate context, no conflicts — that's the whole pitch.
Basic Commands
Create a worktree
# Run from inside the main repo
cd ~/repos/my-repo
# Create directory ~/repos/my-repo-feat with branch feature-A
git worktree add ../my-repo-feat -b feature-A
List
git worktree list
# Example output
# /home/me/repos/my-repo abc1234 [main]
# /home/me/repos/my-repo-feat def5678 [feature-A]
Clean up
# Remove a finished worktree (the directory must be clean)
git worktree remove ../my-repo-feat
# If you deleted the directory by hand
git worktree prune
Recommended Flow
- Keep the main tree on
main— for deployment, syncs, quick spot checks - Do work in worktrees — one directory per
feature-Xorbugfix-Y - Run
claudeinside each worktree → separate sessions - After PR merge, remove the worktree
cd ~/repos/my-repo-feat
claude
# In another terminal:
cd ~/repos/my-repo-fix
claude
Both Claudes know the same codebase but never step on each other.
💡 Hook into
WorktreeCreateandWorktreeRemoveto automate setup at worktree boundaries (auto-install deps, copy env files).
Cautions
| Caution | Why |
|---|---|
| You can't check out the same branch in two worktrees | Git itself prevents it |
| Don't edit the same file across worktrees concurrently | Merge conflict + confusion |
node_modules, .next, dist are not shared | Reinstall per worktree |
| MCP servers may or may not share | Depends on scope. See section 15-mcp |
What about CLAUDE.md?
Each worktree reads its own directory's CLAUDE.md.
- Repo-wide rules → in main repo's
CLAUDE.md(committed → identical in every worktree) - Worktree-specific rules → uncommitted
CLAUDE.mdin that directory - User-wide →
~/.claude/CLAUDE.md
Non-Coding Uses — Same Source, Different Lenses
Worktrees aren't just for code. The same pattern works for research repositories.
Scenario 1 — Investment research
# Main repo: ~/research/markets
git worktree add ../markets-macro -b macro-thesis
git worktree add ../markets-stocks -b stocks-deep-dive
- Main tree: macro indicators, news clippings, market structure
- macro-thesis tree: macro hypothesis, draft reports
- stocks-deep-dive tree: per-ticker financials, sector analysis
Each tree's Claude sees only its folder, so context never leaks.
Scenario 2 — Real-estate listings
git worktree add ../listings-seoul -b seoul
git worktree add ../listings-bundang -b bundang
Keep listings and price data per region in separate trees. Final synthesis happens in the main tree. Because trees are isolated, the comparison stays objective.
Scenario 3 — A book in chapters
git worktree add ../book-ch3 -b chapter-3
git worktree add ../book-ch7 -b chapter-7
Drive each chapter forward in parallel. Different Claude sessions can experiment with tone or structure without spilling into each other.
Common Mistakes
| Mistake | Result |
|---|---|
| Work in the main tree | No clean baseline for merges or checks |
| Five+ worktrees | Confusion, disk waste, repeated installs |
| Same file edited in two trees | Merge conflict, ambiguous truth |
Trying to share node_modules | Package managers expect per-directory state |
Skip prune after deletes | Git keeps stale entries |
One-Line Summary
When you only need to separate context inside one repo, no other answer is as clean as a worktree.
💡 Here's something that happened once. While developing the cc101 guide, I had to run content differentiation and SEO improvement work at the same time. Launched two Claude sessions in the same directory — they mixed up each other's file changes and I spent an hour untangling which change belonged where. That day was the first time I properly used worktrees. One directory for content work, another for SEO. Two Claudes completely unaware of each other, doing their own jobs. I just checked in on two terminal tabs.
How Many Worktrees Is Right?
From experience, 2–3 at the same time is the right size. Beyond that, tracking which tree has what in progress becomes difficult. If you feel like you need 4 or more, consider breaking the work into smaller pieces first.
The Right Mental Model
Think of each worktree as a separate desk in the same office. Same files in the filing cabinet (the repo), but each desk has only the documents for that task laid out. Workers at different desks can't accidentally grab each other's papers.
That's the isolation worktrees give you. Not separate codebases — separate working surfaces on the same codebase.
Before You Close This Chapter
- Created a new worktree with
git worktree add - Understood that the same branch can't be checked out in two worktrees simultaneously
- Understood that each worktree can have its own CLAUDE.md
- Confirmed that dependencies (node_modules, etc.) need separate installation per worktree
Next chapter (24. Custom Slash Commands & Output Styles) covers reducing repetitive work to a single-line command. If you've made the same request more than twice, a slash command is already overdue.
Custom Slash Commands & Output Styles
Repeat work twice? Make it a slash command. Fix response style per project.
24. Custom Slash Commands & Output Styles
Done it twice? Make it a slash command. Need the same format every time? Lock it in an output style.
You'll catch yourself typing the same instruction for the third time and think, "wait, I keep writing this." That's the exact moment to make a slash command. It's just a one-line nickname, but that one line shrinks a daily five-minute prompt into a zero-second keystroke. Output styles work the same way — if a project always needs answers in a specific shape, write it down once and stop thinking about it. Each one becomes a small reusable asset, sometimes even worth sharing.
If you're typing the same prompt or expecting the same shape of answer every week, it's time to move it out of muscle memory and into a file.
Custom Slash Commands
Save frequent prompts as /your-command and call them in one shot. This is the same mechanism as Skills (section 17 — Custom Commands have been merged into Skills).
Where they live (load order — the closest scope wins):
| Scope | Path | Priority |
|---|---|---|
| Project (team-shared) | .claude/skills/ | 1st (closest) |
| Personal (all projects) | ~/.claude/skills/ | 2nd |
| Enterprise | admin policy | 3rd (enforced policy) |
💡 Skills/Commands generally follow closest-wins — the project scope takes priority. Enterprise policy sits on top as a separate enforcement layer for admin-imposed security/compliance constraints.
💡 For full Skills authoring, see 17. Skills & Building Plugins. This section focuses on non-coding patterns.
Simplest Form
.claude/skills/morning-brief/SKILL.md:
---
name: morning-brief
description: Daily briefing on tracked tickers
---
Read @portfolio.csv and brief me in this format:
| Ticker | Code | Change vs prev close | Note |
|---|---|---|---|
- Sort by ticker alphabetically
- Format change as +x.x% / -x.x%
- Leave Note column empty for me to fill
Now in any session:
/morning-brief
Same shape, every time.
Output Styles
Lock the tone, length, and shape of every response, per project. Slash commands say what to do, output styles say how to answer.
Where they live:
.claude/output-styles/
├── concise.md # short and direct
├── tutorial.md # step-by-step explanations
└── research.md # cited paragraphs
Activate:
/output-style concise
All replies follow the style until you do /output-style default.
Sample Output Style — Concise
.claude/output-styles/concise.md:
---
name: concise
description: Short and accurate. Default for coding work.
---
# Concise Style
- Lead with the answer. No greeting or preamble.
- One-line summary, then details only if needed.
- Show only changed lines of code, not whole files.
- One clarifying question max — don't stack assumptions.
- English replies; keep code/commands as-is.
Non-Coding Examples — Four Patterns
Code isn't the only thing you can formalize. Daily ops and research benefit just as much.
1) Daily stock report
.claude/skills/daily-stock/SKILL.md:
---
name: daily-stock
description: Yesterday's news + volume change for tracked tickers
---
For each ticker in @watchlist.md:
1) 1-2 main news items from yesterday (cite source if available)
2) Yesterday's volume vs average
3) Output table:
| Ticker | News summary | Volume change | Flag |
|---|---|---|---|
Flag column: "⚠" if volume is +50% or news is negative.
Call with /daily-stock.
💡 For external data, attach inputs via
@or use an MCP server (see section 15-mcp).
2) Real-estate listing comparison
.claude/output-styles/listings.md:
---
name: listings
description: Always render listings as a fixed-column table
---
# Listings Style
Whenever you discuss listings, output this Markdown table:
| Listing | Location | Size | Price | Floor/Aspect | Notes |
- Use price units like "$X,XXX/mo" or "$XX,XXX deposit"
- Floor as "5/15" (current/total)
- Notes: furnished / pet-friendly / parking — one line
- Below the table, print "Total N listings, average price ___"
Activate: /output-style listings.
3) Weekly economic digest
.claude/skills/weekly-econ/SKILL.md:
---
name: weekly-econ
description: Monday digest of key macro indicators
---
For each entry in @indicators.md, write:
## [Indicator name]
- Previous: ___
- Consensus: ___ (if any)
- This release: ___ (or "TBD")
- One-line meaning: ___
End with the single most-watched indicator this week, in bold.
Call: /weekly-econ.
4) Meeting notes cleanup
.claude/skills/meeting-notes/SKILL.md:
---
name: meeting-notes
description: Clean meeting notes, action-items first
---
Read @$ARGUMENTS and structure as:
1) ## Action Items (owner + due date)
2) ## Decisions
3) ## Discussion summary (max 3 lines)
4) ## Open / Next-meeting topics
Preserve speaker labels as "Name:".
Drop chitchat, greetings, side conversations.
Call: /meeting-notes meeting-2026-04-30.md.
Slash Command vs Output Style — When to Use Which
| Situation | Answer |
|---|---|
| Same task, repeatedly invoked | Custom Slash (Skills) |
| Just want consistent format | Output Style |
| Different tone per project | Per-project output style |
| Content varies by input | Slash + $ARGUMENTS |
They combine freely. With "Listings" output style active, calling /daily-stock automatically applies the table rules.
Dynamic Context — ! + Backticks
In a Skill body, prefix ! with backticks to inject command output as context at call time.
Today: !`date +%Y-%m-%d`
Files in current directory:
!`ls -la`
Live system state lands in context every call. (Security options and full usage in 17-skills.)
Common Pitfalls
| Pitfall | Result |
|---|---|
| Skill written too long | description truncates at 1,536 chars; keep SKILL.md under 500 lines |
| Vague description | Claude doesn't know when to invoke it |
| Project rules saved in personal folder | Team can't share |
| Hard-coded absolute paths | Breaks on other machines |
| Output style too forceful | Every reply feels stilted; aim for light guidance |
One-Line Summary
Done twice? Make it a slash command. Same format always? Make it an output style.
💡 Here's something that happened once. Building course materials, I kept copy-pasting the same prompt: "Turn this section into lecture format — 5 key points, 2 examples, 1 closing question." I counted one day: 28 times in a single month. That day I made
/lecture. Now it's just/lecture [section name]— no typing.
Before You Close This Chapter
- Identified one task you repeat and created a Skill file for it
- Called your new slash command at least once
- Created an Output Style and activated it with
/output-style - Understood that
descriptiondetermines when Claude auto-invokes a Skill - Understood that Skills and Output Styles can be combined
Next chapter (25. Mobile, Web, and Sandbox in Practice) covers using Claude Code away from your desk — moving sessions to the web or iOS, and isolating risky code with the OS sandbox.
Mobile, Web, and Sandbox in Practice
Off your desk or in front of risky code — web, iOS, --teleport, Channels, and Sandbox.
25. Mobile, Web, and Sandbox in Practice
Off your desk, or in front of risky code — Claude Code still goes with you.
If Claude Code only worked at your desk, you'd be using half of it. Ideas you have on the train evaporate by the time you arrive, and running unverified commands on your real system always feels uneasy. Move sessions to the web or your phone, and cage the risky stuff in a sandbox — those two flows make the tool start to fit your day.
Claude Code isn't just a CLI anymore. Anthropic wires the same engine into many surfaces. The same CLAUDE.md, the same MCP servers, and the same Skills work the same way in the terminal, VS Code, the Desktop app, the web, the iOS app, Slack, and GitHub Actions.
claude.ai/code
Park a long task in your browser, check on it from your phone later.
--teleport
Hand a terminal session off to the web or iOS, or pull it back.
Sandbox
OS-level isolation on macOS/Linux/Windows for risky code.
Mobile and Web: Continue Anywhere
Claude Code's mobile story isn't a separate slash command — it's about moving a session to another surface. Your desk terminal and your commute phone share the same engine.
Several entry points
| Surface | How to start | Best for |
|---|---|---|
| Web | claude.ai/code | Repos you don't have locally, long tasks you walk away from |
| iOS app | "Claude" on the App Store | One-handed, quick checks, approvals, notes |
| Desktop app | Download via code.claude.com | Visual diff review, parallel sessions, scheduled tasks |
| VS Code / JetBrains | IDE extensions | Inline diffs, @-mentions |
| Terminal ↔ other surface | claude --teleport / /desktop | Moving between surfaces |
💡 Sign in with the same Anthropic account.
CLAUDE.md, MCP setup, and Skills follow you across surfaces.
Two ways to move a session
Terminal → web/iOS. When you want a long task to keep running in the cloud:
claude --teleport
→ Hand the current session to the web → resume in the browser or iOS app
Web → terminal.
You picked something up on your phone during the commute and want to finish it at your desk. Same --teleport, the other direction. It's bidirectional.
Terminal → Desktop app. When you want to review diffs visually:
/desktop
→ Open the current session in the Desktop app
Remote Control: your phone as a console
If you stepped away but your desktop session is still alive, Remote Control lets you drive that session from your phone. Best for permission approvals and short follow-up nudges.
Channels: Slack / Telegram / Discord
Channels are a way to push messages from a messenger into a session.
- Mention
@Claudein Slack with a bug report and get a PR back (Slack integration) - Use a Telegram or Discord bot for nudges while you're away
- Webhooks you build yourself can also be wired up as a channel
Routines: run on a schedule
You don't have to be at your phone for it to act on your behalf. Routines run on Anthropic-managed infrastructure: morning PR reviews, overnight CI failure triage, weekly dependency audits — they keep running even when your computer is off. Create one with /schedule from the terminal.
💡 If a task truly needs local files or tools, use the Desktop app's scheduled tasks instead. They run on your machine with full local access.
Sandbox: Keep Risky Code Off the Host
Unverified scripts, the first call to a new external API, commands with broad permissions — run them in the sandbox first.
Claude Code's sandbox isn't a separate slash command; it's an OS-level isolation mode. The backend differs by surface.
| OS | Isolation backend | Notes |
|---|---|---|
| macOS | Seatbelt | macOS 13.0+ |
| Linux | landlock | Kernel 5.13+ |
| WSL 2 | landlock | WSL 1 not supported |
| Windows native | AppContainer | Git for Windows recommended |
Turning it on
For one session, use the CLI flag:
claude --sandbox
To make it the default, set it in settings.json:
{
"permissions": {
"defaultMode": "plan"
},
"sandbox": "auto"
}
File edits and network calls inside the sandbox can't touch the host. Only results come back to your main session.
When to use it
| Situation | Why |
|---|---|
| A script you found on GitHub | Verify behavior in isolation before running |
| First token for a new external API | Isolate the risk of key leakage or wrong endpoint |
| System-level commands | rm, chmod, mv — hard to undo when they go wrong |
| Unvetted npm package | postinstall scripts can be hostile |
💡 For security-sensitive code, Sandbox + Plan Mode + Git commit is the standard triple safety net.
What About Voice and Image Input?
Common question. Here's the 2026-05 picture.
- Voice input: there is no separate
/voiceslash command. To dictate, use the microphone button in the Claude iOS app or web (claude.ai/code). The transcribed text becomes your session prompt. - Image input: terminal takes image file paths; the Desktop app, web, and iOS app accept drag-drop, paste, and camera input.
- Chrome integration: for debugging live web apps, use the Chrome integration. It's a separate tool from voice.
Voice works best for drafts. Type exact filenames, commands, and code yourself.
Three Non-Dev Scenarios
Scenario 1: Apartment hunting on the commute
07:50 (subway)
Open the Claude iOS app on your phone → pick up yesterday's listing-review session
08:00
Drop three listing links into the chat
Use the mic:
"Build a comparison table of price, size, and floor for these three.
Rank them by which to visit this weekend."
08:15
Arrive at the office → on your terminal, run `claude --teleport` to pull
the same session back and continue the deeper analysis at your desk.
Scenario 2: Market notes during lunch
12:30 (after-lunch walk)
Voice memo on the phone:
"Stock A is at double its usual volume but I don't see news.
Check the filings and whether a similar pattern showed up in the last month.
Just make a note — no trade calls."
18:00 (desk)
Open the same session — the note is there with filings and a pattern summary.
Decisions stay with the human.
Scenario 3: Sandboxed scraping experiment
You want 50 records from a public site you've never used.
The script wasn't reviewed.
1) Start with `claude --sandbox`
2) Tell Claude: "Run this script and fetch just 5 records.
Stop and report if you see an error."
3) Verify the 5 results → looks correct
4) Move results back to the host session and scale to 50.
If the script has an infinite loop or a destructive command, the host is safe.
Combined Workflow
Commute (iOS app / web) + Channels notifications + Sandbox for risky bits
Example: in Slack, @Claude "try this data source in sandbox, just 5 records" → a Routine runs it overnight → reply lands back in Slack.
Three surfaces, one flow.
Security and Privacy Checklist
| Item | Recommendation |
|---|---|
| Voice data | Deleted after a retention window per Anthropic policy. Avoid sensitive info aloud |
| Mobile sessions | End them when not in use. Prefer cellular over public Wi-Fi |
| Sandbox isolation | OS-level. Still don't paste passwords or keys yourself |
| Channels tokens | Don't put them in settings.json plaintext — use env vars |
| Remote Control access | Lock the desk + use approval mode when stepping away |
Common Mistakes
| Mistake | Result |
|---|---|
| Dictating exact code by voice | Function name / path typos |
| Big refactors on mobile | Small screen → small slips. Mobile is for monitoring/approval |
| Running unvetted code on the host | Hard to recover. Sandbox it first |
| Trusting sandbox output blindly | Isolation is a safety net, not validation. A human still reviews |
One-Line Summary
Off your desk, in front of risky code — Claude Code still walks with you.
💡 A small moment. First time I used
--teleportwas opening the Claude app on the subway to continue yesterday's task. The session I'd parked on the desktop was right there on my phone. Since then, my commute has become time for quick check-ins on running work. One rule, though: I never touch API keys on the subway.
Before You Close This Chapter
- I've signed into the web (claude.ai/code) or the iOS app at least once
- I've used
claude --teleportto move a session between surfaces - I know which OS isolation (Seatbelt/landlock/AppContainer)
claude --sandboxuses on my machine - I've picked one Channel (Slack/Telegram/Discord) that fits how I work
- I treat mobile as a monitor/approval surface; precise work happens at the desk
Next up (22. Finishing the Guide — What You Know Now) wraps up this guide and points you toward the next learning paths.
Next Steps & Resources
Resources and learning paths for going deeper after completing this guide.
22. Finishing the Guide — What You Know Now
If you've read this far, you've held a book to the end. Only one thing remains: take it out and use it.
 Source: Claude Code overview — Anthropic Docs
What You're Holding Now
Reading through this guide, you naturally absorbed a lot. Written out, the list is longer than you might expect.
You understand what Claude Code is and how it differs from other AI tools. Installation and authentication are done. You know how to set up a project with CLAUDE.md on your own terms. Basic commands and daily workflows have become familiar. You've grasped the concept of connecting external tools via MCP. You have a feel for when Hooks and Skills are worth the investment. You know how to approach official plugins with care. You've picked up small habits around cost management and operations. You understand where automation fits and what to watch out for.
This isn't memorizing the usage of one tool. It's learning a new way of working: delegating to AI, reviewing results, and narrowing requests until they land right.
Where You Go Next
Foundations complete
You've taken the first step all the way.
Intermediate: Real use
Run one real project start to finish and let the tools become familiar.
Reference: Later topics
Advanced topics to open when the moment arrives.
Foundations Checklist
✅ Installation and authentication
✅ CLAUDE.md written
✅ Core commands (/help, /usage, /compact, /model)
✅ File reading, modification, document generation
✅ Basic plugin use
If these are in place, foundations are done. You're ready for the intermediate step.
Intermediate: Real Application
Time to put the guide's foundations into actual work.
Start with your own workflow automation. CLAUDE.md + Hooks + Skills combined turns recurring tasks into single-line commands. Weekly report drafts, meeting note summaries, repeated document formatting — these are good starting points.
Running a small project all the way through matters too. Rather than installing multiple automation plugins at once, the habit of breaking one project into small steps and finishing it builds more lasting capability.
1) Set purpose — one sentence on what you're making
2) Gather materials — needed files, links, examples in one folder
3) First result — the smallest version first
4) Check directly — run it, read it, see it
5) Narrow and revise — only what didn't work
6) Record — take what you learned into CLAUDE.md and notes
Multiple sessions can wait. One terminal, one task at a time is enough to start. Editing the same file across sessions causes conflicts. Parallel work comes after you're comfortable with Git and recovery.
Reference: Topics for Later
No need to implement any of these right now. Know the names. Return to the relevant section when it becomes genuinely needed.
MCP server creation: there's a standard for connecting external services. Hooks deep-dive: repetitive check tasks can be automated. Skills development: frequently used prompts can be saved as files. Headless automation: it runs without a human, so cost and permission management are the core considerations. Each of these is covered in the relevant sections when the time comes.
Official Resources
- Official docs (English): code.claude.com/docs
- GitHub repository: github.com/anthropics/claude-code
- Official plugins: github.com/anthropics/claude-plugins-official
- Anthropic Console: platform.claude.com
What It Means to Use Claude Code Well
With the tools learned, when to use what matters more now. Two categories help organize this.
Work That Can Run Freely
Areas where result quality is comparatively stable:
Repetitive boilerplate code generation — patterns are clear, error risk is low. Test code writing — accurate from function signatures. Scoped refactoring — safe when a specific file or function is named. Error message analysis and fixes — strong at combining logs with code context. Documentation and comments — minimal hallucination when based on existing code. Regex, SQL, config files — strong at tasks with well-defined syntax. Exploring unfamiliar languages or frameworks — effective for quick onboarding. Understanding and annotating legacy code — excellent at context grasp and explanation.
Work That Needs a Closer Review
Areas where two looks before one merge is the safe approach:
Authentication and security code — subtle vulnerabilities creep in easily. Payment and financial logic — correctness is non-negotiable. Large-scale refactoring across many files — side effect risk. DB schema changes and migrations — data loss potential. Production deployment scripts — large blast radius from mistakes. External API integration and secret handling — key exposure and wrong endpoint risks.
Five Lines for Every Task
- Git commit before starting — always maintain a rollback state
- Narrow the scope — "just this function in this file"
- Read the generated code directly — don't use code you don't understand
- Security and payment code gets separate review without exception
- Big work gets Plan Mode first (Shift+Tab)
Five Starting Points for Your First Real Project
Guide done — go straight into one small thing. Five starting points that work regardless of coding experience.
Which One to Pick
Choose whatever is closest to your daily life.
Lots of meetings → meeting notes auto-organizer. Write frequently → build a Skills for your work. Watch markets or competitors regularly → competitive analysis report. Need a website → portfolio site. Have existing code → refactor one small file
If you're undecided, start with meeting notes. Almost no coding knowledge needed, and the repetition-reduction effect shows fast.
Starting Point ① · Meeting Notes Auto-Organizer
"I have ~/Downloads/meeting-260225.mp3.
Convert the recording, summarize it, and organize action items by person.
Save as meeting-260225.md."
Claude handles everything from transcription to organized output.
Starting Point ② · Your Own Work Skills
Take something you do every week and reduce it to a single /command.
"Make a Skill for summarizing each week's work every Monday.
Generate a weekly report draft from GitHub commit history
and memo files."
Starting Point ③ · Competitive Analysis Report
"Analyze competitors A, B, and C's websites and
organize key features, pricing, target customers, and differentiators
into a comparison table. Save as competitor-analysis.md."
7-Day Practice Plan
To avoid reading and stopping there, the habit of using it directly in the first week is what matters.
Day 1 — Get a feel : Create and modify files in a practice folder
Day 2 — Make rules : Write CLAUDE.md for your actual work folder
Day 3 — Real material: Organize one meeting note, doc, or CSV
Day 4 — Learn recovery: Esc Esc, /rewind, git diff
Day 5 — Cut repetition: Turn one frequent request into a Skill
Day 6 — Connect outside: Test one connection — Notion, GitHub, or Chrome
Day 7 — Consolidate : Put what worked and what didn't into CLAUDE.md
The first week's goal isn't completing a big project. It's reducing one repetitive thing in your actual work.
Four Steps for When You're Stuck
- Check official docs: Most answers are here. code.claude.com/docs. Or use
/helpfrom inside. - Ask Claude Code directly: Claude Code itself is the most powerful help. "How do I add an MCP server?" "What does this error message mean?"
- Check official issues: github.com/anthropics/claude-code/issues
- Anthropic support: Account and billing at Console
To Everyone Who Read This Guide
💡 Here's something that happened once. A student from the first cohort reached out six months later. "I was afraid of the terminal at first. Now I can't imagine working without Claude." They were a marketer with no coding background. Today their workspace runs meeting note summaries, competitive analysis, and content calendars automatically. All it took was reading the guide to the end and starting one small thing.
Claude Code is a fast-moving tool. Details you learned today may look different in a few months. What matters isn't the surface commands — it's the underlying pattern.
Working with AI doesn't just mean processing tasks faster. It means a new kind of collaboration that pairs AI's strengths (broad knowledge, repetition, pattern recognition) with human strengths (judgment, creativity, domain knowledge). Anyone who's read this far has already taken that first step.
May what you've learned here genuinely change how you work. Come back when you're stuck. This guide will be here. And one more thing — if reading this guide actually changes how you work, drop a line into the community channel; that becomes raw material for the next guide. I want to keep the flow going where one person's transformation becomes another person's starting line.
What people who finished often say at month one
By the end of the first month, three sentences come back from classroom finishers more often than any others. They are worth knowing in advance — partly because the same words may arrive in your own mouth, partly because hearing them ahead of time makes the experience feel less surprising and more confirming.
The first sentence is, "I can't believe I used to do this by hand." This sentence carries no nostalgia for the manual way; it simply names the new baseline. Once a workflow lands, the previous way feels heavier than necessary, and the body doesn't want to go back. The second sentence is, "I'm finishing things I would have postponed." Tools that lower friction don't just shorten existing tasks — they pull dormant tasks out of the backlog. The list of things you weren't going to do changes shape. The third sentence is, "I think differently while typing." This one is the most subtle and the most important. Working with a tool that reads your sentences back as code reshapes the way you compose sentences. The phrasing tightens. Ambiguity gets noticed at the moment of writing rather than at the moment of debugging.
These three sentences don't arrive on a schedule. Sometimes the first one shows up at week two; sometimes the third one arrives only at week six. The order also varies. What stays consistent is that, once the third sentence arrives, the experience feels permanent — not a phase you might exit, but a new shape you've grown into.
A 90-Day Roadmap — What Comes After the First Week
Day eight is when the real game starts. The next twelve weeks have a natural arc that, in classrooms, has shown up consistently across people. Different speeds are fine — read this as a directional map only.
Week 2~4 — Deepen one workflow
Take the small automation you built in week one and run it daily, sharpening it. Don't add features. Use the same automation every day and remove friction one line at a time. If it's a report-tidying automation, when the format shifts subtly each week, add one line to CLAUDE.md, and check next week whether that line actually helped. Tools take time to land in the hand, and that time is where real differentiation begins.
Week 5~8 — Second workflow + Hooks
Once the first automation lands, the second can begin. This is where Hooks naturally enter. Same review step repeated? PostToolUse Hook. Same alert needed? Stop Hook. Hooks aren't about reducing work; they're about reducing mistakes. Even when work doesn't shrink, the mind gets lighter. That difference is real.
Week 9~12 — Skills you can share with the team
Around month three, your own work patterns crystallise, and you start to see those patterns work for the team too. This is when making Skills feels natural. Wrap one weekly task into a /slash-command and share it. There's a moment when one person using it well lifts the team's average. The most rewarding line in classes was always: "a Skill I made helped someone else on Slack."
💡 Here is something that happened. A marketing-team lead built a "weekly report automation Skill" at month three; it spread across the team, and six months later other departments at the same company were using the identical Skill. One small automation can become the standard work tool inside an organisation. That's the natural destination for people who finish this guide.
Learning Beyond the Guide — Where to Look Next
This guide is only an entry point. Around a month in, the next areas surface naturally. Here's a map for when that happens.
Deeper official material
- Anthropic Engineering Blog — best window into Claude Code's design choices and internal thinking. A quarterly read keeps you ahead of the next shift.
- Anthropic Cookbook (GitHub) — practical code examples. Open it when you want to see the abstractions of this guide as code.
- Claude Code GitHub Issues — one hour skimming open issues shows you the tool's edges and what's about to be fixed.
Korean community
- Korean Slack community — best chance someone hit the same stall first and has the answer.
- GPTaku YouTube — Korean case videos. Watch one when text isn't quite landing.
- Local classes / meetups — quarterly offline classes are available. Sitting next to someone moving their hands is something you need at least once.
Adjacent tools and ideas
- MCP ecosystem — skim the official MCP server list. Find one or two that touch your work and your automation jumps a level.
- Deeper git —
git stash,git rebase -i,git reflog. Working with Claude-written code lands you in deep git eventually. After this guide, an hour invested in git itself pays back. - Shell scripting basics — bash and zsh aliases and functions. Even a small grasp doubles the smoothness of working with Claude.
💡 Here is something that happened. A six-month student said, "I can't work without Claude now," and in the same breath, "so I started studying git seriously." Going deeper with AI tools loops you back to the basics of adjacent tools. Working with Claude-generated code makes you need git; building automations makes you need shell scripts; chasing external integrations makes you need MCP.
Common Traps a Month After the Guide
Three traps people most often fall into around weeks 3–4. Knowing them ahead saves at least one of them.
Trap 1 — Building too many automations
Once your first automation lands, the urge to build a second and third comes naturally. Stop here. Three automations running at once make it hard to trace which automation produced which result. Add one automation per month — that rhythm is safest. One in month one, one in month two, one in month three — paradoxically the fastest path.
Trap 2 — Drifting away from Plan Mode
Plan Mode (chapter 16) gets used well at first, then quietly stops. Always turning Plan Mode on right before big work is what people who stay sharp a year later have in common. Not for every small thing. Just that one moment before something big — that single use blocks ninety percent of accidents.
Trap 3 — Forgetting to update CLAUDE.md
CLAUDE.md (chapter 8) gets crafted carefully at first, then a month in, updates stop. Adding one line for every new rule you learn is what turns Claude Code into your tool, for real. Just one line. "Don't use library X here," "Error messages in Korean," "Tests follow jest." Add five lines a month and six months later your CLAUDE.md is a document that mirrors how you work.
💡 Here is something that happened. I once looked at someone's CLAUDE.md at month six — five times the length of the original. They said, "this is how I work now," and you really could see it. CLAUDE.md becomes your work autobiography.
Five Most Asked Questions From People Who Finished
The five questions classroom finishers asked most. Short answers; long roads to those answers.
Q1. "Do I have to memorise all of this?"
No. None of it. The guide is a dictionary that lives on your desk and opens when you stall. Daily commands amount to under five; the rest get searched once when you're stuck. Claude Code itself is your best help — type /help and ask about commands you don't know.
Q2. "How should the first week go?"
Just follow the 7-day plan in the guide. Doing that beats doing nothing by a thousand-fold. Don't aim for a perfect first week; aim to type the first command. "Today I'll just type one command" is the smallest promise you can keep.
Q3. "I can't code — can I really use this?"
Yes. More than half of classroom students couldn't code, and a lot of those went deepest after six months. What matters isn't coding — it's "the ability to say in words what you want done." That's a skill every role has practised for years. Claude Code is the translator that turns that skill into code.
Q4. "Can I use it at work? What about security?"
Depends on company policy. Three safe directions: (1) check internal guidelines for company code first; (2) use --permission-mode plan for review-only; (3) get fluent on a personal side project, then introduce it at work. Running chapter 12's case ⑭ security checklist before each commit clears most corporate environments.
Q5. "Where's the next guide?"
This is an entry guide; next-step material lands better one to two months in. Looking too soon means the tool isn't yet in your hand, and absorption suffers. Spend a month inside the guide, then move to the learning resources above.
💡 Here is something that happened. A serious "do I have to memorise this?" question came in the last class. "Not a single line," I said, and the relief on their face stayed. The guide is a book; books get opened, not memorised. Build the habit of opening when stuck, and the guide stays beside you a year on.
Five Promises to Anyone Who Closed This Guide
Five promises for anyone finishing this. All of them happened to people who used Claude Code for six months in our classes; all of them will happen to you too.
Promise 1 — Within a month, time spent shrinks
Once the tool lands, the same output costs half the time. The first week is slower — there's a learning cost. Past that week, the curve drops. By month one your time-spent is roughly half. That's the first change you can see.
Promise 2 — Within two months, the grain of the output deepens
If shrinking time is the first change, deeper output is the second. The same report becomes more thorough; the same code arrives with tests and docs. You aren't more diligent. The "I can do more in the same time" margin shows up in the work.
Promise 3 — Within three months, colleagues see you differently
This change arrives latest. You've just been working daily, but around month three colleagues start asking "how do you do this so fast?" That moment is when the real reward of the guide arrives. Not a tool learned — a way of working changed, visible to others.
Promise 4 — Within six months, you become someone's guide
Around month six, the person at the next desk asks, "how do you do that?" You start opening sections of this guide to explain. Reader becomes writer. Some people who reached this point ended up returning as instructors themselves.
Promise 5 — Within a year, your attitude toward work shifts
The biggest one, last. Around the year mark, "who can do this work?" turns into "how do I solve this?" in your own mouth. The tool widens your edge. The most common testimonial: "I tried things I'd previously have refused as out of scope."
💡 Here is something that happened. A marketer who said "I can't code" in their first class came back a year later: "I built a site myself this time." Their face had changed. Tools don't change people. Tools shift the edge of what people will try.
One Thing You Can Do Right Now, Without Closing This Page
If you've made it this far, one favour. Before you close this page, open a terminal and type one command. Anything. claude --version, or claude and saying "hello." Surprisingly many classroom finishers never typed their first command.
The first command before closing decides the year ahead. That single command turns the guide from a book into a tool. Once it's a tool, it doesn't go back. A guide on the shelf doesn't get reopened in six months; a tool in the hand works with you daily.
💡 Here is something that happened. Late in a final class, I said, "type your first command now." Someone replied earnestly, "I'll do it at home, slowly." So we typed it together right there. "At home" is a moment that never arrives — that became one of the truths of the classroom. Right now, with this page still open, type once.
One-Page Reference Card
Official docs : https://code.claude.com/docs
GitHub : https://github.com/anthropics/claude-code
Plugins : https://github.com/anthropics/claude-plugins-official
Console : https://platform.claude.com
Right now
Foundations → write CLAUDE.md, master core commands, browse plugin market
Intermediate → small real project, basic MCP setup, apply one Hook
Reference → Skills creation, headless runs, scheduled automation when needed
Updates
This guide keeps evolving. Track what's been changed or added since launch.
29. Updates
Read it like a book, but know it's a living one.
This guide is a rewrite based on what I've learned from using Claude Code myself, grounded in the official Anthropic documentation. It's meant to be read once, calmly, before you open the terminal — hopefully sparing you a few rounds of trial and error.
I'll keep updating it as new features ship and as I learn more along the way.
How to stay in the loop
There's no RSS or email list yet. To keep up:
- Email: lee.kkhwan@gmail.com
- Site: revisit sionlab.co.kr
Feedback, typos, and new-chapter requests are all welcome.
Changelog
2026-05-21 — Comprehensive Audit Against Official Docs
Aligned with the move of the official docs from docs.claude.com to code.claude.com. All 30 chapters were fact-checked against the current docs and the site architecture was tightened up.
Fact corrections (P0)
- Chapter 25 rewritten from scratch.
/voice,/mobile, and/sandboxare not official slash commands. Voice input is the mic button in the iOS Claude app and web client. Mobile meansclaude --teleport, Remote Control, and Channels. Sandbox is an OS isolation mode (macOS Seatbelt / Linux landlock / Windows AppContainer). The chapter title is now "Mobile, Web, and Sandbox in Practice." - Chapter 18 Sub-agents — softened the "Explore uses Haiku" claim. The official docs do not pin a model for Explore.
- Chapter 6 Plugins — fixed the MCP server repo URL from
anthropics/mcp-servers(wrong) tomodelcontextprotocol/serversplus the Anthropic Directory. - The old
docs.claude.com/...link that was still in this updates page is nowcode.claude.com/docs/en/overview.
Version / consistency cleanups (P1)
- Chapter 3 Pro plan — softened the "extra Opus 1M usage" wording to "primarily for Max and above."
- Chapter 12 — documented both
/logoutandclaude logoutfor sign-out, and added a note to useclaude --helpfor the latest CLI options. - Chapter 14 — Computer Use is a Claude API tool, not Claude Code.
/loopcorrected to Routines (/schedule)./voicecorrected to iOS/web microphone./effortlevels noted as model-dependent. - Chapter 16 hooks count "about 29" → "about twenty-something" (the official list changes quickly).
- Chapter 17 Skills frontmatter table expanded (
argument-hint,arguments,effort,agent,hooks,paths,shell). Added one line on${CLAUDE_SKILL_DIR}. Clarified that.claude/commands/still works. - Chapter 20 added a line on the 5-hour rolling + weekly limit.
anthropic.com/pricingstandardized toclaude.com/pricing. - Chapter 21 — "Agent SDK CLI" wording was wrong. The official name is
claude -p/--printnon-interactive mode; Agent SDK is a separate product.
Small additions (P2)
- Chapter 1 — added iOS Claude app, Slack
@Claude, and Chrome debugging integration to the entry-points list. - Chapter 4 — noted
node -vonly matters for npm installs (native installer doesn't need Node). - Chapter 9 — added a one-liner recommending Skills (
.claude/skills/<name>/SKILL.md) for new custom commands. - Chapter 12 — Docker
node:20recommendation now notes the native installer doesn't need Node. - Chapter 17 statusline-cost — added one line on the plugin
subagentStatusLinekey. - Chapter 23 worktrees — added one line on
WorktreeCreate/WorktreeRemovehook automation.
Site infrastructure
- Migrated
middleware.ts→proxy.tsfor the Next.js 16 convention (same runtime, ready for the next major). - Removed six unused deps (
remark,remark-parse,remark-rehype,rehype-stringify,unified,rehype-highlight). - Added Zod schema validation for
sections.json— duplicate id/order now fails the build immediately. - Removed all "23 chapters" hardcodes. Hero, metadata, and OpenGraph all compute from
sections.length. Adding a chapter updates everything automatically. - Migrated GA4 to
@next/third-parties/googlewith per-host SSR matching. - TypeScript target ES2017 → ES2022.
next.config.tsnow setsimages.formats(avif/webp) andcompiler.removeConsole.
2026-05-21 (second pass) — Five-team Parallel Re-audit
Ran five review teams in parallel (four content + one infra) the same day and tightened a second round of issues.
Fact corrections
- Chapter 8 CLAUDE.md precedence — added managed/Enterprise policy to the Mermaid diagram, prose, and summary table.
CLAUDE.local.mdauto-.gitignoreclarified as "when you choose the personal option in/init"../.claude/CLAUDE.mdnoted as officially supported. - Chapter 8 English template — "Always write in Korean" was lingering in the English template example → now "Match the language of the prompt."
- Chapters 9 and 10 Shift+Tab — corrected the over-simplified "Plan ↔ Default toggle" to the official "default → acceptEdits → plan three-mode cycle." Now aligned with chapter 7.
- Chapter 12 sign-out —
claude logout(non-official) → officialclaude auth logout./logoutslash command listed alongside. - Chapter 12 file recovery —
git checkout --→ moderngit restore(consistent with chapter 11). ko/en both. - Chapter 14
/voiceand/loop— leftover slash-command references in the Mermaid node, table, and checklist → replaced with "iOS / web microphone input" and "Routines (/schedule)." Now consistent with the L80 disclaimer. - Chapter 17 Skills "merged" wording — softened to note
.claude/commands/still works officially. The two mechanisms are separate; if a name collides, the Skill wins. - Chapter 16 hooks — added
WorktreeCreateandWorktreeRemoveto the in-chapter event list (previously only mentioned in chapter 23). - Chapter 25 next-chapter reference — "Next chapter (
22. Next Steps & Resources)" → corrected to the actual chapter 22 H1: "22. Finishing the Guide — What You Know Now."
Structure and consistency
- Chapter 6 duplicated heading — "What's Next: A Tour of Core Concepts" appeared both mid-chapter and at the end → renamed the middle one to "A Quick Recap" and moved the checklist + next-chapter pointer to the end. ko/en both.
- Chapter 0 English duplicate paragraph — two paragraphs with almost the same meaning → kept one.
- Chapter 2 numeric mismatch — ko "less than a minute" / en "in 40 seconds" → standardized to "40 seconds."
- Chapter 3 ko missing summary — checklist that existed in en was missing in ko → added. "Four Small Habits" in ko also synced to "Five Small Habits" in en.
- Chapter 20 ko cost cleanup — "Cost-Saving Checklist" block was duplicated → kept only the full 11-item version. Fixed the
****…****markdown typo at L450 to proper**…**. - Chapter 24 priority table — re-ordered to "Project > Personal > Enterprise" with a caption, aligning with chapter 18's closest-wins convention.
ko↔en parity work
- Chapter 16 hooks — ko 1,417 lines vs en 562 → en gained 28 translated sections (Hooks JSON syntax, full event list including Worktree, team rollout notes, FAQ, advanced scenarios, etc.), now 1,437 lines, on par.
- Chapter 11 git-with-teacher — ko 426 vs en 333 → en got the PAT guide, "Git not installed" Q&A, "Why branches even for solo work", and "GitHub Actions" sections translated, now 425 lines.
- Chapter 5 workflow en — added the "Bad Habits That Wreck a Workflow" section (traps ①~④) translated from ko.
English image paths — six chapters (4, 9, 14, 15, 16, 17) had src="/images/docs/ko/..." on the English page → corrected to /images/docs/....
Small fixes — chapter 0 timing "April 2026" → "as of May 2026"; chapter 9 /model aliases gained opus[1m] and sonnet[1m]; font fallback stack now lists CJK families (Apple SD Gothic Neo / Noto Sans KR / Malgun Gothic) so Korean punctuation no longer renders as a horizontal stroke; Hero hard-coded "23 chapters" removed in three more spots (now a totalChapters prop).